
Are you looking for the ultimate guide on how to post on Instagram? Luckily for you, you’ve come to the right place.
Who doesn’t love a neat and organized Instagram feed? Your aesthetically perfect photos and Reels getting posted at the perfect times? With the right scheduling app and our easy Instagram tips, you’ll get there in no time.
Start using the Instagram app like a true pro and don’t be afraid to launch those social media campaigns you’ve had on the back burner. This step-by-step guide will show you exactly how to post on Instagram for perfect reach, engagement, and conversion rates.

How to Share Instagram Posts from a Desktop Browser
Since it’s a mobile-first app, most of us don’t even know what the Instagram desktop website looks like or where the ‘Add Post’ button is located on browsers such as Google Chrome or Firefox.
Here’s how you can create a regular Instagram post from your desktop:
- Go to the Instagram website
- Adjust your post
- Add tags, hashtags, and a caption
- Select or add a location
- Share your post
1. Go to the Instagram Website
Open your preferred browser. Enter the Instagram desktop website, log in to your Instagram account and click on the Create button to drag and drop your images and videos from your computer.

2. Adjust Your Post
Once you uploaded the photo, you’ll be able to crop your content or choose the aspect ratio that fits it best. Next, the desktop app will give you the option to improve your post with Instagram filters or by manually adjusting its contrast or brightness.

Once you’re done selecting a flattering filter or lowering your post’s saturation levels, get ready for the final step, which is posting to your Instagram feed.
3. Add Tags, Hashtags, and a Caption
Tag people by clicking the photo. For best results, write an interesting caption that is both short and compelling. Watch our video below to learn more tips and tricks for writing catchy captions.
Don’t forget to add a maximum of 10 hashtags to your caption. Remember to mix and match your hashtag collections since the Instagram algorithm dislikes the repeated use of the same hashtags.
4. Select or Add a Location
Add a location and let your audience know where you are. Location-based searches are awesome to connect locally.
5. Share Your Post
Click the Share button. Now you know how to post on Instagram from Instagram’s desktop website.
How to Share an Instagram Post from a Mobile Device
Posting to your Instagram feed via mobile devices makes total sense. That is why you too should give it a try ASAP.
Here’s how to share an Instagram post from your mobile:
- Open the Instagram app and create your post
- Edit your post with filters
- Type in a caption and add hashtags
- Tag other accounts and use advanced settings
1. Open the Instagram App and Create your Post
First, tap the Instagram icon on your phone, log in, and take a look at your Instagram home page.
Next, look for the upper right corner of your screen and tap the ‘plus’ symbol, it basically stands for ‘Add Post’. You will be redirected to the camera roll of your mobile phone. From there, select the photo you wish to post by simply tapping it once.
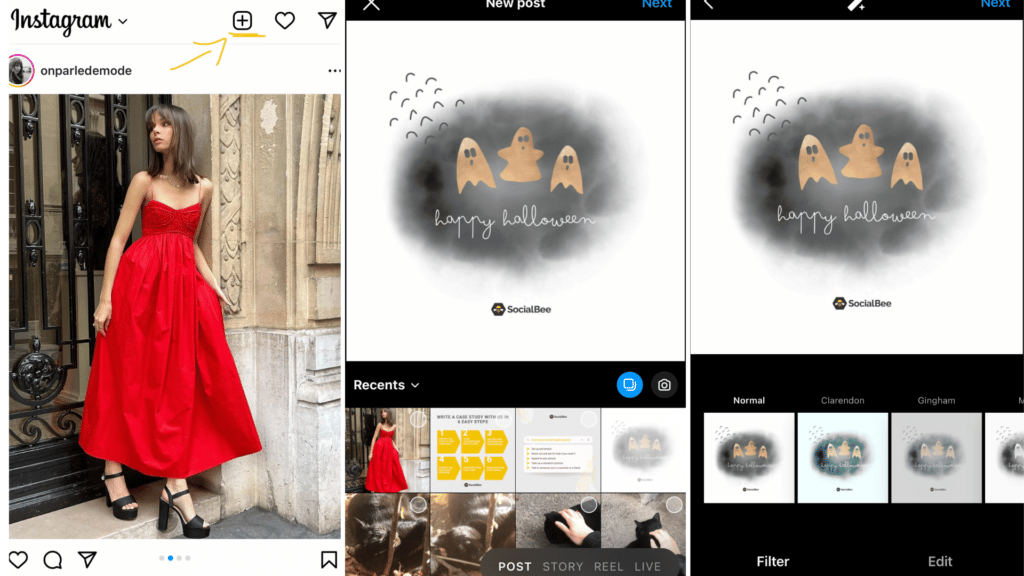
2. Edit Your Post with Filters
Once you’re ready to go, tap Next in the top right corner. By doing this, you’ll be prompted to add built-in Instagram filters to your posts.
If you want to do some last-minute editing, you can do so by switching from the Filter tab to the Edit one. Find them at the very bottom of your screen. The Edit tab gives you the opportunity to adjust your photo’s brightness, saturation, or contrast levels.
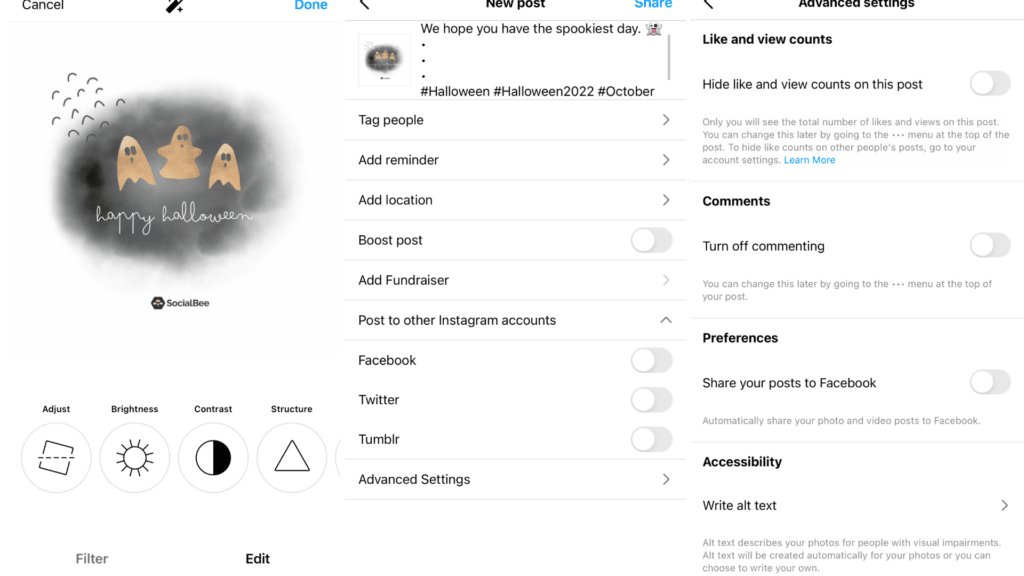
3. Type In a Caption and Add Hashtags
When satisfied with how your image looks, tap the Done button. The last step is to add an awesome description. Also, don’t forget to add up to 10 hashtags. This will make your Instagram photos easier to find while connecting you with the target audience that shares your brand’s values and interests.
4. Tag Other Accounts and Use Advanced Settings
Before you hit the Share button, you can tag people, add a location, or even boost your post. For even more preferences, tap Advanced Settings. Do you want to hide your likes or view counts on your post? If so, tap the toggle switch button so that it goes from grey to green.
Do you want to prevent others from leaving a comment? Do the same thing. However, we advise that you don’t do this because it could easily affect your Instagram engagement rate. Be brave and communicate openly with your fans.
How to Post an Instagram Story
With 500 million users watching Instagram stories every day, it’s easy to understand why you need to make the most of this amazing feature. Once you have some awesome Instagram Story ideas in mind, you’ll be more than ready to put them into practice.
Here’s how to create and post an Instagram story:
- Create an Instagram story from scratch
- Experiment with Instagram story stickers
- Share your latest Instagram story
1. Create an Instagram Story from Scratch
To get started with Instagram stories, start off on the home page and look for your account icon. You can also tap the ‘Add post’ button and select Story from there. Tap it and let the fun begin.
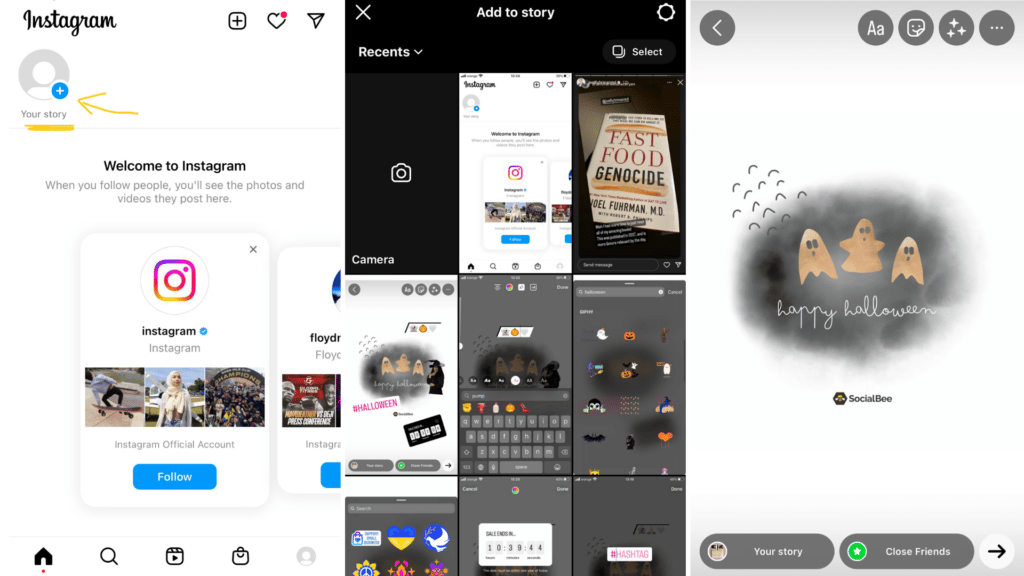
You’ll be redirected to your camera roll. From here, you can select a picture or video that you already have on your phone or tap the camera icon to create content on the go. Once you’ve chosen your preferred items, you’ll land on the editing page where your Instagram Story comes to life.
2. Experiment with Instagram Story Stickers
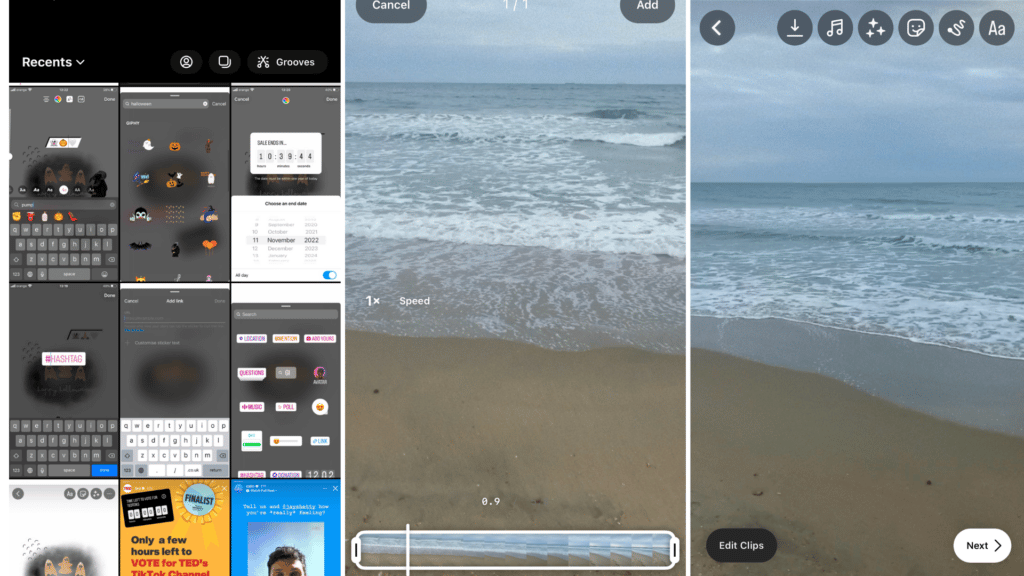
In the upper right corner of the screen, there are four main functions you can play with. Let’s start with the text button. Tap it and type something nice. Keep it short and simple.
As for us, we chose to simply add three emojis to fit the tone of the post. As you can see, we also selected a specific font. On the upper part of your screen, you’ll notice that you can change the alignment of your text, edit the color, use special effects, and even animate the text.
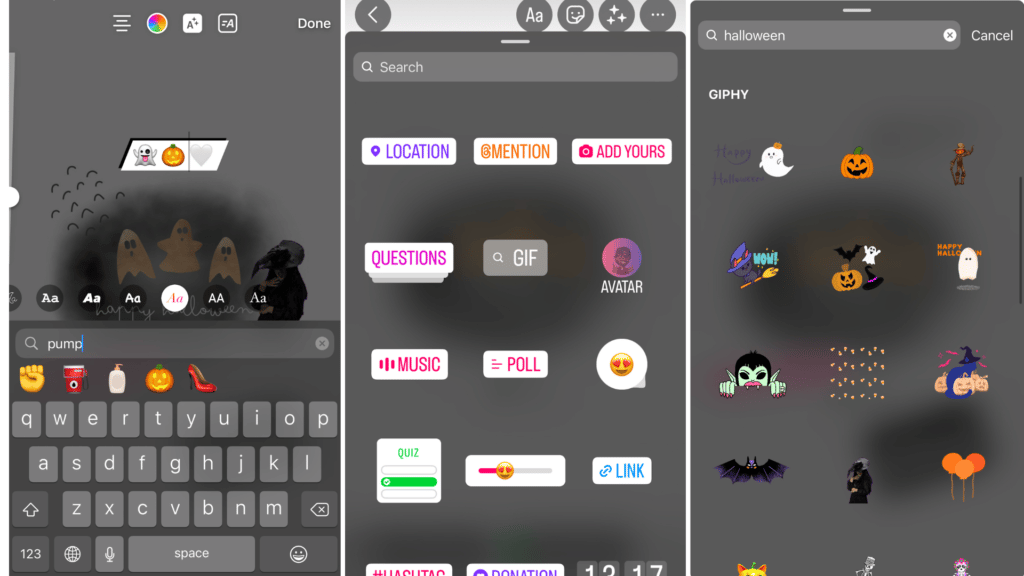
Once you’re back to the starting point, go for the next button, the one that looks like a smiling sticker. Instagram Story Stickers can be incredibly useful for your brand. Here’s how.
Use the Search bar to type in anything that might be of interest to you. We typed in ‘Halloween’ and ended up scrolling through a bunch of thematic GIFs.

When you’re done, go back, and tap the sticker button again. As you can see, you can add your location to the story, mention someone, add another photo, or even ask your audience a question that will increase your engagement rates.
Here’s what the countdown sticker looks like. Do you have a sale going on for a limited time? Simply select the date and add the countdown sticker to your stories. Once the countdown ends, the sticker will expire.
You can also use the hashtag sticker or add a link to your latest landing page or blog post. To learn more about your audiences, give the poll sticker a try.
3. Share Your Latest Instagram Story
Once you’re good to go, simply tap the “Your Story” button or the black arrow symbol at the very bottom of the screen.
All in all, Instagram Stories are the perfect way to connect with your audiences and allow them to share their big ideas with you. Ultimately, an Instagram Story will help humanize your brand and we think that’s a pretty big deal.
How to Share an Instagram Reel
It’s not just TikTok that’s helping social media videos become popular. Instagram Reels are also becoming the norm. Known to be the most engaging content type out right now, Reels have become very powerful.
Wondering how you can share Reels on your Instagram accounts? Nothing easier.
Here are the five easy steps to sharing an Instagram Reel:
- Create an Instagram reel from scratch
- Add and crop videos
- Enhance your reel with filters and music
- Add a caption, hashtags, and topics
- Share your Instagram reel with the world
1. Create an Instagram Reel from Scratch
First, tap the ‘Add post’ symbol, select Reel instead of Post, and your camera should automatically turn on.
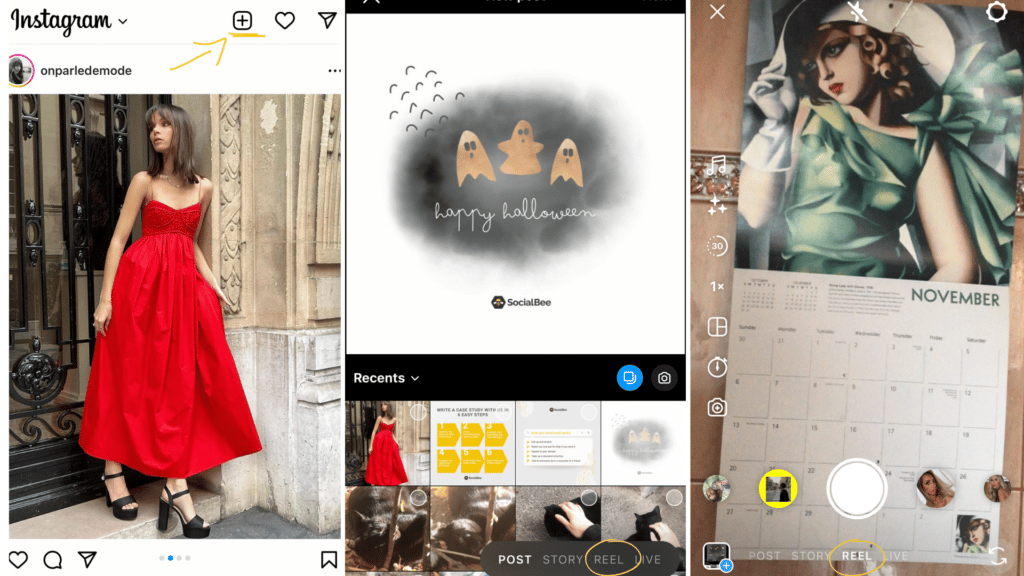
If you want to create a Reel on the go, tap the white button and hold to film. In case you’d like to add some photos or videos from your camera roll, tap the lower left icon. Once you’re there, select the photo or video you’d like to add to your Reel.
2. Add and Crop Videos
You can either crop the video or change its speed, completely up to you. If you’d like to add more photos or videos, simply tap the Add button above. Once you do this, you should see all six icons above.
3. Enhance Your Reel with Filters and Music
Next up, play around. You can add filters, aesthetics, special effects, and even music, voiceovers, or sound effects to your new reel.
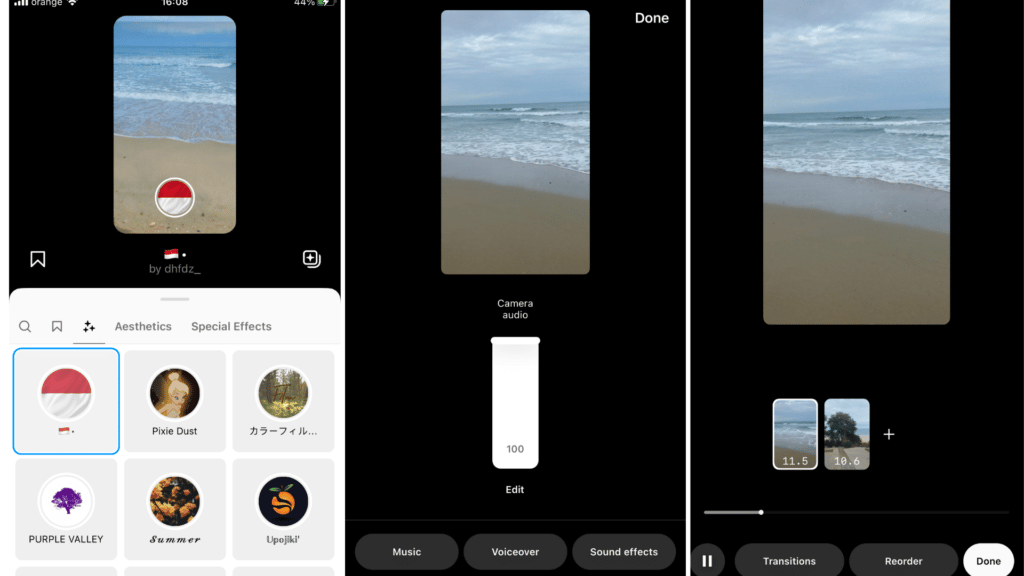
In case you have more than one video/photo, make sure to reorder them. Transitions between videos are optional but quite an aesthetically pleasing touch.
4. Add a Caption, Hashtags, and Topics
Make sure to add a neat description and some awesome hashtags for optimal exposure.
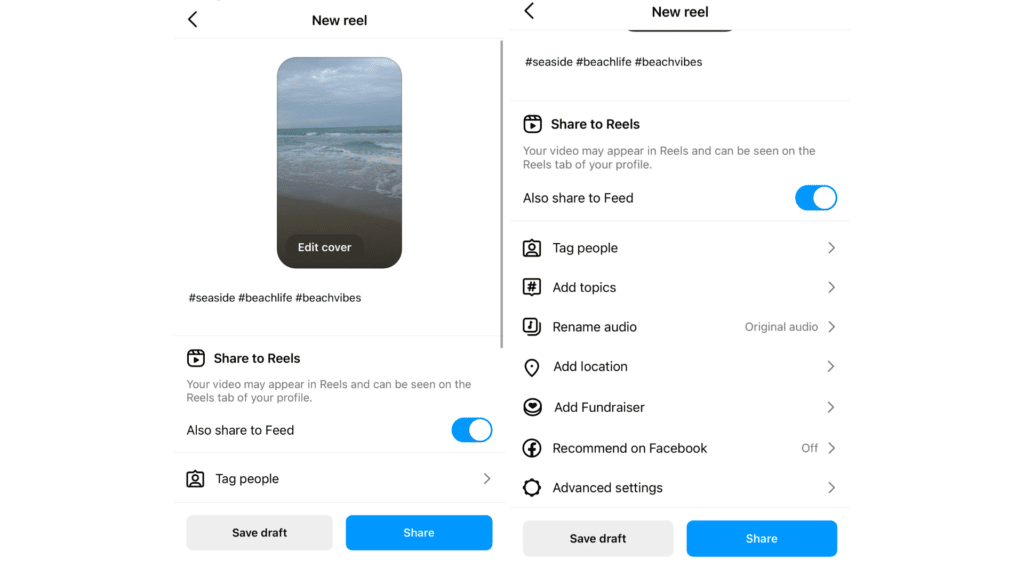
Also, Instagram allows you to edit the cover of your Reel and choose whether you’d like it to go to your Feed or be posted directly to the Reels section of your profile.
You can also tag others and choose to select up to three topics that define your Reel. For that, tap Add Topics.
5. Share Your Instagram Reel with the World
Once you’re done, tap Share. In case you’d like to work on it some more, tap Save draft. This way, the Reel won’t get posted but you’ll be able to go back to it anytime you want.
How to Share Multiple Photos and Videos at Once
Ready to post multiple photos on Instagram? Perhaps looking to create Carousel posts?
Here’s how to post an Instagram carousel:
- Select multiple photos and videos
- Add tags, hashtags, and a caption
- Publish photos via a carousel post
1. Select Multiple Photos and Videos
First, tap the ‘Add post’ button and select the first post you’d like to post.
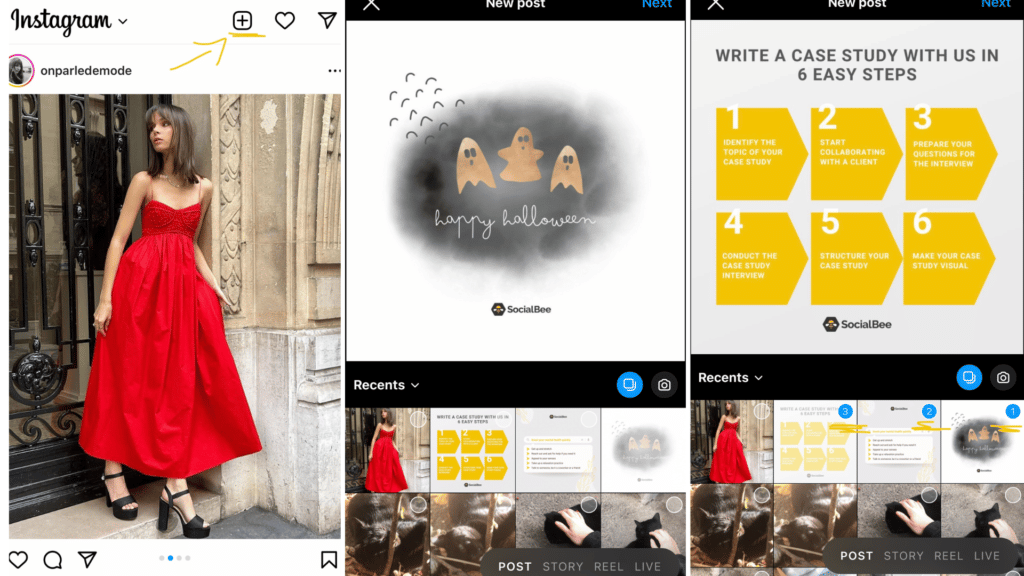
Tap and hold the first post. This will enable you to easily upload photos. Note that Instagram only allows you to post up to 10 photos.
2. Add Tags, Hashtags, and a Caption
Tap next and don’t forget to tag the right people on each of the photos/videos and add the correct caption and hashtags.
3. Post Photos via a Carousel Post
Finally, tap the Share button and allow the world swipe through your latest collection of photos/videos.
How to Go Live on the Instagram App
Live streams are prioritized on the news feed. Instead of choosing to post on Instagram, more and more creators and businesses choose to go live instead.
Here’s how you can go live on the Instagram mobile app:
- Select the live button
- Edit, schedule, and experiment before going live
1. Select the Live Button
First, tap the ‘Add post’ button from the home page and select Live by swiping left at the bottom right corner of your screen.
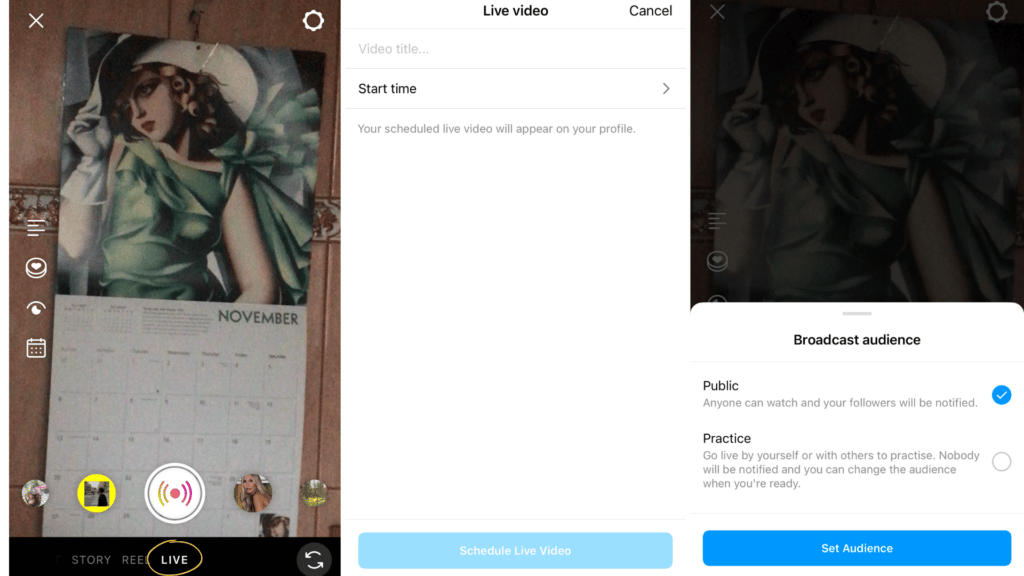
2. Edit, Schedule, and Experiment Before Going Live
The four icons on the left side of the screen are very important. Use them to add a title to your live stream and even schedule your live video. Why schedule? You’ll have plenty of time to promote your live and make it an event that will be joined by many.
In case you’re not ready to go public, do a live practice by changing your broadcast audience.
How to Repost on Instagram: 5 Ways
Feed posts are not everything when the time comes to post on Instagram. In fact, the more you branch out with your content, the more opportunities you will have to reach and engage your audience.
Here are five ways to repost content on Instagram:
- Use SocialBee to reschedule your evergreen content
- Repost on Instagram using a screenshot
- Share user-generated content
- Promote your feed posts on Instagram Stories
- Shout out other Instagram creators on your Stories
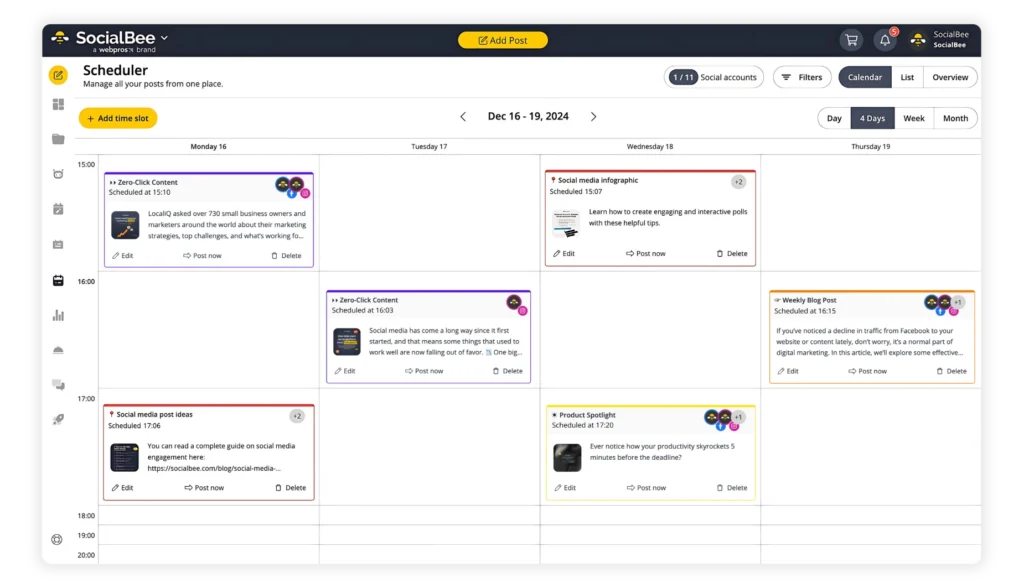
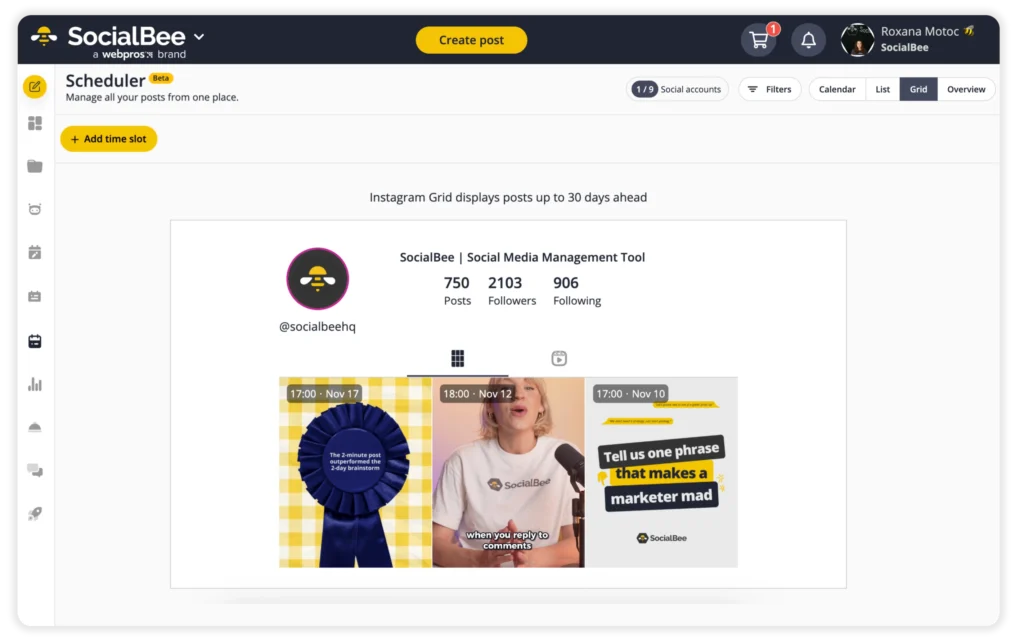
1. Use SocialBee to Reschedule Your Evergreen Content
Evergreen content is a lifesaver for most businesses. It showcases information that could never get outdated in a perpetually fresh way.
To make the most out of your evergreen content, you have to learn how to reschedule your posts in a way that doesn’t take up too much of your time.
After all, the goal of creating and resharing evergreen posts is to have a consistent batch of content ready for each week without the headache of constantly preparing and scheduling new posts.
With SocialBee, you can prioritize evergreen content like never before. Regularly repost photos or videos that are always relevant to your target audience and brand.
Here’s how to actually do it:
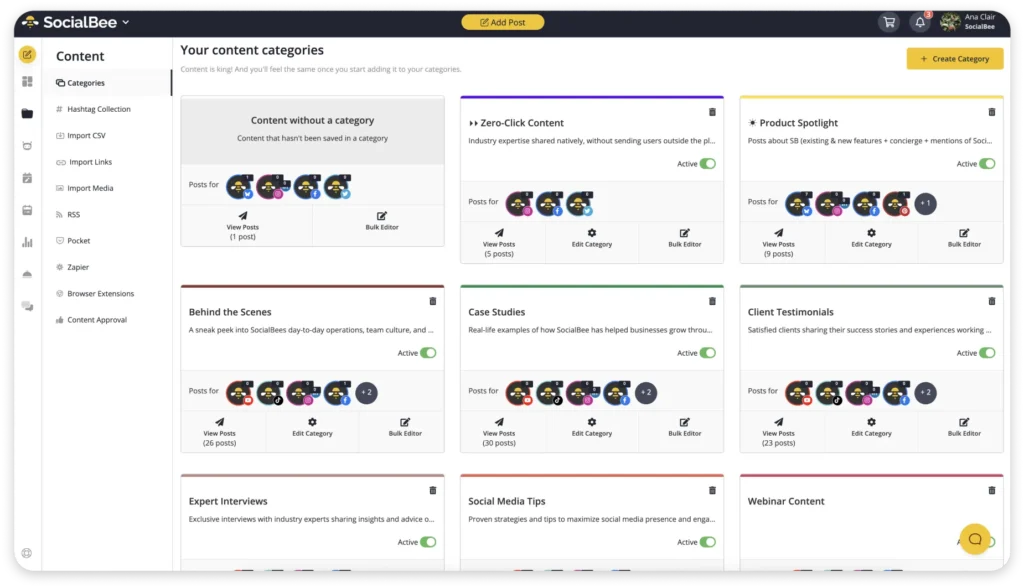
Step A: Create an Evergreen Category
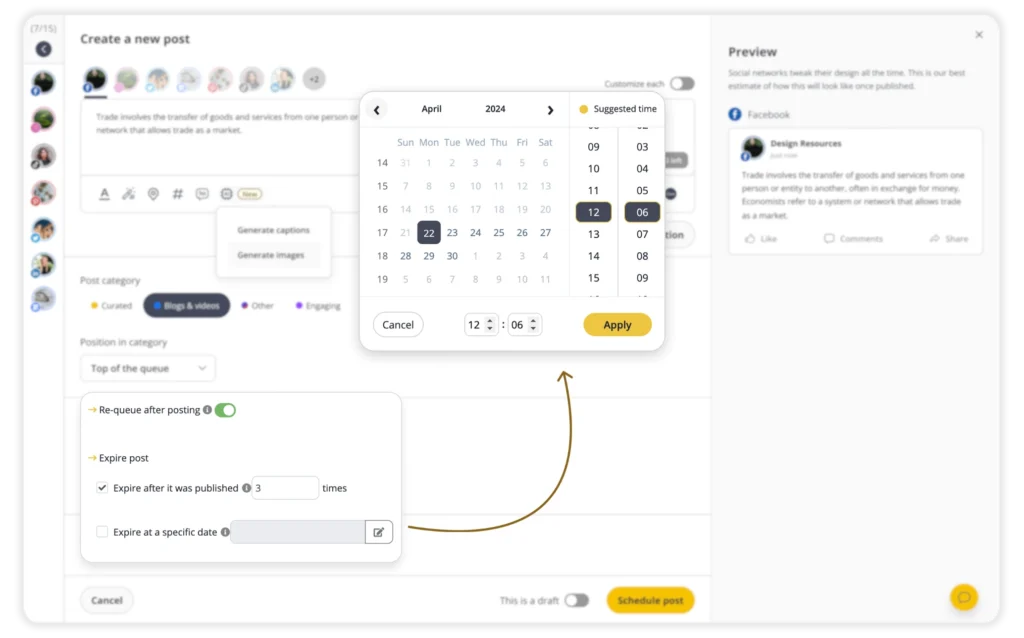
In order to continuously share your evergreen content, first you’ll need to create an evergreen category. To do this, tap the ‘Create Category’ button and switch to the ‘Default Settings’ section.
Make sure that the ‘Re-queue after posting’ button is set as active. That way, the posts you’ll add to this new category will be re-shared in an evergreen cycle until you decide to delete them or when they expire.
Step B: Create Your Evergreen Instagram Post
Upload the photo/video you wish to post in an evergreen cycle, type in the caption, select the hashtag collection you wish to use, and don’t forget to toggle the ‘Re-queue after posting’ button.
Create evergreen posts and re-queue them to be shared regularly on your Instagram account.
Start your 14-day free SocialBee trial today!
SocialBee allows you to reschedule your most relevant content and have it repost on Instagram every once in a while.
Once you’ll start reposting via SocialBee, you’ll notice a continuous increase in brand awareness and traffic to your website.
2. Repost on Instagram Using a Screenshot
Reposting content has never been easier. Simply screenshot the post you wish to repost, resize it by cropping its edges, make sure it looks nice and clean, and post it!
If you don’t feel like doing this manually, there are plenty of reposting tools out there for you to use. The screenshot method is one of the easiest ways to repost on Instagram. Psst, make sure not to break any copyrights and credit the original poster when necessary.
3. Share User-Generated Content
No ideas on how to repost on Instagram? Share someone else’s Instagram Story or posts. User-generated content is extremely valuable and powerful nowadays. It encourages others to give your brand a try and it significantly increases your exposure and credibility.

User-generated content is generally reposted via Stories. For that, the original poster will need the Instagram Sharing Story feature enabled. This is easy to achieve via the Instagram app.
This is a quick and fun way to let your audiences know that your brand is gaining momentum. Make sure to tag those who were kind enough to promote your brand. Who would’ve thought that it’s so easy to repost on Instagram?
4. Promote Your Feed Posts on Instagram Stories
Increase your feed posts’ impression levels by learning how to share posts to your Instagram Story. This is an easy way to stay active and engage followers even when you’re not posting new content.
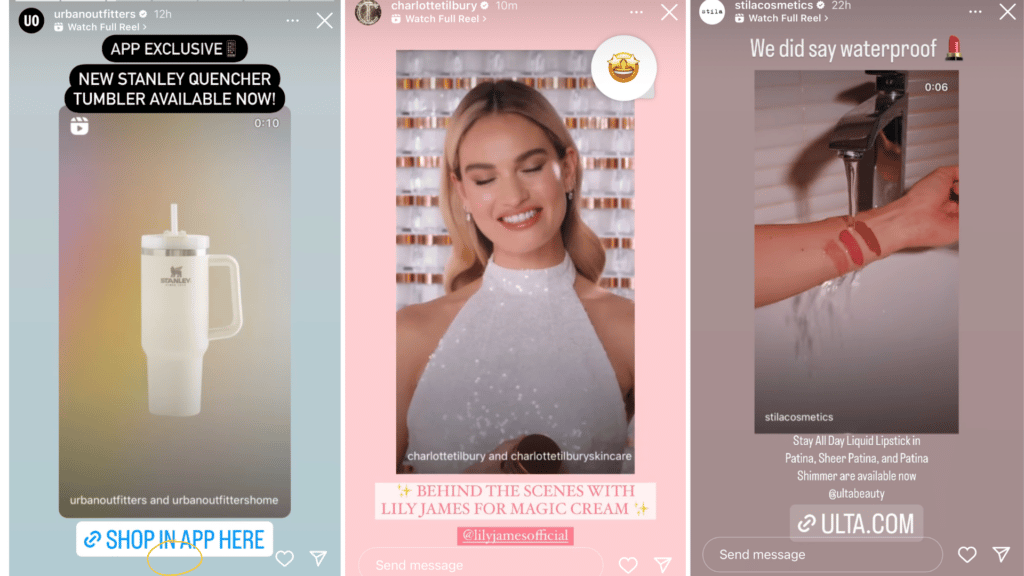
Additionally, you can add a catchy caption and a link to your website. No need to consistently post on Instagram when you can recycle content, right? That’s exactly what an Instagram Story does for you.
5. Shout-Out Other Instagram Creators on Your Stories
Give your fellow creators some love. Repost Instagram stories and mention them in your Instagram Story. This is going to increase both your exposure levels.
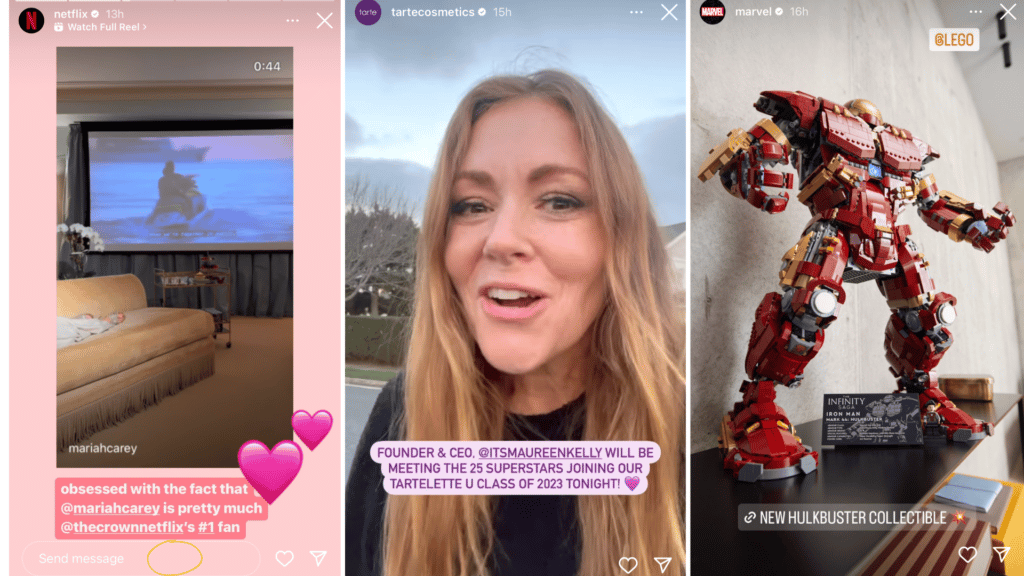
Best case scenario? The shout-out gets reciprocated and they repost your story. This is one of the best ways to repost content and spread some digital kindness.
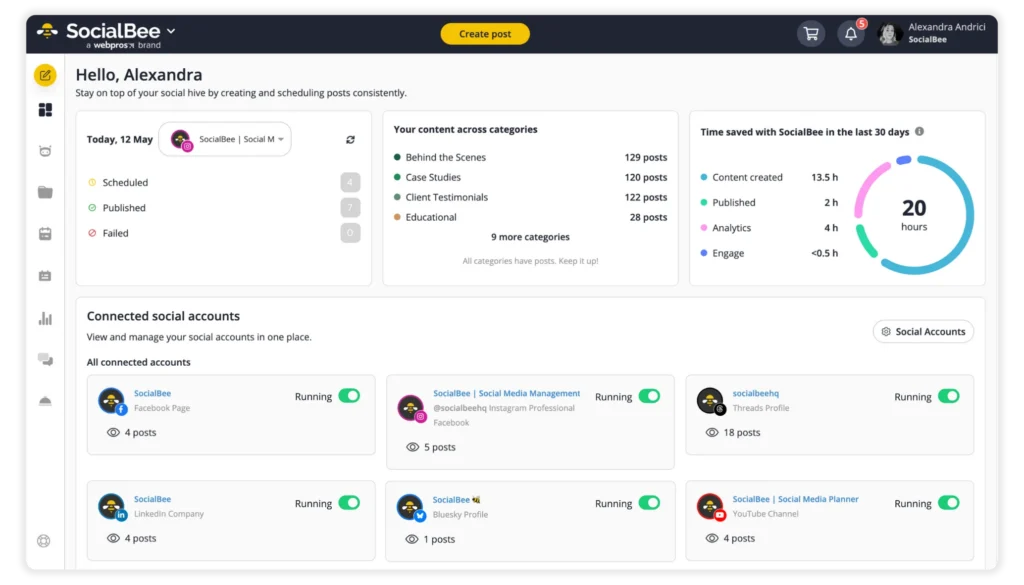
Manage Your Instagram Account Like a Pro
Now that you’ve learned how to post and repost on Instagram, it’s time to manage your account like a pro. You’ll need a social media management tool that can help you stay on top of everything.
Learning how to master the Instagram mobile app is a definitive must. However, knowing how to upload photos and videos manually is sadly not enough. You’ll need a third-party app that will show you how to repost and post on Instagram without any effort on your part.
SocialBee helps you schedule, post, and track your Instagram analytics, all from one brilliant app. Start your 14-day free SocialBee trial today!