
Are you ready to start a YouTube channel? Whether you’re looking to express your creativity, showcase your products, or connect with your audience, YouTube offers a powerful platform to help you achieve your marketing goals.
In this guide, we’ll teach you how to start a YouTube channel from scratch and cover all the steps you can take to enhance your presence on the platform, from planning your content to growing your audience. Let’s get started, shall we?
How to Start a Successful YouTube Channel in 7 Steps
Starting a new YouTube channel is a great opportunity for you to consolidate your online brand. And if you follow a few key steps, you can set up a channel that keeps your viewers coming back for more. In this section, we’ll go through seven essential steps to start a successful YouTube channel.
Here’s how to start a successful YouTube channel:
- Create a YouTube strategy
- Create a YouTube channel
- Invest in the right equipment
- Record your first video
- Monitor your YouTube channel
- Monetize your channel
- Engage and grow your audience
1. Create a YouTube Strategy
Creating a successful YouTube channel starts with a solid strategy that lays the foundation for your presence on the platform.
Here’s how to create a YouTube strategy:
- Define your goals
- Examine your target audience
- Find your YouTube niche
- Determine the content you’ll create
A. Define Your Goals
Start by clearly defining what you want to achieve with your YouTube channel. Your goals should align with your broader business objectives. Are you aiming to drive sales, increase brand awareness, educate your audience, or establish yourself as an authority in your field? By identifying your primary objectives, you can create a focused content strategy that supports your overall mission.
For example, if your goal is to build brand awareness, your strategy might involve creating engaging and informative videos that resonate with your target audience, encouraging them to subscribe, share, and interact with your content.
Pro Tip: To ensure your goals are actionable and trackable, use the SMART framework—Specific, Measurable, Achievable, Relevant, and Time-bound. This approach will help you monitor your progress and make necessary adjustments to stay on track.
Example SMART Goal:
“Increase our YouTube channel’s subscriber count by 1,000 within the next six months. We’ll achieve this by implementing a content strategy that includes producing one high-quality video per week, optimizing each video for search engines (SEO), and promoting our content through social media platforms and email newsletters.”
This example breaks down the goal into clear, manageable steps, making it easier to track progress and adjust tactics if needed. By setting SMART goals, you can ensure that your efforts are aligned with your overall business objectives and that you have a clear path to success.
B. Examine Your Target Audience
When examining your audience, you’ll need to answer the following questions:
- Who is your target audience? Identify their demographic characteristics such as age, gender, location, education, and income level.
- What type of content do they prefer? Determine whether your audience favors tutorials, vlogs, product reviews, interviews, or another content type. This can be uncovered by analyzing your most popular videos or researching competitors’ content.
- Which tone of voice resonates with them? Whether it’s casual and humorous, professional and authoritative, or somewhere in between, understanding the right tone will help you connect with your audience on a deeper level.
To get an accurate image, use tools like Google Analytics and YouTube Analytics to learn all you need to know about your target audience’s preferences and behaviors.
Pay close attention to the following aspects:
- Demographics: Consider the age, gender, location, education, and income level of your viewers. These factors can influence the type of content that appeals to them and the platforms they frequent.
- Interests: Identify the hobbies, topics, or niches that capture your audience’s attention. Understanding what interests them can help you create content that not only attracts views but also keeps them engaged.
- Challenges: Consider the problems or pain points your audience is trying to address. Whether they’re looking for how-to guides, product recommendations, or solutions to specific issues, your content should aim to provide value by addressing these needs.
C. Find Your YouTube Niche
Depending on who you are and what you do, you may already have a general idea of what you’ll post about.
However, to stand out, you’ll need a more granular approach that aligns with both your expertise and your audience’s interests. For example, instead of a broad cooking channel, you can create a channel dedicated to vegan meals or cooking with kids.
Here are some things to keep in mind when selecting a niche for your YouTube channel:
- Explore a niche that aligns with your skills and passions to keep your efforts sustainable.
- Ensure there is already an audience for your niche.
- Check out the competition—breaking into a competitive niche can be difficult.
D. Determine the Content You’ll Create
Then, depending on your audience’s preferences and your goals, decide on the types of videos you’ll produce. This could range from tutorials and how-tos to interviews, reviews, or behind-the-scenes glimpses.
Here are the main types of YouTube content to consider:
- Educational: How-to tutorials (e.g., cooking, home improvement), explainer videos, webinars, educational series, software tutorials, language lessons
- Entertainment: Comedy sketches, music videos, pranks, challenges, magic tricks, dance videos, short films, animated stories
- Conversational: Q&A sessions, live streams, interviews, reaction videos, video podcasts, opinion pieces, community updates
- Inspirational: Personal stories, motivational speeches, success stories, documentary-style profiles, transformative journeys, charity and social cause spotlights
- Review and recommendations: Product reviews, book reviews, movie and TV show reviews, software and app reviews, travel recommendations, restaurant reviews
- Lifestyle: Day-in-the-life videos, routines (morning, workout, beauty), room or home tours, travel vlogs, fashion hauls, cooking segments
Understanding content through this perspective can help you explore multiple sides of content creation and come up with specific video ideas, as well as skip the dreaded “I don’t know what to post” dilemma.
E. Research Similar YouTube Accounts
Since YouTube boasts more than 113.9 million active channels, it’s likely that someone is already posting content related to your niche.
Look at your most successful competitors and note elements such as:
- Video quality
- Content structure
- Thumbnail designs
- Titles and descriptions
- Engagement tactics
- Posting frequency
- Viewer responses
Additionally, pay attention to their most popular videos—what topics do they cover, and what can you learn from their approach?
However, remember that the goal isn’t to copy them but to understand market trends and better position your channel. Look for gaps in their content that you could fill with your unique perspective and expertise.
2. Create a YouTube Channel
Next, it’s time to set up an account on the platform.
Here’s how to set up a YouTube channel:
- Create a Google Account by signing up on Google’s account page, or use an existing account if you have one.
- Access YouTube, log in with your Google account, and create your channel by clicking your profile picture and selecting “Create a channel.” Follow the prompts to complete the setup. Opt for a business account if multiple people will manage content.
- Customize your channel by adding a profile picture, banner image, and channel trailer that reflect your brand and channel theme. Make sure these elements are high-quality and consistent.
- Verify your phone number in YouTube Studio under Channel Settings to enable features like longer videos and live streaming. Adjust privacy, default upload settings, and connect social media accounts as needed.
Step 1: Create a Google Account
First thing first, to set up your YouTube profile, you’ll need a Google account. This integration makes it easier to enjoy all the benefits of the ecosystem that Google has built, including monetization options like Google AdSense.
Go to Google’s account sign-up page, type in your details, and follow the remaining instructions and prompts.
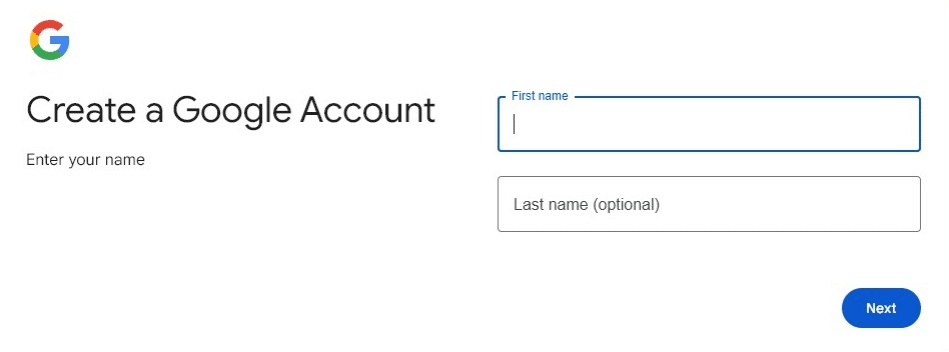
If you already have a Google account that you can use for this specific purpose, you can move on to the second step.
Step 2: Go on YouTube
Access the YouTube website, and log in using your Google account. Then, click your profile picture in the top right corner, and select “Create a channel.” Follow the remaining prompts to add your channel name and complete the setup.
However, if you’re planning to have more than one person create and share content, a business YouTube account is better. You can also link it to your Brand Account if you have one.
Step 3: Customize Your Channel
To make your account pique visitors’ interest, add various branding and channel art elements to your channel. Make sure these are consistent and reflect the brand you want to convey. Additionally, upload high-quality images that convey your channel’s theme.
Here are the main elements you can use to customize your YouTube channel:
- Profile picture: This is the small image that represents your channel across YouTube. Choose an image that is clear, recognizable, and reflective of your brand. It could be your logo, your face if you are the brand or a specific design. For the best resolution, select an image that’s at least 800 × 800 pixels.

- Banner image: The header image that displays at the top of your channel page is a great place to convey the essence of your channel. The ideal size for a YouTube banner image is 2560 × 1440 pixels. Double-check that the central elements of the image are centered so they don’t get cropped on different devices.
- Channel trailer: This is a bite-sized video that automatically plays when non-subscribers visit your channel. It’s an excellent opportunity to quickly tell viewers who you are, what your channel covers, and why they should subscribe. Keep it short (30–60 seconds), engaging, and informative.
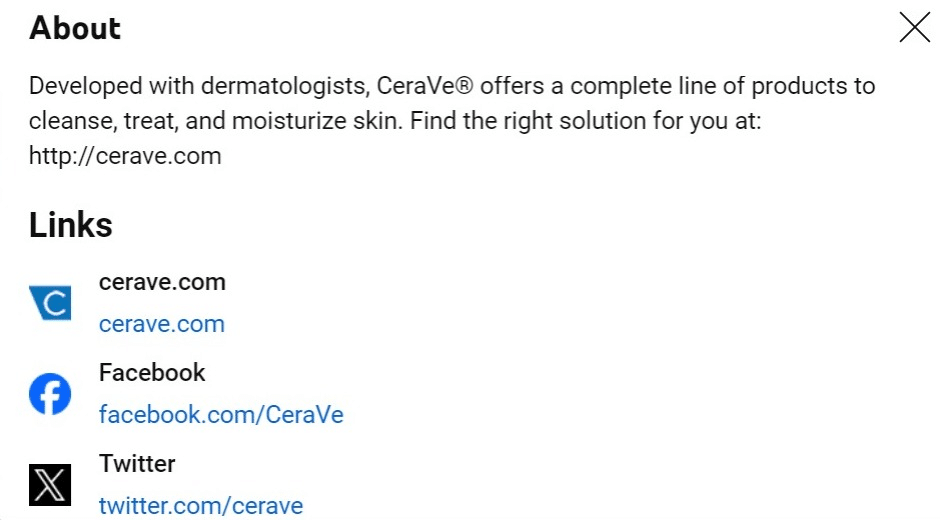
- Channel description: This is a brief overview of what viewers can expect from your channel. Since YouTube is the second largest search engine out there, include keywords related to your content, as this can help your channel’s SEO. Be straightforward and concise, and don’t forget to include any social media links or contact information.
Step 4: Configure Your Channel Settings
After creating your channel, the next step is to verify your phone number. This allows you to make videos longer than 15 minutes, live stream, upload custom thumbnails, and appeal Content ID claims.
Here’s how to verify your phone number on YouTube:
- Click your profile picture and select YouTube Studio.
- In the left navigation bar, click Settings.
- Go to the Channel tab and select Feature Eligibility.
- Under intermediate features, click Verify Phone Number and follow the instructions.
Afterward, feel free to explore these YouTube settings to further configure your channel:
- Manage privacy settings
- Set up default upload settings
- Connect to social media accounts
- Add a business email for inquiries
3. Invest in the Right Equipment
Creating high-quality videos for YouTube doesn’t require a Hollywood budget, but investing in the right equipment can significantly enhance your content’s quality. Whether you’re a beginner or looking to upgrade your setup, having the right equipment is key for producing visually and audibly pleasing videos.
Here is the equipment you need to create YouTube videos:
- Video camera
- Sound equipment
- Lighting
- Stabilization tools
- Video editing software
- Additional accessories
A. Video Camera
The right camera is the most important part of creating quality content. Depending on your budget and the type of content you plan to create, your choice of camera can vary from a simple smartphone to professional-grade equipment.
Here is how to choose the right camera for recording YouTube videos:
- Smartphones: Plenty of smartphones are equipped with cameras that can shoot in HD or even 4K, making them a great option for beginners or those on a tight budget. According to @PrimalVideo, “if you’ve got no budget or just starting out, then I suggest that you start with what you have. That could be a webcam that’s built into your computer or even your phone. Remember, the content is the most important, not the camera you’re using to shoot the content. Start with what you have and upgrade when you can or when you need to.”
- Cameras under $500: For those looking to step up their quality without breaking the bank, @PrimalVideo recommends several options that are the perfect middle ground. Their list includes names like Logitech Brio 100, Logitech Brio 4K, Insta360 Link, Sony ZV-1F, GoPro, Insta360 Ace Pro, Insta360 X3, and Insta360 X. Some of these have built-in zoom capabilities, good low-light performance, and are designed specifically for video making.
- Cameras over $500: These cameras provide high-quality video and the ability to change lenses to match different shooting conditions. They offer superior image quality and more control over depth of field, giving your content a more cinematic feel, If this is your budget, @PrimalVideo recommends trying Sony ZV-E10, JI Osmo Pocket 3, Sony Alpha ZV-E1, Sony FX30, Sony FX3, or Panasonic’s GH5.
B. Sound Equipment
Good audio quality is mandatory, as poor sound can turn viewers away, regardless of how good your video looks.
Here is how to choose the right sound equipment for YouTube videos:
- Condenser microphones: They are highly sensitive and can pick up subtle nuances, making them excellent for capturing a wide range of frequencies. @ContentCreators suggests trying Rode NTG3 for its clarity in capturing sound in filmmaking, or Audio-Technica AT2020 for its great accuracy.
- Lavaliere microphones: They are small, clip to the speaker’s clothing, and allow for hands-free operation, making them perfect for interviews or presentations. Pop Voice Pro offers an affordable option with decent sound quality, which is why @ContentCreators recommends it for beginners and professionals who need a reliable lav mic.
- Shotgun microphones: These are best for targeting sound from a distance while rejecting ambient noise, which is ideal for film and television production. According to the same creator’s suggestions, Rode VideoMic Go and Rode VideoMic Pro are both suitable for vlogging and on-the-move filming.
- USB microphones: They are convenient for home studios, voiceovers, and podcasting, as they plug directly into a computer without any additional hardware and offer decent sound quality for simple setups. For video podcasters and YouTube live streamers, @ContentCreators suggests trying The Blue Yeti for its versatility and ease of use, as well as its sound quality and multiple pattern options.
C. Lighting
The right lighting can significantly improve the visual quality of your videos, making them look professional even if you’re using a relatively simple camera.
Here are several lighting options for shooting YouTube videos:
- Natural light: This option is ideal for beginners or those with zero budget. Natural light provides a soft and flattering effect if used correctly. Additionally, as @ThinkMedia suggests, you can use a $1 shower curtain from Dollar Tree as a diffuser near a window for softened light.
- Budget lighting options under $25: Suitable for those starting out with a minimal budget, these lights can enhance your video quality without breaking the bank. If this is your budget, @ThinkMedia recommends trying the NEEWER 160 LED CN-160 Dimmable Video Light
- Best lighting under $50: For this budget, you can get a bi-color LED bulb softbox kit like the one provided by MOUNTDOG Lighting Kit, which offers adjustable color temperature and intensity, providing versatility for various shooting conditions.
- Best lighting under $75: Options like the 50x70CM Four Lamp Softbox Kit are great for creators looking for a brighter setup or needing multiple lighting sources to create more dynamic lighting effects.
- Best lighting under $100: If you’re ready to invest in a more professional setup without spending a fortune, the Emart Photography Softbox Lighting Kit offers the ability to adjust settings like brightness and color temperature.
- Best lighting Under $200: This category is suitable for serious content creators who require high-quality, versatile lighting for professional-level videos. @ThinkMedia recommends trying the GVM 80 watt LED light kit, which includes everything needed for a comprehensive setup—light stand, the light itself, and a large softbox.
D. Stabilization Tools
Shaky videos can be distracting, so to keep your footage looking smooth and professional when you record videos, stabilization tools are a must.
Here are the most popular stabilization tools for shooting YouTube videos:
- Tripods: These are essential for static shots, interviews, or scenes where the camera doesn’t need to move. @MarkWiemels, a professional content creator and gear reviewer, recommends exploring options like the Neewer LT32, Neewer LT35, iFootage Video Tripod, or the Ulanzi Video Tripod.
- Gimbals and stabilizers: For moving shots, gimbals can keep your camera steady even when you’re walking or moving around, making them perfect for dynamic shots that involve motion. @HowMuchTech suggests exploring options like the ZHIYUN Crane 4 Combo, the Zhiyun Crane M3S Handheld Gimbal, or the DJI Ronin–SC– Camera Stabilizer.
E. Video Editing Software
Editing is where your video comes to life, but you don’t need to be a professional to edit videos.
Here are the most popular video editing tools for YouTube videos:
- Beginner-friendly: Programs like iMovie or Windows Movie Maker offer basic editing tools that are easy to use for beginners.
- Advanced editing: Adobe Premiere Pro and Final Cut Pro provide extensive features and tools for more complex projects, allowing for intricate effects, color grading, and much more.
F. Additional Accessories
Lastly, there are several accessories and additions that may come in handy when you begin your YouTube journey.
Here are some accessories you’ll need to shoot YouTube videos:
- Memory cards: Invest in high-capacity, fast memory cards so you never run out of space or encounter buffering issues while shooting.
- Batteries and chargers: Having extra batteries around ensures that you don’t run out of power during long shooting days, especially when on location.
- Backdrops: Different backdrops or a green screen can help set the scene for your videos and add a professional touch.
4. Record Your First Video
Recording your first YouTube video can feel intimidating, but by following a few key steps, you’ll be well on your way to creating content that resonates with and grows your audience.
Remember, each video is a learning experience, and with practice, you’ll see your skills improve.
Here are some best practices for creating your first YouTube:
- Give your videos a familiar structure
- Add music to your videos
- Get creative with thumbnails
- Optimize your video titles and descriptions
- Post your video
A. Give Your YouTube Videos a Familiar Structure
Creating a familiar structure for your videos helps establish consistency, which most viewers appreciate.
Here’s what a typical YouTube video structure includes:
- Introduction: Briefly present yourself and the topic you’re going to cover. Use the intro to hook the viewers’ attention and outline what they will gain by watching.
- Main content: This is where you deliver on the promises made in the introduction. Keep the format structured and easy to follow.
- Call to action: Finish with a CTA where you encourage watchers to like, comment, and subscribe, or direct them to other related videos or your website.
- Outro: Wrap up with a brief conclusion that reiterates the main points, and thank viewers for watching.
PRO TIP: To add a dynamic component to your channel and interact with viewers in real time, consider using YouTube Live. It’s great for Q&A sessions, live tutorials, or just casual conversations. The best part? Live videos tend to generate higher engagement levels, which will boost your channel’s activity metrics.
B. Add Music to Your Videos
Background music can boost the emotional impact of your videos, so explore options that complement the tone and theme of your video. Upbeat music can energize viewers, while a slower tempo can lend a more serious or contemplative air.
When you add music, ensure it’s not overpowering your voice or key sound effects. It should complement, not distract from the content.
PRO TIP: To avoid copyright issues, you’ll need to use royalty-free music. Platforms like YouTube Audio Library provide plenty of options that you can use safely.
C. Get Creative with Thumbnails
A well-thought-out, custom thumbnail can be the decisive factor between a viewer checking out your video or skipping it.
Here is how to get creative with YouTube thumbnails:
- Choose clear, high-resolution images that are aesthetically pleasing and relevant to the video’s contents.
- Briefly include text on the thumbnail describing the video but ensure it’s readable and not cluttered.
- Maintain a consistent approach throughout your thumbnails to enhance brand recognition by incorporating similar fonts, colors, and layouts.
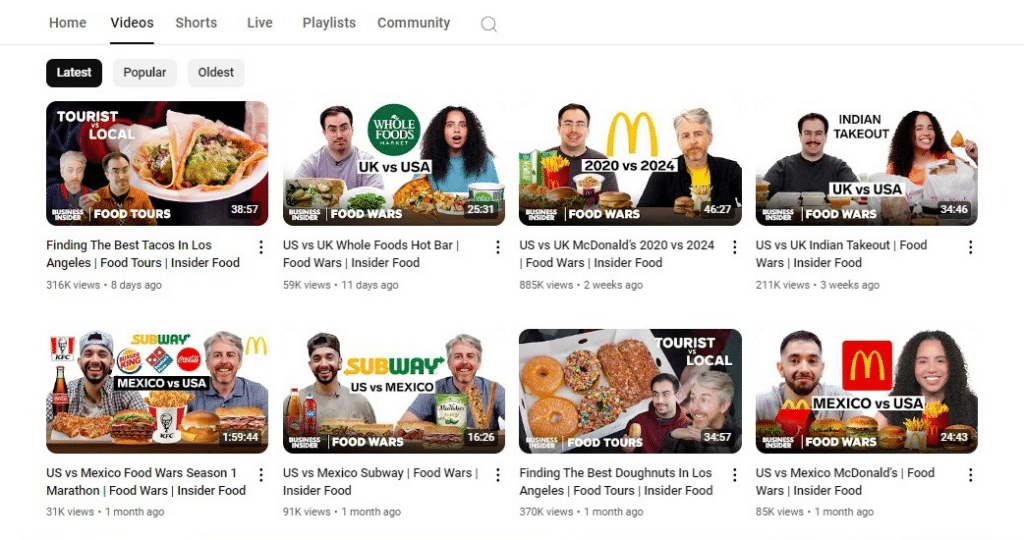
For reference, check out this example from @InsiderFood’s YouTube channel:
D. Optimize Your Video Titles, Descriptions, and Chapters
Since YouTube is essentially a search engine, your video’s title, description, and chapters play crucial roles in search optimization and viewer attraction. Use them as an opportunity to include single and long-tail keywords and improve your video content’s visibility in search results.
Additionally, ensure the title clearly tells potential viewers what the video is about, but keep it concise and intriguing.
Here’s a simple formula to craft compelling YouTube titles that engage viewers and optimize your video for search:
[Keyword/Topic] + [Unique Value Proposition] + [Outcome/Enticement]
Here’s how to use this formula:
- Keyword/topic: Start with a relevant keyword or topic that clearly defines the content of your video. This helps with SEO and ensures that your video is discoverable by the right audience.
- Unique value proposition: Include a unique selling point or what makes your video different. This could be a specific benefit, a unique insight, or an interesting angle on a common topic.
- Outcome: End with an enticing element that promises a specific outcome or benefit. This could be what the viewer will learn, how they will feel, or any other result they can expect after watching the video.
For example, if you’re making a video on baking a cake, here’s how you might use the formula:
- Keyword/Topic: Easy Chocolate Cake Recipe
- Unique Value Proposition: Under 30 Minutes
- Outcome/Enticement: Perfect for Busy Sweet Lovers!
Result: “Easy Chocolate Cake Recipe | Under 30 Minutes | Perfect for Busy Sweet Lovers!”
This title tells viewers exactly what to expect, why it’s unique, and what they’ll gain by watching— all elements designed to attract clicks and improve search performance. This is likely to appeal to viewers looking for easy and quick solutions.
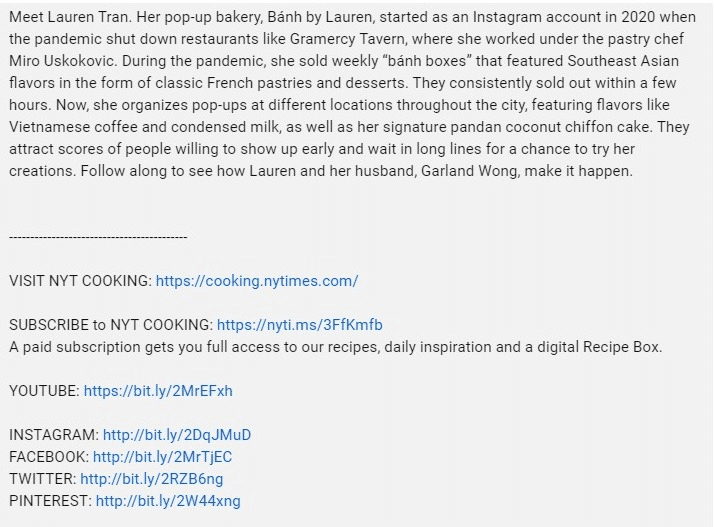
As for the description, it should offer more insight into the video content and include any links or calls to action mentioned in the video. Here’s what that can look like:
To further support your optimization efforts when you post videos, consider adding chapters to your videos. Essentially, YouTube video chapters break down your video into sections, each with a brief title. These appear along the video’s progress bar, making it simple for viewers to jump directly to specific points of interest within the video.
To add chapters to your YouTube video, you need to include timestamps in your video’s description. Start with 00:00, followed by the title of your opening segment, and then list subsequent times and titles for each chapter.
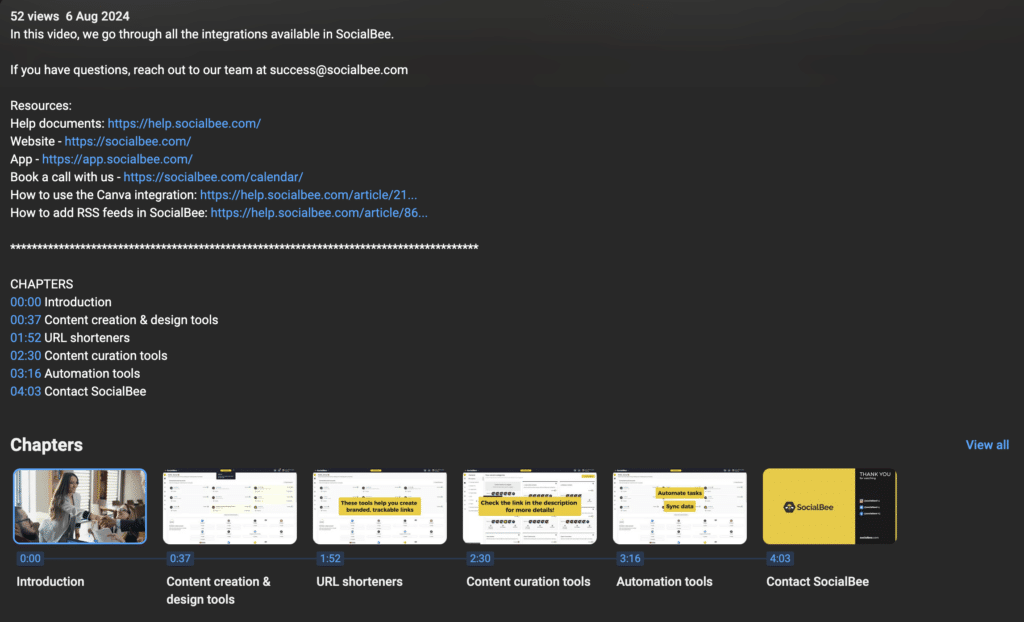
Additionally, make sure that your first timestamp starts at 00:00, and you have at least three timestamps in total. Remember, each chapter must be a minimum of 10 seconds long.
Here is how to optimize YouTube chapters:
- Be clear and descriptive: Use concise but descriptive titles for each chapter. This not only helps viewers find exactly what they’re looking for but also improves the SEO of your video as these keywords can help your video turn up in search results.
- Cover key points: Ensure that your chapters reflect the main content of your video. Highlight critical information, steps, or interesting points that can stand alone as mini-topics within your video.
- Aim for regular intervals: If possible, try to space your chapters at regular intervals to maintain a rhythm, unless specific sections require more time. This makes your video appear well-structured and digestible.
E. Post Your Video
Once the creative aspects of your video are finished, you can finally upload it to YouTube. Before hitting publish, you can choose whether your video will be public, unlisted, or private, depending on your readiness to receive audience feedback.
For optimal results, post your video during peak times when your audience is most likely to see and engage with it. The best times to post on YouTube are generally in the afternoon to evening hours, specifically between 2 PM to 4 PM on weekdays, and extending to 8 PM to 11 PM on weekends.
However, avoid posting on YouTube during morning hours on weekdays and very early mornings (6 AM to 9 AM), regardless of the day. These times usually see lower engagement rates as most viewers are likely busy with their daily routines.
5. Monitor Your YouTube Channel
Keeping an eye on various metrics tells you what works, what doesn’t, and how you can optimize your video strategy for better engagement and more subscribers.
For this purpose, YouTube’s in-platform analytics offer a wealth of data broken down into various reports, such as views, watch time, revenue, and interaction data.
Here are the metrics that matter most on YouTube:
- Views: Knowing how many views your videos are getting can provide an overview of your channel visibility on the platform. What’s more, a higher view count can lead to better ad revenue.
- Watch time: This metric is crucial as YouTube prioritizes content that keeps viewers’ attention longer. The more time viewers spend watching your stuff, the better visibility it has in search results and video recommendations.
- Engagement: Likes, comments, shares, and the number of subscribers can help you gauge the impact your content has.
- Subscriber growth: Knowing how many new subscribers you’re gaining over a specific period is a tell-tale sign of whether your strategy is working.
- Average view duration: Are people watching your content all the way through? If not, it may be time to rethink your video structure.
- Click-through rate (CTR) on thumbnails: How effective are your thumbnails in making people click on your videos? Is there anything you should improve.
Additionally, YouTube Analytics breaks down traffic sources into several categories such as direct searches, external referrals, and YouTube recommendations. This will help you identify which areas are driving the most traffic to your videos and focus more on those channels.
For instance, if a lot of traffic comes from external websites, you might consider partnerships with these platforms for cross-promotion.
6. Monetize Your Channel
Monetizing your YouTube channel is an exciting prospect. It means you can potentially turn your video creation efforts into a sustainable income.
Here are the main ways to monetize your YouTube channel:
- YouTube Partner Program
- Channel memberships
- Super chat and super stickers
- Merchandise shelf
- Affiliate marketing
- Sponsored content
A. YouTube Partner Program
Before you can start earning directly from YouTube, you need to sign up for the YouTube Partner Program (YPP).
Here are the requirements for becoming a YouTube Partner Program (YPP) member:
- Having 1,000+ subscribers
- Accumulating at least 4,000 public watch hours in the last 12 months
- Living in a country or region where this feature is available
- Following all the YouTube monetization policies
- Having a linked AdSense account
Once you meet these criteria, and you’re part of YPP, you can earn money from display, overlay, and video ads.
Here’s how you can optimize your ad revenue on YouTube:
- Enable all types of ads for your videos to maximize potential earnings. This includes skippable video ads, non-skippable video ads, display ads, and overlay ads.
- Create engaging content that keeps viewers watching. Ads are typically placed at the beginning of the video (pre-roll), and the longer viewers watch your video, the more likely they are to view multiple ads.
- Understand your audience’s preferences to create content that not only attracts viewers but also keeps them engaged.
B. Channel Memberships
Once your channel hits 30,000 subscribers, YouTube allows you to set up channel memberships. Through this feature, viewers can join your channel through monthly payments and receive members-only perks such as emojis, badges, and access to exclusive videos, live chats, and more.
To encourage your viewers to become members, offer attractive and feasible perks, such as exclusive videos, giveaways, or private streams. Promote your memberships regularly in your videos to let your audience know about the benefits of joining.
C. Super Chat and Super Stickers
Super Chat and Super Stickers are features available during live streams. Essentially, they require users to pay to have their messages highlighted.
To make the most of this opportunity, host regular live streams to engage with viewers and prompt them to use Super Chat and Super Stickers. During the streams, acknowledge all of these contributions to show appreciation, encouraging more viewers to participate in future streams.
D. Merchandise Shelf
If you have merchandise such as t-shirts, keychains, or any other branded items, you can showcase them on your channel through YouTube’s merchandise shelf, which is available to channels with more than 10,000 subscribers.
Integrate your merchandise shelf into your videos by mentioning your products and showing them during your broadcasts. However, this takes more effort, as you’ll need to collaborate with reliable manufacturers to ensure your merchandise is of high quality.
E. Affiliate Marketing
Even if you’re not eligible for YPP, you can still earn money via affiliate marketing. This requires you to promote other companies’ products or services and earn a percentage or commission for every sale made through your link.
PRO TIP: Go for products that are compatible with your content and are relevant to your audience, and include the affiliate links in your video descriptions. Don’t forget to mention that your links are affiliate, since people appreciate transparency and honesty.
F. Sponsored Content
Working with brands can be lucrative. You can create sponsored videos where you specifically showcase or mention a product in exchange for payment. Clearly disclose any sponsored content to your viewers to build trust, and only aim to partner with brands that resonate with your values and appeal to your audience.
7. Engage and Grow Your Audience
Viewers want to feel valued and part of a community, but to maintain their loyalty, you’ll need to find ways to drive engagement.
Here’s how to boost engagement on your YouTube channel:
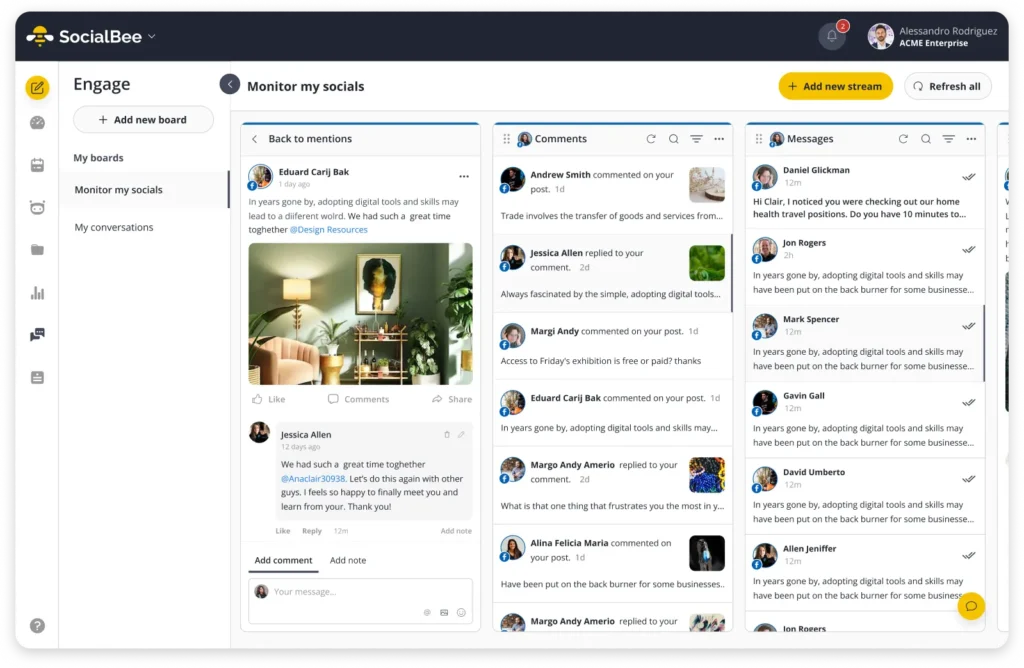
- Respond to comments: Create the habit of reading and replying to the comments on your videos to make your audience feel heard and encourage further engagement.
- Host Q&A sessions: Regularly ask your viewers to submit questions and host Q&A videos or live streams where you answer them. This can be a great way to engage with your audience on a more personal level.
- Create incentives: Occasionally, run small contests or product giveaways that require likes, comments, or subscriptions to enter.
- Collaborate with other YouTubers: Look for UGC creators or influencers whose content fits into your niche and who share a similar or complementary audience. Chances are, their viewers might be interested in your content as well. Mutual promotion can significantly boost reach and subscriber growth.
- Engage followers with questions: Pose questions in your videos and encourage your viewers to answer them in the comments to increase comment activity and get more in-depth insights into your audience’s preferences.
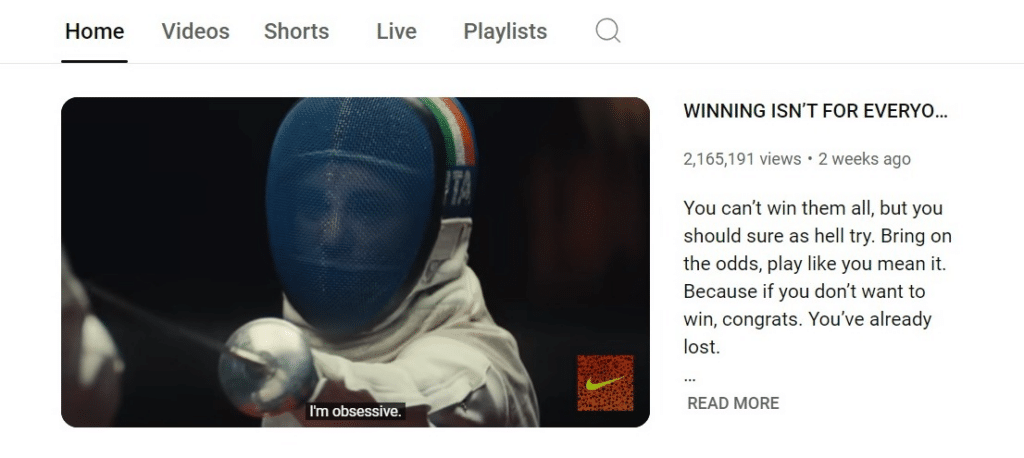
- Be direct but not pushy: At the end of your videos and in your descriptions, remind viewers to like, subscribe, and comment. Keep the tone friendly and appreciative rather than demanding, just like @FutureProof does in the example below.
![]()
However, the best way to retain audience engagement and grow your account is consistency.
Decide how often you can realistically publish new content, whether it’s daily, weekly, or bi-weekly, and stick to this posting schedule as closely as possible. Consistency helps build a habit in your viewers to look forward to your next video.