
Even the best posts can go unnoticed without the right content distribution strategy.
I learned that the hard way.
For a long time, my posting strategy looked like an effort without direction. The problem wasn’t the content. It was everything around it. Without a system, distribution becomes reactive.
Once I built one, things changed quickly. I wasn’t guessing what to post or what various content distribution channels to choose. Every post had a role, a place, and a path to reach more people.
In this article, I’ll break down the strong content distribution strategy I use now. It’s designed to reduce effort, remove the stress of constant posting, and make your results far more consistent over time.
We’re SocialBee LABS SRL, part of WebPros. We use the information you provide to share relevant content & updates, as outlined in our Privacy Policy. You can opt out anytime.
Short summary
- Start by narrowing your focus. Pick a few organic and paid distribution channels where your audience is active and decide what each one is meant to do. When each platform has a role, it becomes much easier to decide what kind of content belongs there.
- Define 3–5 content themes and assign each one a fixed day or recurring slot (e.g., share educational posts on Wednesdays) so your posting schedule is predictable without daily planning.
- Keep a running list of content ideas and update it constantly. Every time someone asks a question, leaves a comment, or reacts to a post, add that topic to your list. This way, you’re always creating content people have already shown interest in.
- Don’t rely on one post per idea. Take a single idea and turn it into a few specific pieces: write a short post explaining it, turn the same idea into a visual step-by-step, and record a short video covering one key part.
- Look at your recent posts in groups, not individually. Go through your last 10–20 posts and write down what they have in common when they perform well. Pay attention to the topic, the format, and especially how the post starts.
- When you find a format that works, keep using it. If a “3 mistakes” post or a simple step-by-step performs well, use that same structure again with a new topic instead of trying to come up with something completely new.
- Always have a few ready-to-use posts that don’t depend on timing. Things like tutorials, explanations, or common mistakes can be published anytime and help you stay consistent when you don’t have something new.
- Create content in batches instead of one post at a time. Sit down and write 10–15 posts in one session. Later, create all the visuals for those posts, and then record any videos. This is faster and easier than switching between writing, designing, and recording for every single post.
- Before publishing, adjust each post so it fits different social media channels. That means changing image sizes, shortening or expanding the caption, removing links where they don’t work, and adapting the call to action so it matches how people use that platform.
- Prepare one or two weeks of content at a time and review everything together. This makes it easy to see if you’re repeating the same idea too often or missing an important theme.
- Schedule your posts ahead of time so they go out automatically. Then check your calendar view to make sure your week looks balanced, and nothing is stacked too closely together.
- Leave a few open spots in your schedule. Not everything can be planned in advance, and you’ll want room to post about trends, updates, or conversations that come up during the week.
- Keep your schedule at least 2–3 weeks ahead. This removes the pressure of having to create and publish on the same day and gives you time to improve what you’re making.
- Check your results regularly and make simple adjustments. If a certain type of post gets comments or clicks, do more of it. If something keeps getting ignored, stop or change how you present it.
- Use SocialBee to keep this organized. You can connect all your accounts, group posts by theme and day, create different versions of the same post for each platform, schedule everything in advance, review it in a calendar, and track what’s working without juggling multiple tools.
What I learned after years of posting on social media
At first, it all seems straightforward. Post consistently, share value, use good visuals, and growth should follow. But over time, you realize the things that actually make a difference are not the obvious ones.
Here are the lessons I learned during my social media career:
- Your “best” content usually isn’t your best performer
- Timing helps, but it’s not the main driver
- Saying something slightly controversial gets attention
- People follow for value, but stay for connection
- Repeating yourself is actually necessary
- The first line matters more than everything else
- You’re competing with more than just other creators
1. Your “best” content usually isn’t your best performer
You can spend hours creating something polished and detailed, and it barely gets attention. Then a simple, quick post you almost didn’t share performs much better. This happens because people connect with what feels real, not what feels perfect. When content looks too edited, it creates distance. When it feels natural, it builds connection.
2. Timing helps, but it’s not the main driver
Timing does matter because posting across owned channels, earned, and paid channels when your intended audience is active increases the chances of your content being seen. However, timing alone does not make a post or social media ads perform well. It only creates the opportunity for early engagement. What really determines success is how people react once they see the content.
If people engage quickly by liking, commenting, or replying, platforms see that as a strong signal to push your content further.
3. Saying something slightly controversial gets attention
If everyone already agrees with you, your content probably won’t stand out. The posts that perform best often challenge common advice or flip a familiar idea on its head. This doesn’t mean being extreme or negative; it just means offering a fresh perspective. People stop scrolling when something makes them think, “Wait… is that true?”
Example:
- “Consistency is overrated”
- “Stop posting every day”
4. People follow for value, but stay for connection
Useful content can attract followers, but it does not keep them. People stay when they feel understood. They continue following because they relate to how you think and see the world. Over time, your content becomes more than information. It becomes a shared perspective that people want to be part of.
5. Repeating yourself is actually necessary
At some point, you will feel like you are saying the same things again and again. This is normal. Most people do not see everything you post. They might only catch a small portion of your content. Repetition helps your message stick. What feels repetitive to you feels consistent to your audience.
6. The first line matters more than everything else
Even a great overall content marketing strategy will be ignored if the opening does not grab attention with the right audience members. People decide very quickly whether to keep reading or keep scrolling. That decision happens in seconds. Because of that, the first line carries the most weight. It needs to spark enough curiosity to make someone pause.
7. You’re competing with more than just other creators
Your content is not only compared to others in your niche. It competes with everything else people see on their screen. Messages, videos, and endless scrolling all fight for attention. This means your content needs to be engaging on a human level and match audience preferences. If it does not capture interest quickly with online communities, it gets skipped, and your content distribution efforts will be in vain.
Steal my step-by-step social media content distribution framework
A winning content distribution strategy starts before you publish anything. I don’t open a scheduler and ask, “What should I post today?” I set up the system first, so every piece of content already has a place to go, a reason to exist, and a clear role in the larger content strategy.
Here’s the framework I use to turn content distribution from a guessing game into a repeatable process:
Phase A: Setup & foundation
- Choose the right platforms and set up your accounts
- Define content pillars and assign posting frequency by platform
- Build a backlog of content ideas
- Collect and repurpose high-value content
Phase B: Planning & strategy
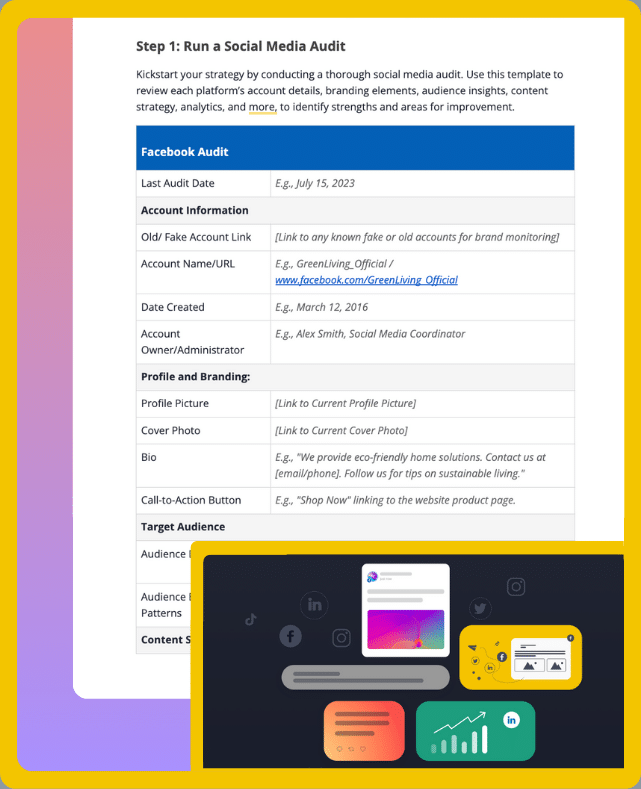
- Audit past performance (if any) or research competitors/brands
- Identify top-performing content formats and hooks
- Build a swipe file of proven post formats
- Plan evergreen content to maintain a buffer
- Difersify content angles and formats across categories
Phase C: Content creation
- Batch-create content by task type (writing, recording, designing)
- Use templates and frameworks for faster content production
- Customize posts for each platform to feel native
Phase D: Collaboration & approval
- Set up a shared workspace for teams, clients, and accounts
- Prepare content batches for approval
- Get consolidated feedback and limit revisions
Phase E: Scheduling & publishing
- Schedule posts in advance across platforms using one tool
- Review the full content calendar for balance and gaps
- Leave room for trend-based or spontaneous content
- Maintain 2-3 weeks of scheduled content as a buffer
Phase F: Monitoring & optimization
- Review performance weekly/monthly to identify patterns
- Repeat top-performing content and formats
- Adjust content plan based on analytics insights
Phase A: Setup & Foundation
1. Choose the right platforms and set up your accounts
Start with where your target audience already spends time. Every platform has its own role, and trying to be active everywhere usually spreads your efforts too thin and won’t increase brand awareness.
I focus on a small set of various social media platforms that align with both the format I can produce and the outcomes I want. If the goal is lead generation, I’ll prioritize platforms that support links and deeper conversations, like LinkedIn. If the goal is visibility, I’ll lean into platforms that reward visual content or short-form video content, like Instagram or TikTok.
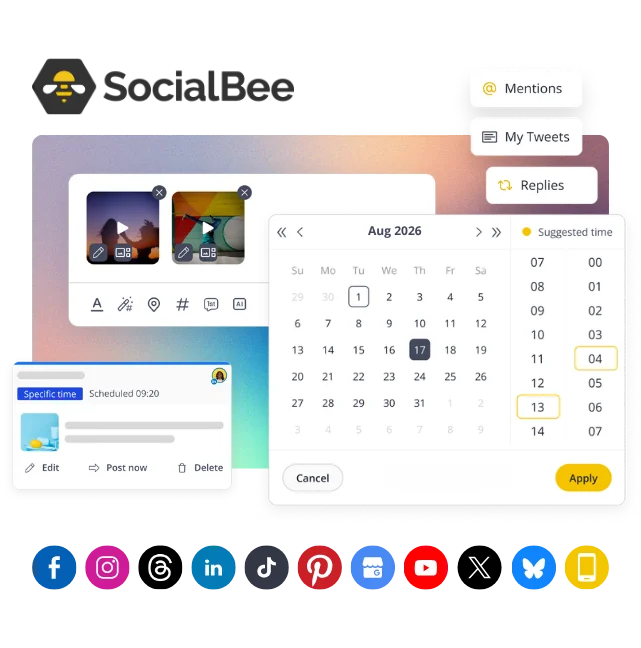
Once those choices are clear, I connect all my social media accounts in one place, my social media management platform, SocialBee, so I can manage them without switching between tools. That alone simplifies the distribution process and keeps everything consistent across your social media pages.
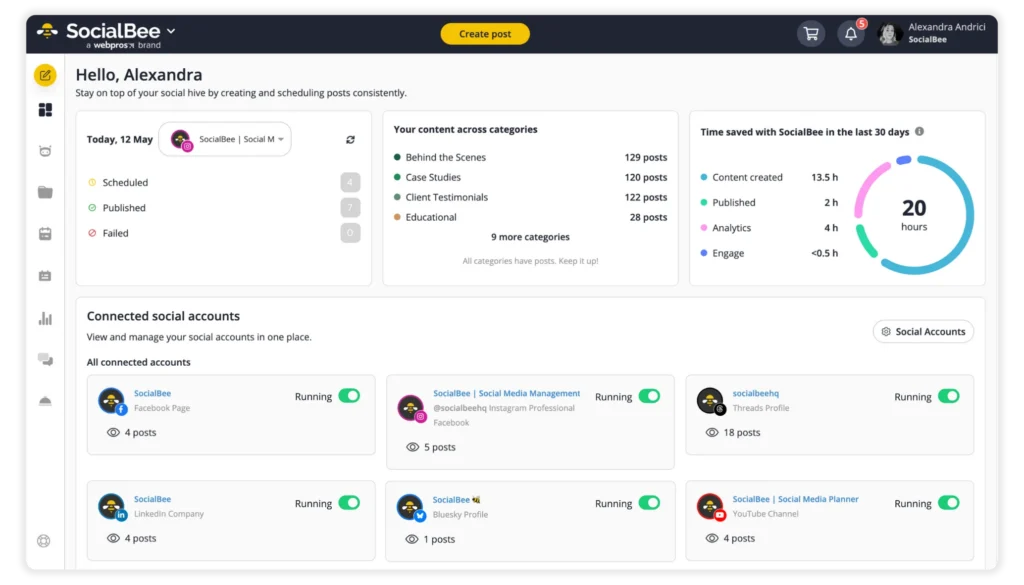
The goal here is clarity. Each platform should have a purpose, and every account should be ready before you start publishing content.
2. Define content pillars and assign posting frequency by platform
After choosing platforms, I structure what I’m going to publish and how often it should go out, from organic posts to paid media and sponsored content.
Defining a small set of content pillars based on my strategy and what my audience actually cares about is only the first step. These pillars act as a filter, helping me decide what’s worth posting and what’s not.
The main content pillars I use are:
- Education: actionable advice and insights, valuable resources
- Proof: case studies, results, testimonials
- Product: features, workflows, use cases
- Authority: opinions, trends, industry takes
- Engagement: memes, polls, Q&As, collabs with social media influencers and user-generated content
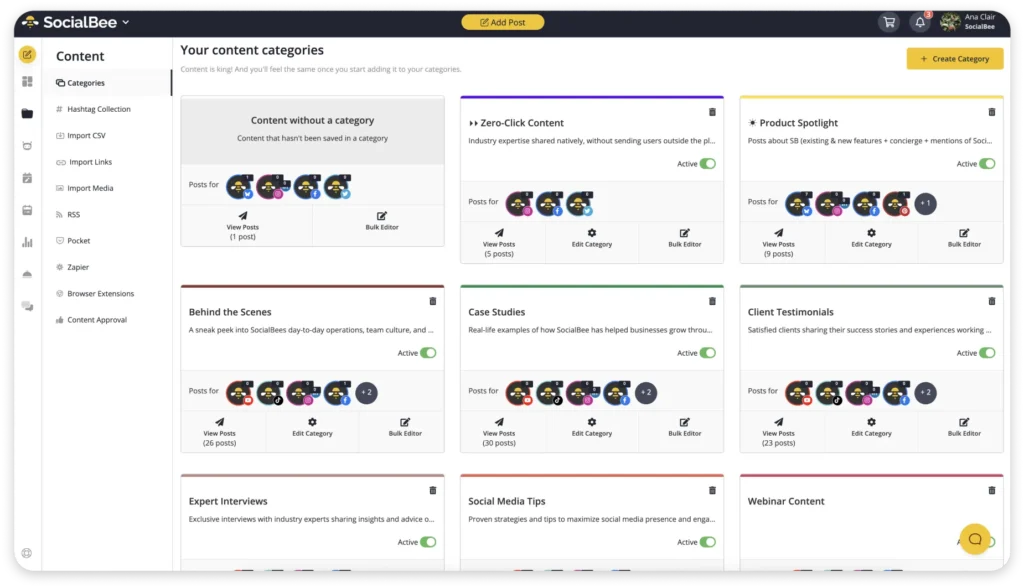
Then I turn these pillars into content categories. Each category becomes a structured stream of posts built around a specific goal. Instead of managing posts individually, I keep adding content to these categories over time.
From there, I assign a posting frequency to each category and content distribution platform. This gives me precise control over how content is distributed. For example, educational content can go out more often, while product content stays occasional. It keeps the mix balanced without manually planning every post.
I also adjust frequency based on the publishing platform. Here is a general guideline of how often you should post on the best content distribution platforms:
- Facebook: 3–7 times per week
- Instagram: 1–2 times per day
- X (Twitter): up to 15 times per day
- LinkedIn: 3–5 times per week
- Pinterest: around 3 times per day
- Google Business Profile: once per day
- TikTok: 2–3 times per day
- YouTube: 2–3 times per week
With third-party platforms like SocialBee, each category and platform can have its own posting schedule. Once that’s set, every post is automatically placed into the next available slot.
So instead of asking, “When should I publish this post?”, the decision is already made. The category controls when and how often that type of content goes out, keeping everything consistent without daily manual work.
3. Build a backlog of content ideas
Consistency breaks when you run out of ideas.
To avoid that, I keep a running backlog of content ideas and digital assets tied to real inputs:
- Questions from comments and messages
- Topics that already generated engagement
- Patterns I notice in audience behavior
- Problems that come up repeatedly in my niche
This backlog gives me direction. When it’s time to create content, I’m working from ideas that already reflect what my audience cares about.
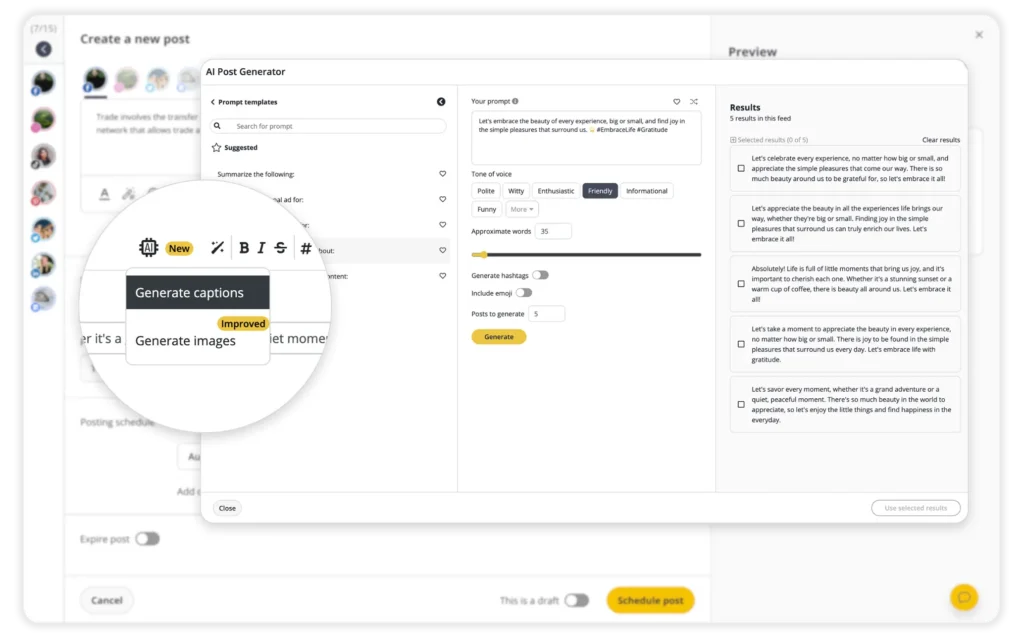
When that list starts to feel thin, I don’t sit there trying to force new ideas. I use SocialBee’s AI content generator to expand what I already have. I’ll take a topic that’s working and generate different angles, formats, or hooks around it. Sometimes that turns one idea into five usable social media posts.
4. Collect and repurpose high-value content
Before creating something new, I look at what already exists and make repurposing plans.
Most businesses sit on a lot of underused digital content. Blog posts, long-form videos, past campaigns, and even older social media posts can be broken down and distributed again in different formats.
I focus on:
- Content that already performed well based on success metrics
- Topics that are still relevant
- Pieces that can be split into smaller insights
Then I adapt that content for different distribution channels. A blog post can turn into several social media posts. A webinar can become short video content. A strong idea can be reused across multiple formats.
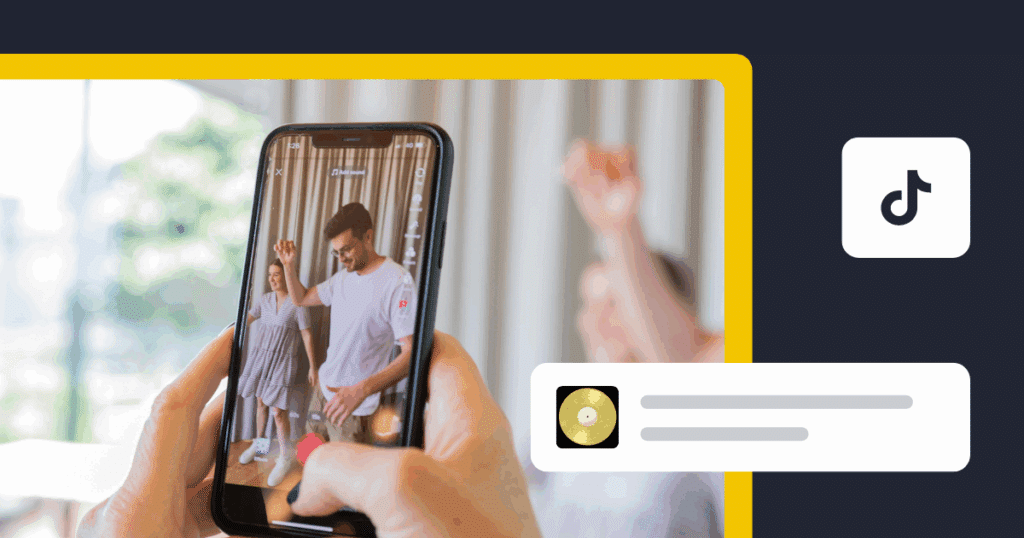
This, for example, is a snippet from a webinar that was turned into a TikTok:
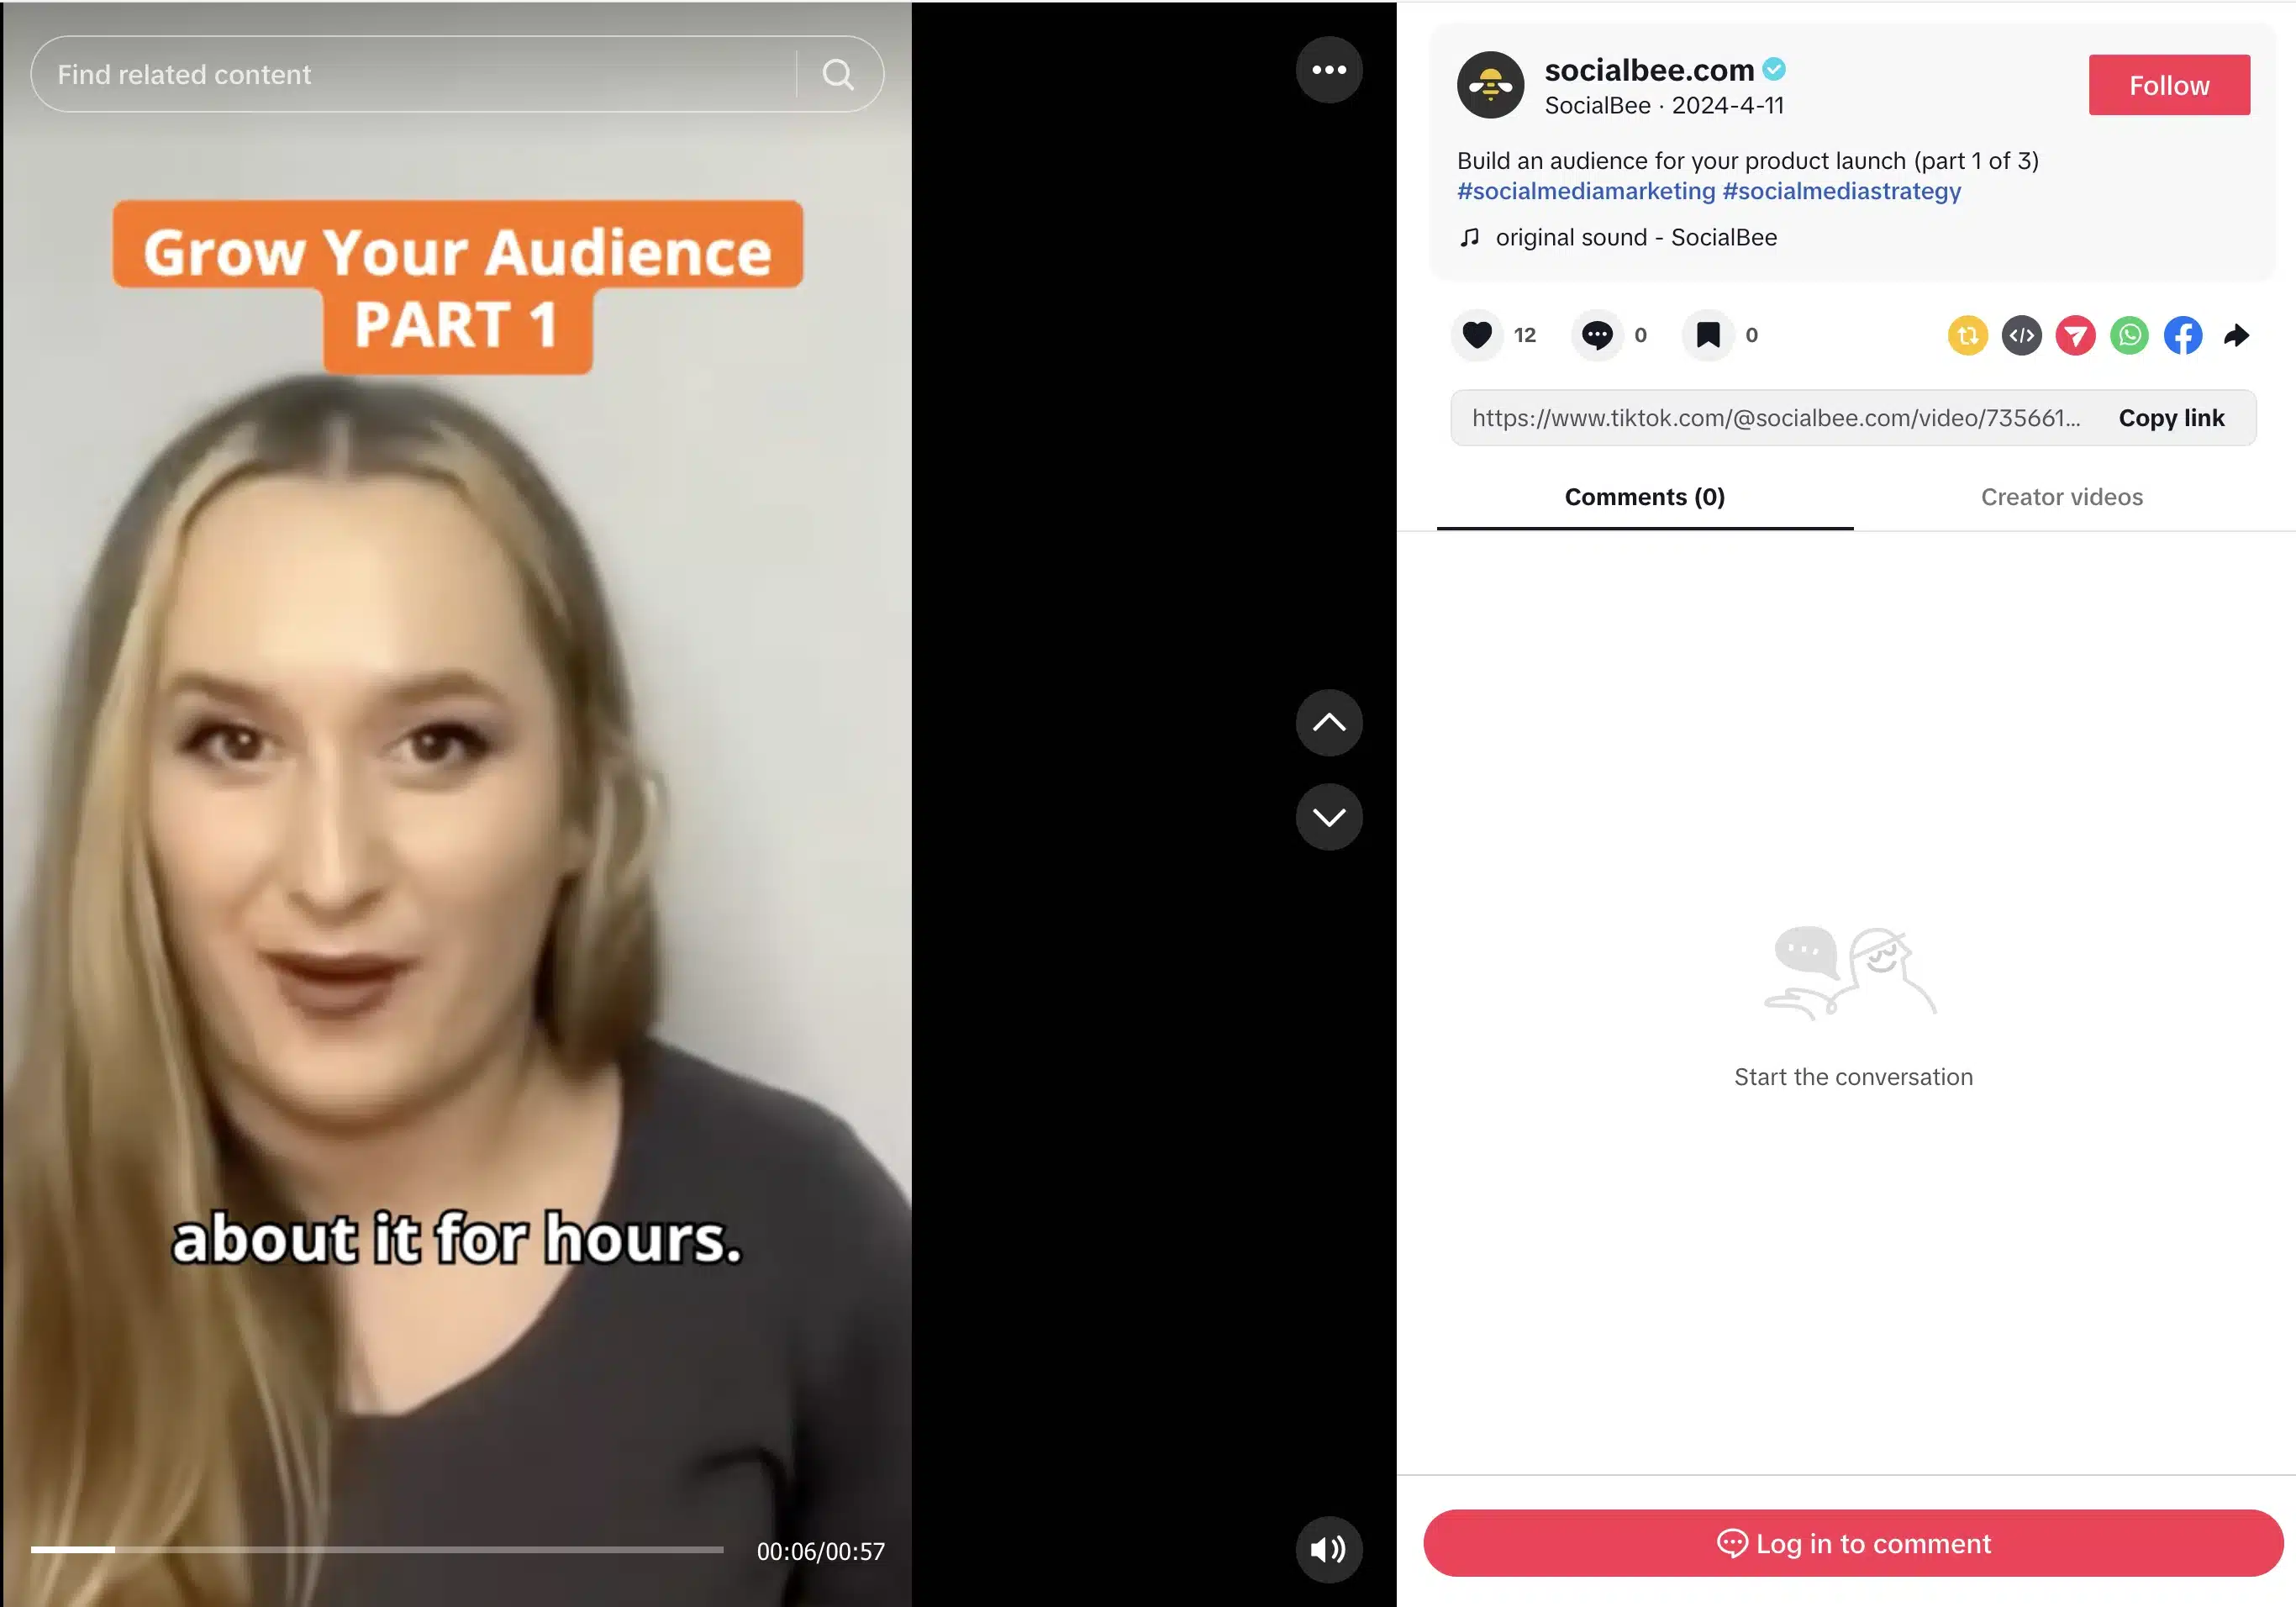
This way, I’m extending the life and reach of existing content across various channels.
Phase B: Planning & Strategy
1. Audit past performance (if any) or research competitors/trends
If I already have content, I start by reviewing it.
I don’t look at everything. I filter for posts that triggered a strong reaction:
- Posts that generated comments, not just likes
- Posts that drove clicks or profile visits
- Posts that were saved or shared
Then I look for patterns across those posts:
- Was it a specific topic?
- A format like carousel or short-form video?
- A certain type of opening line?
If I don’t have enough data, I analyze accounts in the same niche. I look at what gets repeated. When multiple creators use similar formats or angles, that usually points to something that works with that audience.
SocialBee helps here by centralizing your analytics so you can actually compare performance without jumping between platforms.
Instead of checking each social media network separately, I can see how my posts perform across all connected accounts in one dashboard. It tracks key performance indicators like likes, comments, shares, reach, and clicks, so I can quickly spot which posts are getting attention and which ones are being ignored.
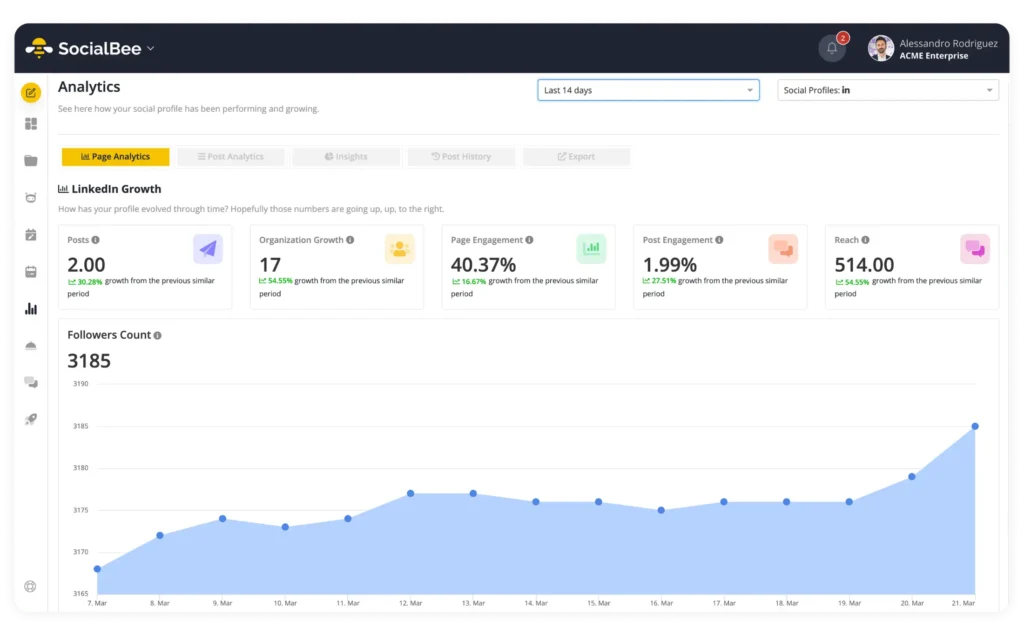
More importantly, I can look at patterns over time from one place, without having to fo through the data myself. It shows me:
- Which content categories consistently drive engagement
- What formats perform better on specific platforms
- When my audience is most active
That makes the audit process faster and more precise.
2. Identify top-performing content formats and hooks
After reviewing performance, I break winning posts into components.
I look at three things:
- Format → text, carousel, video
- Hook → the first line or first 2 seconds
- Structure → how the idea is explained
For example, I’ve seen the same topic fail as a long caption but perform well as a short, structured list. That tells me the issue wasn’t the idea, it was how it was presented.
I keep a simple rule: if something works once, I test it again with a different topic. If it works twice, it becomes part of my regular content approach.
3. Build a swipe file of proven post formats
I don’t rely on memory when something works. I document it.
Over time, I’ve built a swipe file that captures the patterns behind strong posts. That includes hooks that made people stop scrolling, structures that kept them reading, and formats that consistently led to engagement.
For example, I’ve noticed that openings like “Most people get this wrong” tend to grab attention quickly. Comparison formats like “Do this, not that” make ideas easier to understand, and simple list-based posts such as “3 mistakes to avoid” often perform well because they’re easy to scan.
When I create new content, I start from these patterns and apply them to a new idea. That makes the process faster and more reliable because I’m working with structures that have already proven they resonate.
4. Plan evergreen content to maintain a buffer
Relying only on timely or reactive content creates gaps.
I ran into this early on. If I didn’t have something ready, I simply didn’t post. That broke consistency and made performance harder to sustain.
Now I maintain a base layer of evergreen content that I can rely on at any time. This includes explanations of core concepts, step-by-step processes, and breakdowns of common mistakes and how to fix them.
In SocialBee, I add these posts to categories with a set schedule and use the re-queue option when the content is worth repeating. After a post is published, SocialBee can send it back to the bottom of the queue so it gets shared again later without me having to reschedule it manually.
I also set expiration rules for when a post shouldn’t run forever. For example, I can expire a post after a specific date or after it has been published a certain number of times. That matters for content tied to campaigns, seasonal topics, limited offers, or advice that may need regular updates.
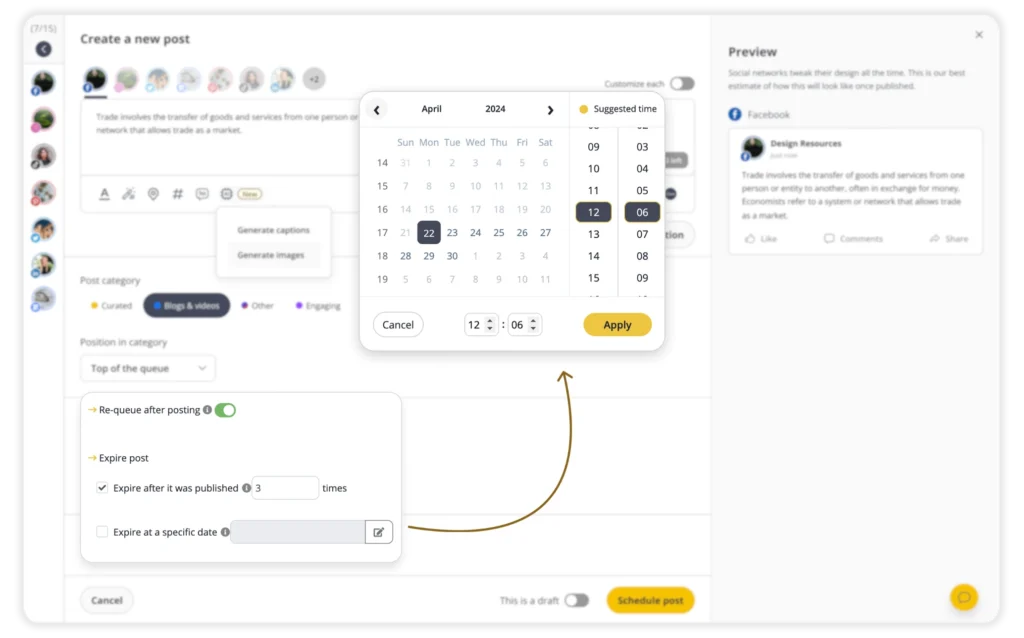
This gives me control over the evergreen buffer. Strong posts can keep circulating, while time-sensitive content stops before it becomes outdated or irrelevant.
5. Diversify content angles and formats across categories
One idea can be used more than once if you change how you present it.
When I create content, I break it into multiple angles:
- A direct tip
- A short story or example
- A list of mistakes
- A quick breakdown
Then I adapt each version to the platform.
For example:
- LinkedIn → text-based insight
- Instagram → carousel with the same idea
- Short-form video → quick explanation
This keeps the content aligned with each platform while still being efficient to produce.
Phase C: Content Creation
1. Batch-create content by task type (writing, recording, designing)
I don’t create content one post at a time. That slows everything down.
Instead, I batch tasks based on the type of work involved. I’ll dedicate one block of time to writing captions, another to recording video content, and another to designing visuals. This reduces context switching and helps me stay focused.
For example, I might write 10–15 social media posts in one session, then move on to creating the visuals for all of them. The output is higher, and the process feels more structured.
Inside SocialBee, I save these posts as drafts and organize them into categories as I go. That way, I’m not just creating content, I’m preparing it for distribution at the same time.
2. Use templates and frameworks for faster content production
Starting from scratch every time is inefficient.
I rely on a set of templates and frameworks based on what I’ve already seen work. These come directly from my swipe file, so I’m not guessing what structure to use.
For example, I might use:
- A problem → solution format
- A short list of mistakes or tips
- A step-by-step breakdown
These frameworks make it easier to turn an idea into a finished post quickly. I’m focusing on the message, not the format.
When I need variations, I use SocialBee’s AI tools to generate alternative captions or expand on a point. This is useful when I want to test different angles or create multiple posts around the same topic without repeating myself.
3. Customize posts for each platform to feel native
Every platform has its own expectations.
I don’t post the exact same version of content everywhere. Even when the core idea is the same, I adjust the format, structure, and details so it fits the platform.
For example:
- On LinkedIn, I keep the focus on text and clarity
- On Instagram, I pair the idea with strong visuals or a carousel
- On platforms where links aren’t clickable, I remove them or adjust the call to action
- I adjust image sizes and aspect ratios to match platform requirements
- I use hashtags where they’re effective and skip them where they’re not
- I add alt text for accessibility on supported platforms
- I adapt captions based on how people consume content on each channel
In SocialBee, I customize and schedule platform-specific versions of the same post from one place using the “Customize for each profile” feature. I keep the core idea, then adjust the caption, visuals, and details for each platform without creating separate posts, so everything feels native while staying efficient to manage.
Phase D: Collaboration & Approval
1. Set up a shared workspace for teams, clients, and accounts
The first thing I do is separate accounts and responsibilities clearly.
If I’m managing multiple brands or clients, each one gets its own workspace. That way, content, approvals, and comments don’t mix across accounts.
Then I assign roles:
- Someone creates the content
- Someone reviews it
- Someone gives final approval
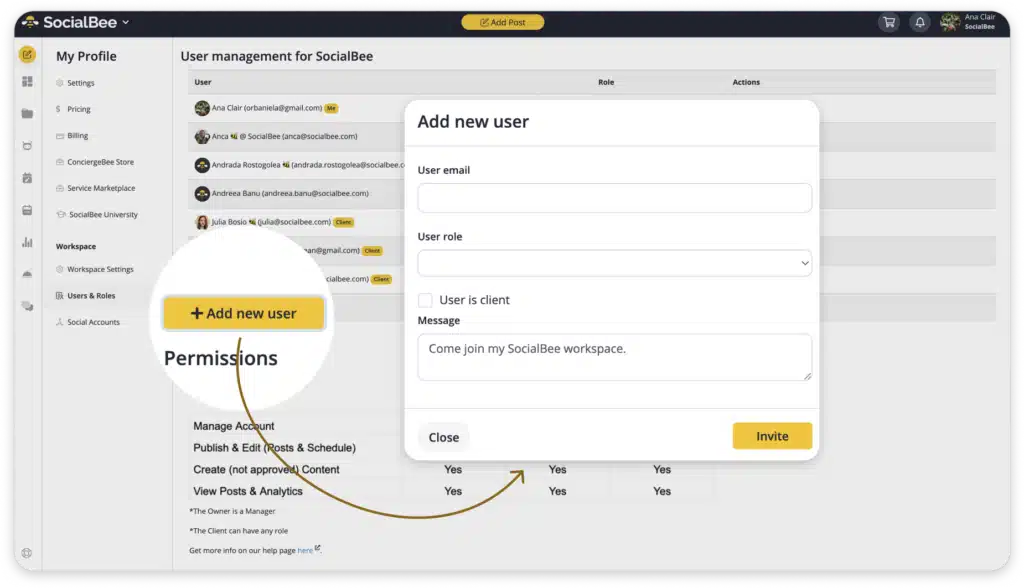
In SocialBee, I set this up using workspaces and role-based permissions.
Each workspace acts as a separate environment for a brand or client, so content, schedules, and social media accounts stay organized and don’t overlap.
Within each workspace, I assign roles based on responsibilities. For example, a team member can create and edit posts, while someone else is responsible for reviewing and approving them before they go live. This creates a clear workflow where content doesn’t get published until it passes through the right checks.
For approvals, SocialBee includes a dedicated process. Posts can be marked as “Draft”, and they won’t be published until someone with the right permissions approves them. This prevents unfinished or unreviewed content from going out.
2. Prepare content batches for approval
I stopped sending posts for approval one at a time because it kept breaking everyone’s focus, including mine.
Now I prepare content in batches. I usually put together one or two weeks of social media posts, fully written, organized into categories, and already assigned to their slots. At that point, the content isn’t just a list of posts; it’s a full view of how everything will go out.
Reviewing content this way changes the quality of feedback. You can immediately see if there’s too much of one type of content, if certain topics repeat, or if the overall mix feels off. Those are things you simply don’t catch when looking at isolated posts.
3. Get consolidated feedback and limit revisions
Feedback used to be the messiest part of my process. I’d get comments in Slack, emails, and sometimes directly in documents. Keeping track of what needed to be changed took longer than actually editing the post.
Now I keep all feedback tied to the post itself.
In SocialBee, you can leave notes directly on each post. These notes act as internal comments where reviewers can point out specific changes, suggest edits, or ask questions. Because the notes live inside the post, there’s no disconnect between the feedback and the content. I don’t have to cross-reference anything or guess which version someone is referring to.
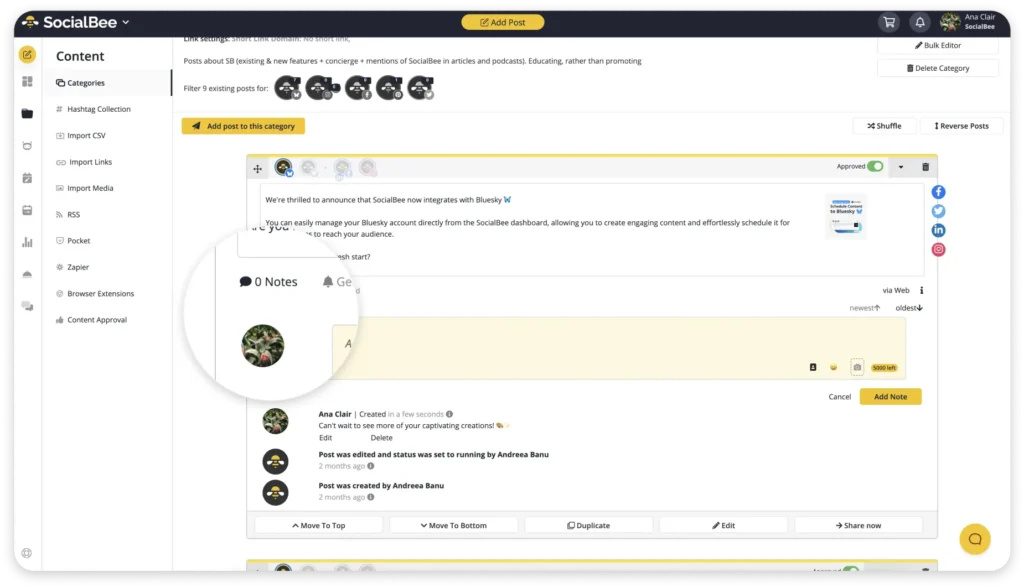
It also makes revisions more focused. I can go through each note, make the change, and resolve it without second-guessing what was meant.
I keep the number of revision rounds low on purpose. If feedback keeps coming in small waves, the content drifts and takes longer to publish. It’s more effective to collect clear feedback in one pass, update the post, and move it forward.
Phase E: Scheduling & Publishing
1. Schedule posts in advance across platforms using one tool
As soon as a post is approved, I schedule it.
Most posts go into their assigned categories in SocialBee, which already have time slots attached. That means I don’t decide when to publish each post individually. The category handles that.
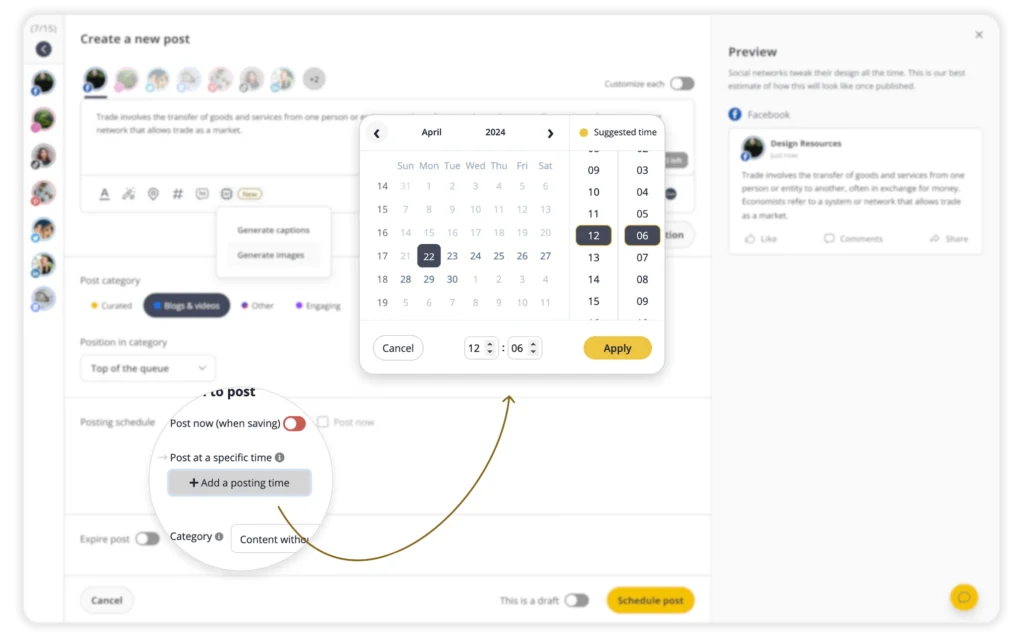
For posts tied to a specific date, like announcements or campaigns, I override the schedule and set an exact time. Based on past content performance, SocialBee recommends an ideal posting time in the scheduling window, so I can get the best results.
Because the structure is already in place from earlier phases, scheduling becomes a placement task, not a decision-making one.
2. Review the full content calendar for balance and gaps
Before I finalize anything, I review the content calendar.
In SocialBee, the calendar gives a visual view of all scheduled posts across platforms and categories. You can see exactly what’s going out each day, which platform it’s assigned to, and which category it belongs to.
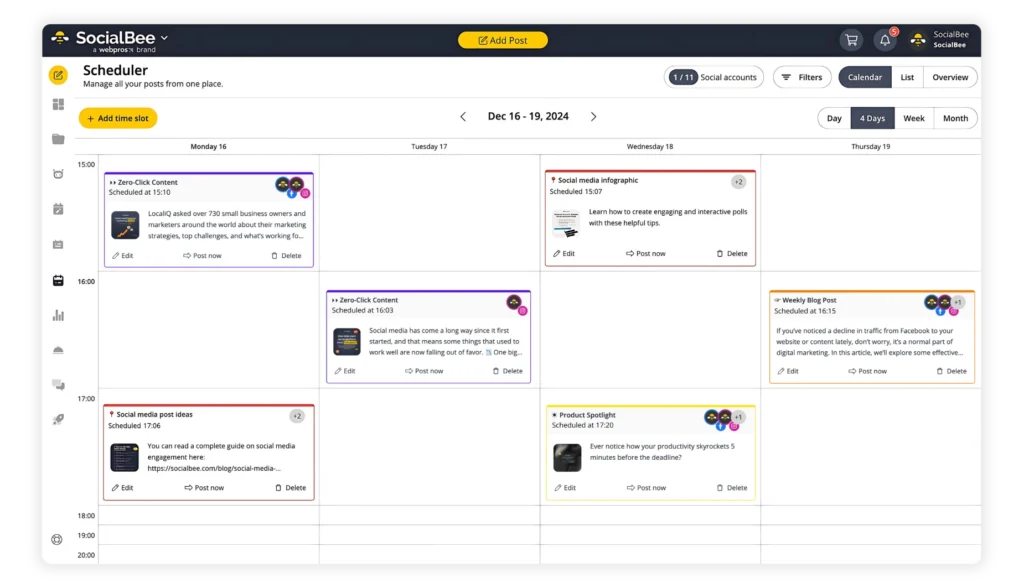
This makes it easy to spot issues that aren’t obvious when looking at posts individually. For example, I can immediately see if I’ve scheduled too many posts from the same category in a short window, or if there are days where nothing is planned at all.
Adjustments are straightforward. I can reschedule posts to different days, change their time slots, or move them between categories if needed. I can also switch between views, like weekly or monthly, depending on how far ahead I want to plan.
This step is less about scheduling and more about refining the distribution. The calendar acts as a final check to make sure content is spaced out properly, covers all key categories, and aligns with how I want my content to show up across different organic channels.
3. Leave room for trend-based or spontaneous content
I don’t fill every available slot in advance.
Some posts need to be created and published quickly to stay relevant. That could be a response to a trend, a new feature, or a conversation happening in real time.
Keeping a few open slots each week makes it possible to act on those opportunities without disrupting the rest of the schedule.
4. Maintain 2–3 weeks of scheduled content as a buffer
I keep at least two to three weeks of content scheduled ahead.
This removes the pressure to create content daily and reduces the risk of gaps in publishing. If something delays content creation, the schedule continues without interruption.
When I add new content, it extends the schedule further instead of filling urgent gaps. Over time, this keeps the distribution stable and predictable.
Phase F: Monitoring & Optimization
1. Review performance weekly/monthly to identify patterns
I check performance of both my organic posts and my paid content distribution at fixed intervals, not constantly.
Weekly reviews help me catch short-term shifts, like a post format that suddenly starts getting more engagement. Monthly reviews are where I look at bigger trends, like which content categories are pulling more organic traffic over time.
What matters at this stage is consistency. Looking at valuable data in batches gives a clearer picture than reacting to individual posts.
In SocialBee, I use reports to get a structured view of performance over a defined period. Instead of checking posts one by one, I can see how entire categories or platforms performed during that timeframe.
2. Repeat top-performing content and formats
When a post performs well, I don’t treat it as an isolated result.
I turn it into something repeatable.
That usually means taking the same structure or idea and building a series around it. For example, if one post about a specific mistake performs well, I’ll create similar posts that cover related mistakes or variations of that topic.
I also use this as a starting point for content syndication. A strong idea doesn’t stay on one platform. I adapt it across other channels and media formats, turning a single post into multiple high-quality pieces like videos, carousels, or longer-form content. This not only increases reach but also strengthens search engine rankings, since consistent, high-quality content across other reputable websites signals relevance and authority and will drive traffic.
This is how formats evolve into content pillars over time and how I build an effective content distribution strategy. Instead of testing random ideas, I’m expanding on what already connects with a broader audience.
3. Adjust content plan based on analytics insights
I don’t optimize content by tweaking single posts after they’re published. I adjust the system that produces them, using information from analytics tools like SocialBee or Google Analytics.
That includes:
- Shifting how often certain categories are scheduled
- Reducing formats that consistently underperform
- Increasing the presence of formats that drive social media engagement or clicks
- Rebalancing platforms based on where results are stronger and where I have a wider audience
These changes happen inside the existing structure, so I’m not rebuilding the content distribution plan every time something changes.
Over time, this creates a feedback loop. Each round of content improves the next one because the system keeps adapting based on real results, and it leads to a strong online presence.
How I turn my content distribution into an organized system with SocialBee
Everything I’ve described so far only works if it’s easy to execute. Otherwise, instead of a robust content distribution strategy, it turns into another plan that looks good on paper but breaks in practice.
This is the exact setup I use in SocialBee to keep content distribution structured and manageable:
- I start by connecting all my social media accounts and grouping them into a workspace. This keeps each brand or client separate and gives me one place to manage content assets, scheduling, and performance without switching between platforms.
- Next, I define my content categories based on the pillars I want to maintain, like educational content, proof, or product-related posts. Each category acts as a queue of posts and has its own posting schedule, so I’m not deciding when to publish every time I create something.
- When I create content, I batch it. I write multiple posts in one session, then add visuals or videos in another. As I go, I add each post to its category so it’s already part of the distribution system.
- If I’m working from existing content, like a blog post or video, I break it down into smaller pieces and create multiple posts from it. When I need more ideas or variations, I use SocialBee’s AI content generator to expand on topics or generate different angles I can test.
- Before scheduling, I customize each post for the platform it’s going to. That includes adjusting captions, visuals, hashtags, and small details like removing links where they don’t work or adapting the format to match how people consume content on that platform.
- Once the posts are ready, I either assign them to their category, which will publish them based on the predefined schedule, or I set a specific date and time if the post is tied to something time-sensitive.
- For evergreen content, I enable re-queuing so posts go back into the category after being published and continue circulating. If a post shouldn’t run indefinitely, I set an expiration limit based on a date or number of shares, so it stops automatically.
- If I’m working with a team or a client, I keep everything inside SocialBee. I prepare content in batches, move it into the approval stage, and use notes directly on each post to handle feedback. Once approved, the post moves forward without needing external tools or version tracking.
- Before everything goes live, I review the content calendar. This gives me a clear view of how posts are distributed over time, so I can adjust spacing, fix gaps, or rebalance categories if needed.
- After publishing, I check performance regularly using SocialBee’s analytics. I look at how categories, formats, and platforms perform over time, then use that data to adjust my categories, posting frequency, and content approach for the next cycle.
Frequently asked questions
How often should I post on social media?
Post as often as you can maintain quality and consistency. For most brands, that means 3–5 times per week on core social media sites, with higher frequency on fast-moving platforms like X or TikTok. The exact number depends on your audience, content type, and resources, so tracking key metrics is a must. A consistent schedule matters more than posting daily for a short period and then stopping.
What are the best social media platforms for brands?
The best platforms are the ones your target audience actively uses and engages with. For B2B brands, LinkedIn and YouTube often perform well. For visual or consumer-focused brands, Instagram, TikTok, and Pinterest are strong options. Local businesses usually benefit from Facebook and Google Business Profile. Instead of trying to be everywhere, focus on 2–3 different social media platforms that align with your goals and content format.
How can I schedule my social media posts?
You can schedule social media posts using a social media management tool like SocialBee. These social media tools let you create posts in advance, assign them to categories or time slots, and automatically publish them across multiple platforms. This removes the need to post manually and helps you stay consistent while managing multiple social media accounts.
Time to get your content out there
For a long time, I treated content distribution as something I’d figure out after publishing. That made everything harder. Content felt inconsistent, results were unpredictable, and I was always trying to keep up.
What changed things for me was building a system for social media sharing.
Once you have clear categories, a defined schedule, a content buffer, and a simple approval flow, distribution becomes predictable. You know what’s going out, when it’s going out, and how it fits into your broader content strategy.
Using SocialBee helped me keep all of that organized in one place. I can plan content, schedule posts across platforms, manage approvals, and track performance without switching between tools. That structure is what allows the system to actually work day to day.
If you’ve been posting without a clear process, start simple. Choose your main platforms, define a few content categories, and plan your next week of content in advance. That alone brings more clarity than most people have.
From there, you can build toward a system that runs consistently in the background and gives you room to focus on improving your content instead of constantly managing it.
If you want to put this into practice, you can start a 14-day free trial of SocialBee and set up your own social media distribution system step by step.