Illustration of a social media content layout showing multiple posts arranged in a grid. The posts include product images, lifestyle items like headphones and a water bottle, and a “grand opening” announcement, with placeholder text and profile icons, representing content planning and organization across platforms like Instagram.

How I organize my content to never miss or repeat a post

Organizing social media content is the only way I’ve managed to stay consistent across multiple platforms without missing posts or losing track of what needs to go out.

At some point, managing social media stops being about individual posts. As a social media manager, you’re dealing with drafts, scheduled content, different formats, and multiple social accounts all at once. If there’s no clear structure behind it, it gets messy fast.

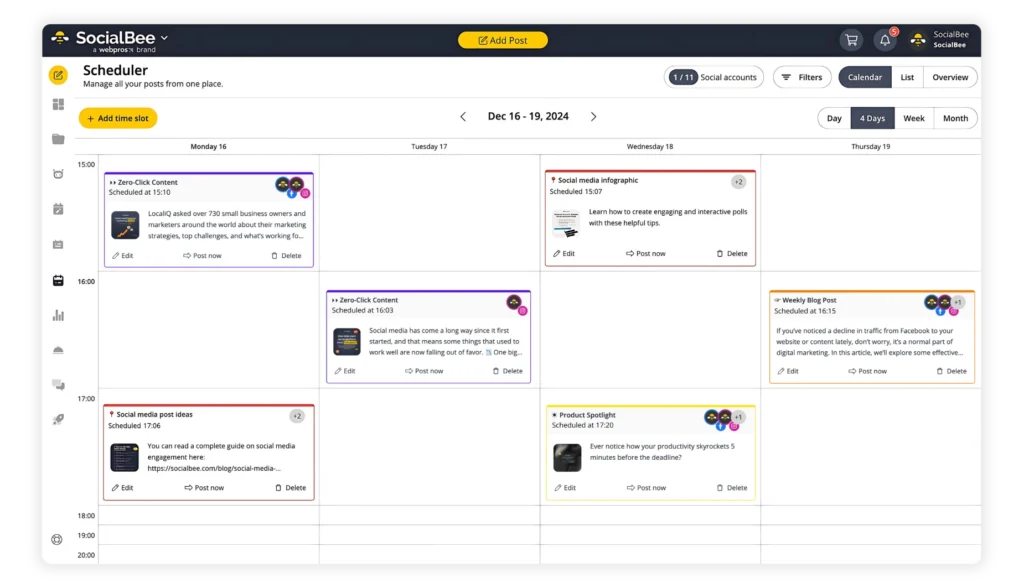
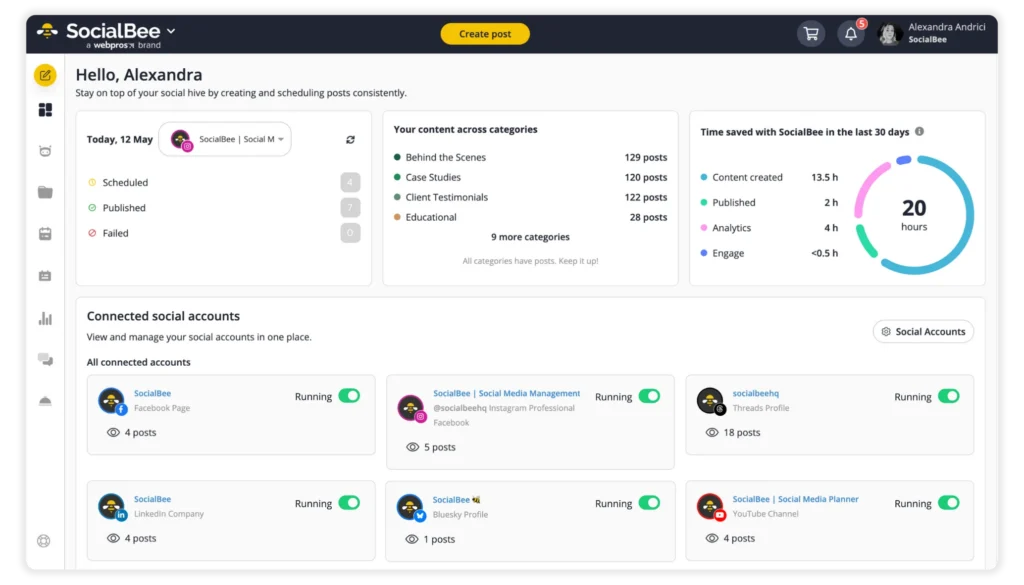
This is the system I use to keep everything organized so I know what’s going out, what’s already been published, and what still needs work.

Social Media Strategy Template
Streamline your marketing with an efficient social media strategy template.

We’re SocialBee LABS SRL, part of WebPros. We use the information you provide to share relevant content and product updates, as outlined in our Privacy Policy. You can opt out anytime.

Short summary

  • Organizing content starts with keeping everything in one place, so you’re not jumping between drafts, content management tools, and various channels.
  • Setting up content categories based on your content pillars helps structure your social media posts and prevents repetition or imbalance.
  • Batch-creating content, saving posts as drafts, and having team members review and approve them makes the process faster and easier to manage on a weekly basis.
  • Customizing and scheduling posts across platforms makes it faster to cross-post content and saves time, instead of logging into different platforms at posting time, creating posts from scratch, and sharing them manually.
  • Repurposing high-performing content reduces the need to constantly create from scratch and helps you get more value from each idea.
  • Using evergreen content and republishing it on a set schedule keeps your social media presence active without requiring daily posting or constant manual effort.
  • Using a social media management platform like SocialBee, I rely on the calendar view to review my content before publishing. It helps me quickly spot gaps, overlaps, and issues with content consistency across all my social channels.
  • Tracking performance monthly shows which posts and formats drive the most engagement, so you can adjust your content strategy based on real social media metrics.

How not being organized on social media held me back

The biggest issue was that I had no clear view of my own social media content.

I’d open a document with draft posts, check a separate social media content calendar, then scroll through my social media accounts to figure out what had already gone live. Nothing matched. My social media data was scattered, and that made even simple decisions harder than they should’ve been.

A few things kept happening:

  • I spent way too much time double-checking that I hadn’t posted the same type of content recently and somehow still made that mistake. The content mix would end up repeating anyway.
  • I had to constantly chase content teams and clients for reviews and approval processes. This usually meant long email threads, scattered messages, and a lot of back-and-forth just to get one post approved.
  • I was also posting everything manually. I had to remember to publish at the right time, set reminders, and repeat the same small tasks over and over again.

That last one was especially frustrating. Even when I had content ready, actually getting it posted felt like a chore.

Over time, it started to show. Instead of a balanced mix of content, things felt inconsistent and unplanned. Some days I’d overthink every post, other times I’d rush just to get something out.

What I realized is that the real problem wasn’t the content itself. It was the lack of a system to organize everything in a way that actually supports a consistent social media strategy.

How I organize my social media content without feeling overwhelmed

Once I cleaned up my process, my day-to-day schedule changed more than my strategy.

I stopped wasting time trying to figure out where things were. I stopped second-guessing posts. And I could actually focus on creating content instead of managing chaos behind the scenes.

Here’s the step-by-step process I use to keep my social media content organized:

  1. Set up a shared workspace for teams, clients, and accounts
  2. Define content pillars to structure and rotate posts
  3. Build a backlog of content ideas to never run out of posts
  4. Collect and repurpose high-value content to save time on content creation
  5. Batch-create content ahead of time
  6. Work with templates so content isn’t designed from scratch every time
  7. Prepare platform-specific versions for cross-posting without errors
  8. Plan evergreen content to maintain a buffer
  9. Batch approvals to prevent back-and-forth chaos
  10. Schedule posts in advance across all platforms from one place
  11. Review the full content calendar before publishing
  12. Monitor performance monthly to inform future content

Step 1: Set up a shared workspace for teams, clients, and accounts

The first fix was setting up a shared workspace where everyone involved can access the same content and accounts.

When you’re managing multiple projects and clients or different social media platforms, things break down fast without clear visibility and structure. You need a system where team members and clients can log in, see what’s planned, and understand their role in the process.

I use SocialBee for this because it lets me separate content projects by brand or client without mixing anything up. Each workspace has its own social media calendar, its own content, and its own schedule. When I switch from one project to another, I’m not digging through files trying to remember what belongs where thanks to its advanced features.

It also makes working with other people a lot easier. If someone needs to review post content or approve something, it’s already there. No screenshots, no sending Google Docs back and forth, no confusing color-coded labels and wondering about which version is final.

This step doesn’t feel strategic, but it is. Once content is in one place, content marketers stop losing time on small decisions. And that’s what makes the rest of your social media strategy easier to run.

Step 2: Define content pillars to structure and rotate posts

Once everything was in one place, the next problem became obvious. I had content, but no structure behind it.

I use content pillars to decide what I post, how often I post it, and how everything fits into my overall social media content strategy. Without them, it’s easy to default to whatever feels easiest in the moment, which usually leads to repetitive or unbalanced social posts and can hurt audience experience.

Here’s how I think about it:

  • What type of content actually helps my target audience?
  • What supports my marketing strategy, not just short-term engagement?
  • What mix keeps my audience engaged without overwhelming them?

For example, my content usually falls into a few clear buckets:

  • Educational content (written content with how-to guides, deep dives, insights)
  • Promotional content (offers, product updates, case studies)
  • Engaging content (questions, opinions, quick takes)
  • Social proof (user-generated content, testimonials, influencer content)

Once I defined these, effective content organization became much easier. I wasn’t deciding what to post from scratch every time. I was choosing from a structure that already made sense.

Inside SocialBee, I quickly find the content I need because I organize my posts into categories (which act like folders for my posts) based on these content pillars. Each category has its own posting schedule, so I’m not manually deciding what goes out every day. The system rotates my content automatically, which keeps my social media presence balanced without extra effort.

That’s what helped me move from random posting to a consistent, intentional content plan.

Step 3: Build a backlog of content ideas to never run out of posts

Even with content pillars in place, there’s still one thing that slows most people down: starting from zero every time they sit down to create content.

I used to do that too. I’d open a blank page and try to come up with something to post, hoping that inspiration strikes. It worked, but it was slow and inconsistent.

Now I don’t rely on the moment. I keep a backlog.

This is just a running list of content ideas tied to my pillars. Anytime I see something worth sharing, a trend, a question from my audience, a good post from other accounts, I add it to that list.

A few sources I use regularly:

  • Comments and questions from my own social media accounts
  • Posts from other accounts in my niche that get strong audience engagement
  • Trending topics that fit my brand voice
  • Previous content that performed well and can be expanded into new formats
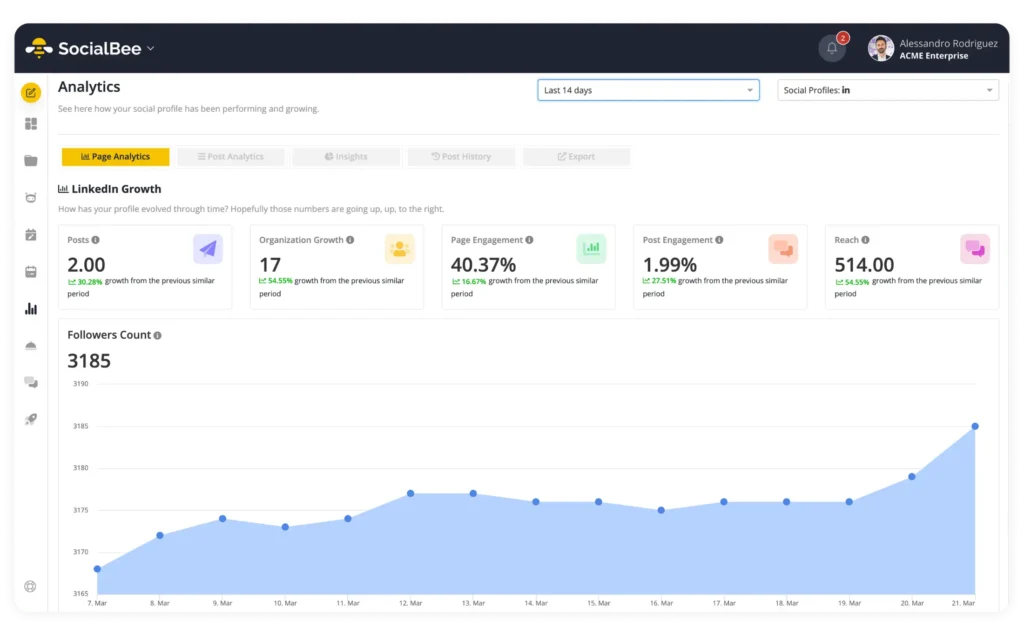
  • Insights from social media data and analytics

This way, when it’s time to create content, I’m picking from ideas that already make sense for my audience and my social platforms. This also contributes to a cohesive brand image. 

Step 4: Collect and repurpose high-value content to save time on content creation

I used to move on too quickly from what I had already posted.

If existing content performed well, I’d notice it, maybe feel good about it for a second, then go straight back to creating something new. Over time, that turned into a lot of unnecessary work.

Now I pay attention to what actually resonates and build from it.

When a post gets strong engagement, I don’t treat it as finished. I break it down and reuse the core idea in different formats, depending on the platform and content type.

For example:

  • I turn high-performing short posts into longer LinkedIn or blog articles
  • I split long-form content into multiple social posts, each focused on one key idea
  • I take strong discussion topics and revisit them with a different angle or updated perspective
  • I extract key moments from videos or podcasts and turn them into short-form clips for platforms like TikTok or Instagram Reels
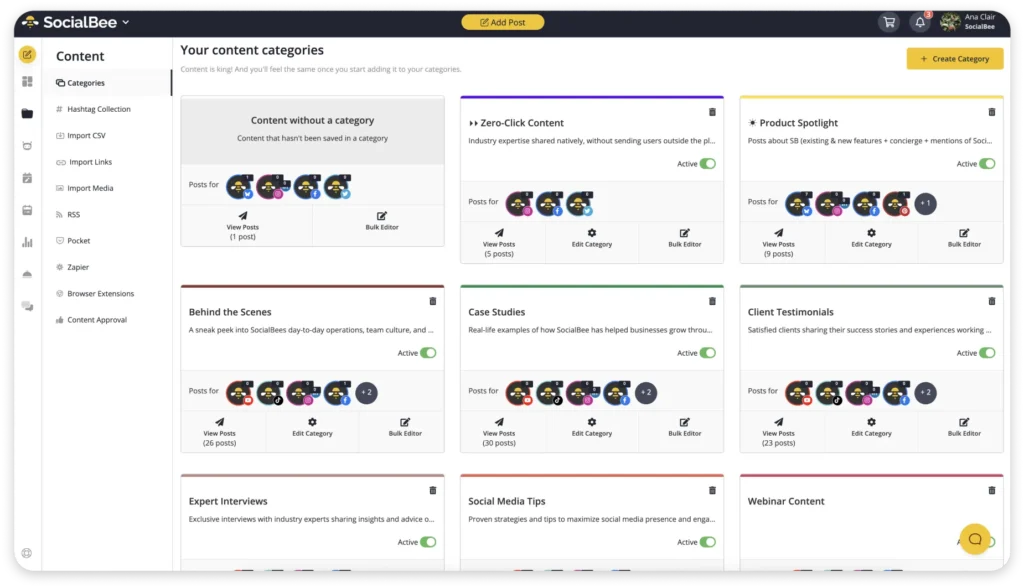
  • I rework educational posts into carousel content to make them easier to consume

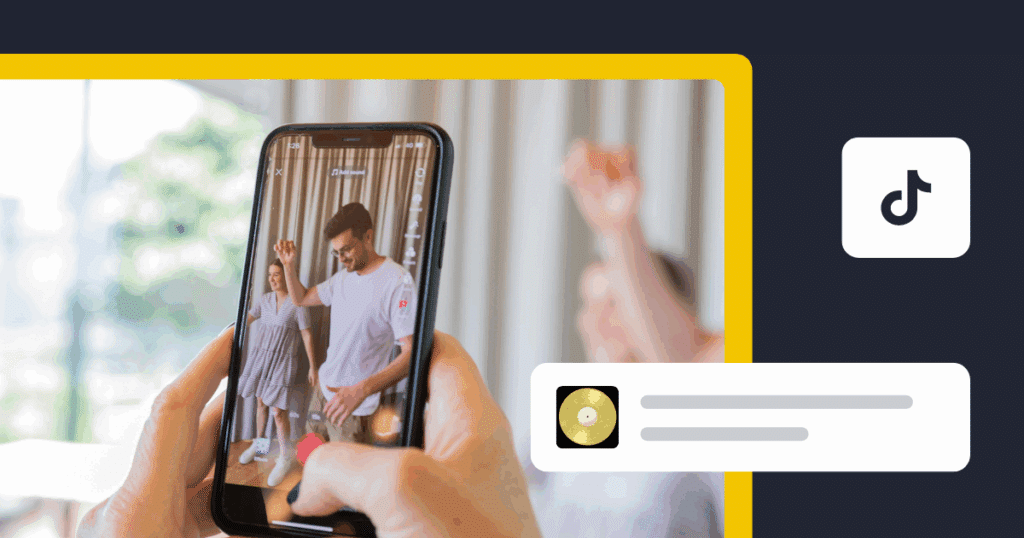
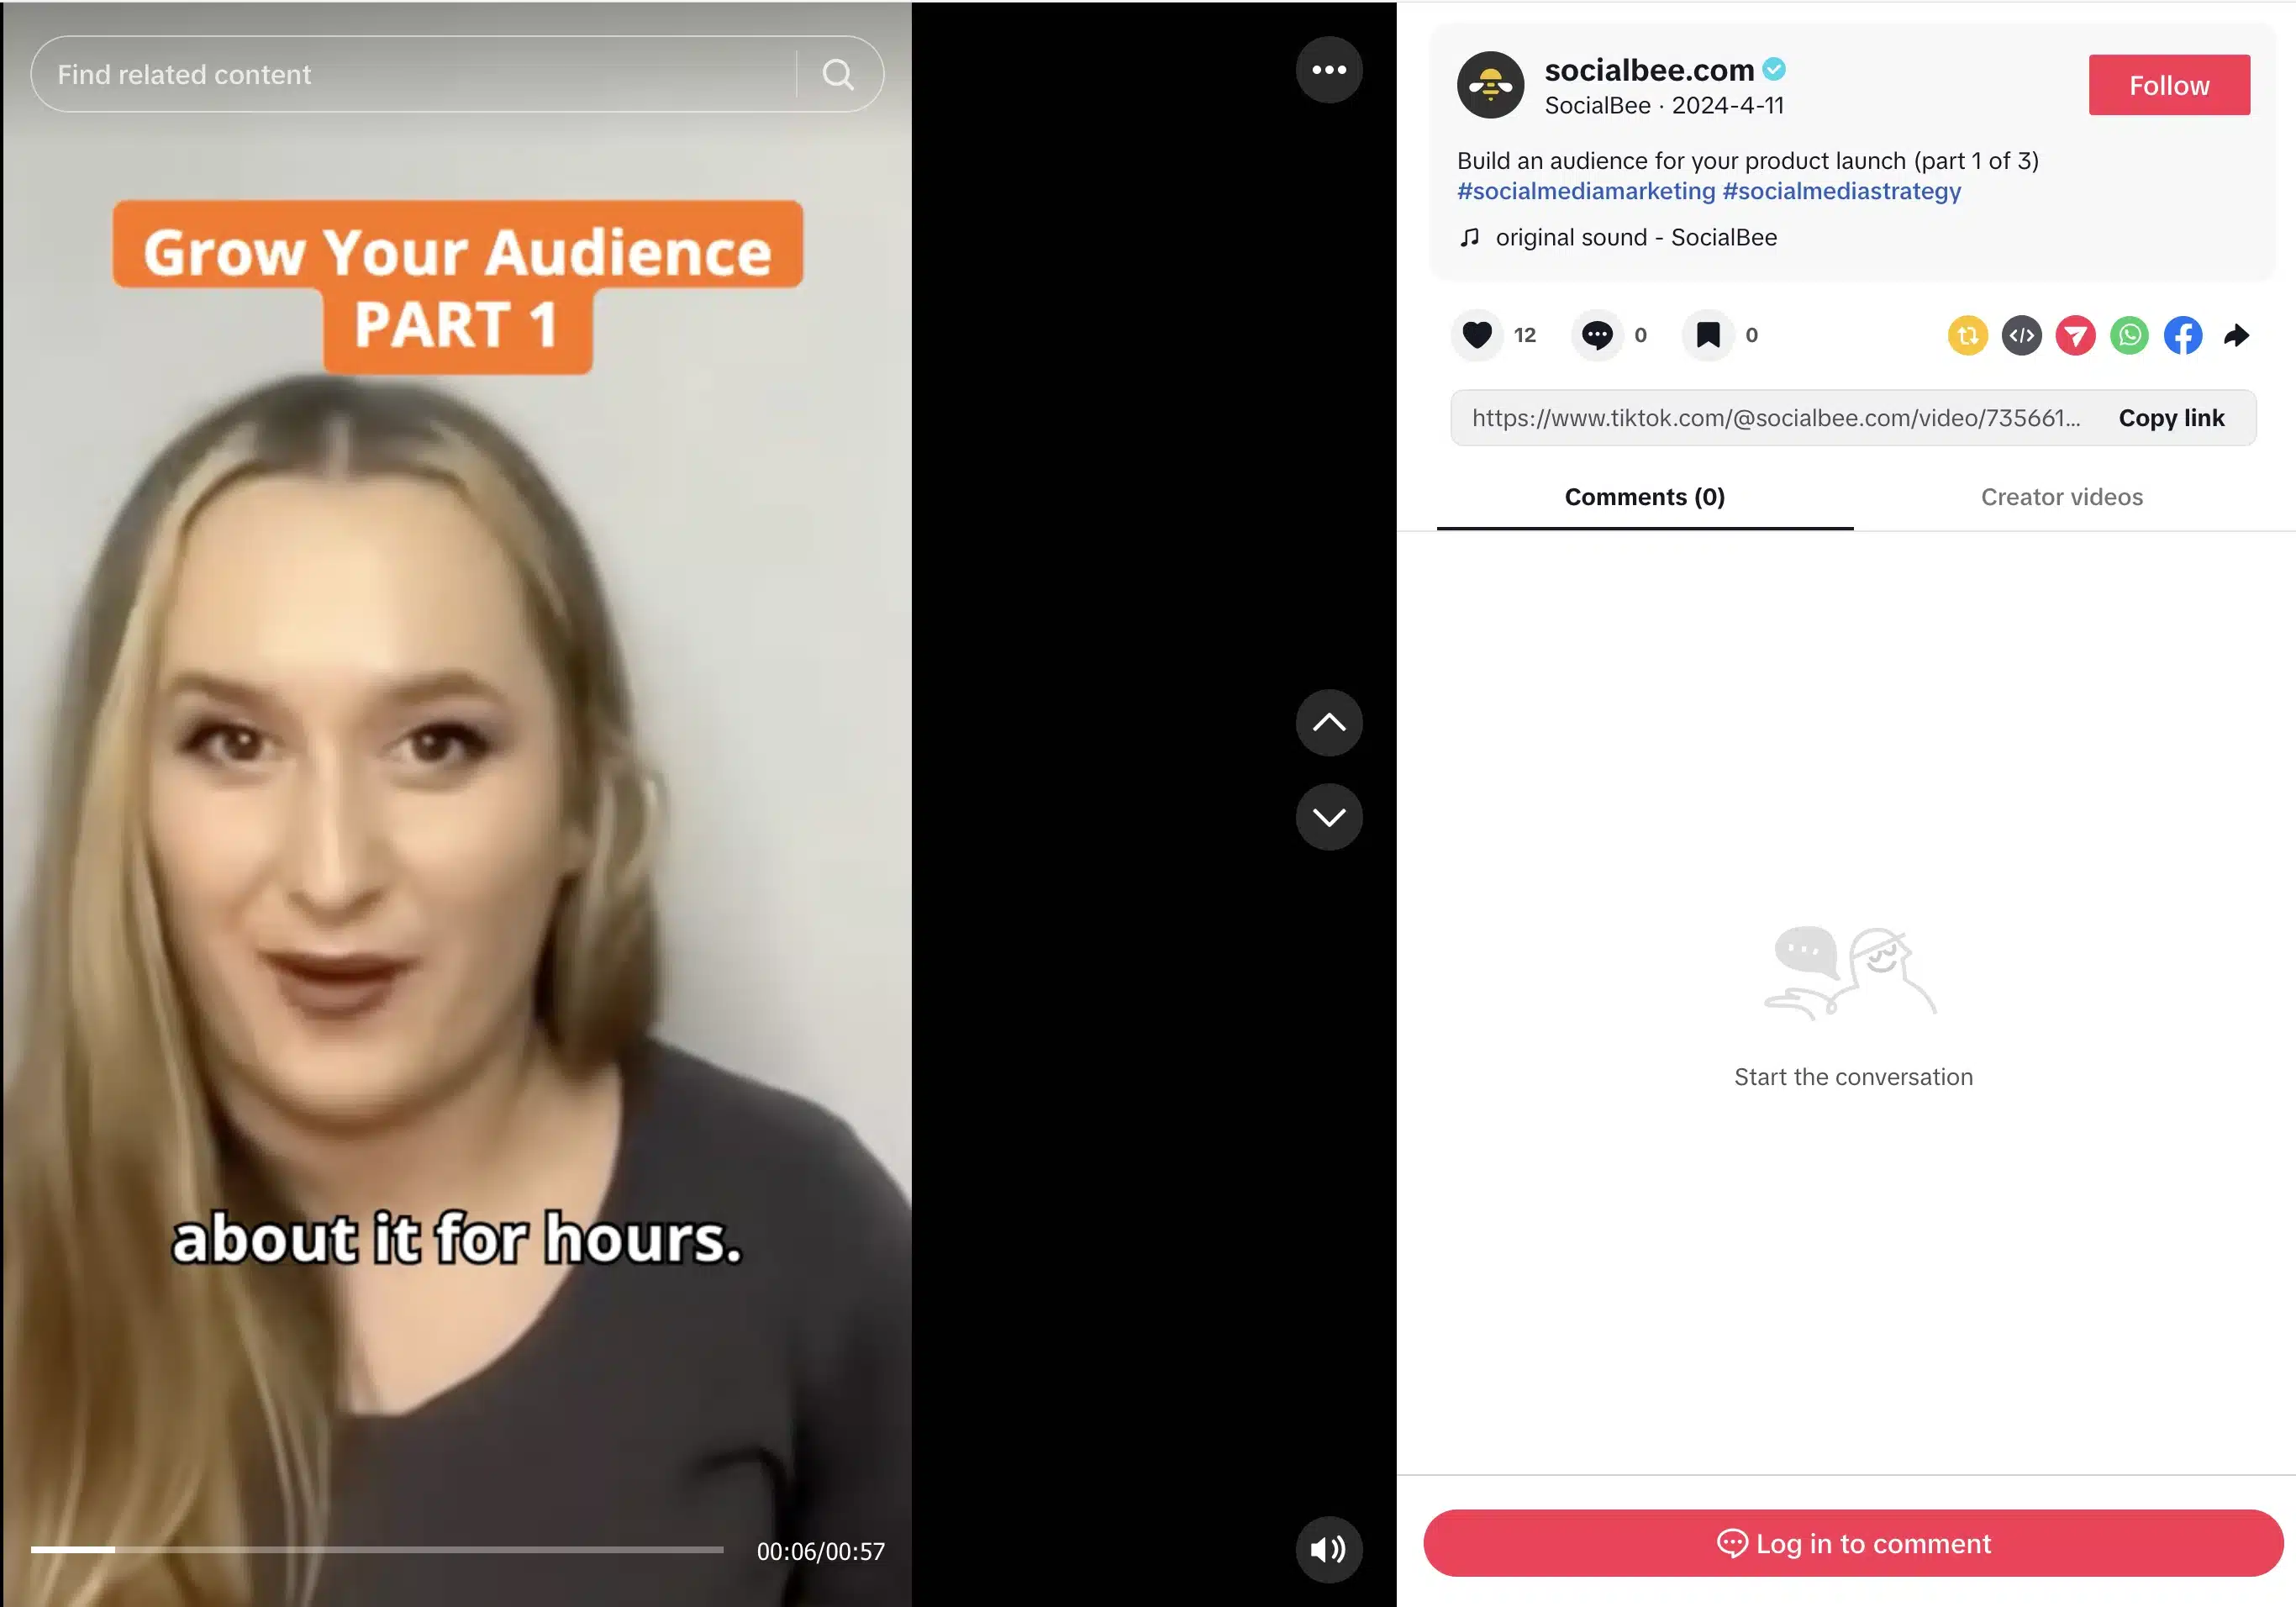
This TikTok was taken from one of SocialBee’s webinars and turned into a short, vertical video. We thought the information shared in this particular snippet would be valuable to our social media audience as well, so we repurposed it and adjusted it to the right format:

TikTok video screen showing a woman speaking to camera with on-screen text “Grow Your Audience Part 1” and subtitles. The interface includes the SocialBee account, caption about building an audience for a product launch, engagement icons, and comment section on the right.

The idea stays the same, but the execution changes.

This approach makes the content creation process more efficient. I’m not starting from zero every time, and I’m not relying on new ideas to keep my social media presence active.

Instead, I’m building on what has already proven it can keep my audience engaged and turning one post into multiple pieces of relevant content.

And when I bring those ideas into SocialBee, I can quickly turn them into draft posts, adjust the post copy for different platforms like LinkedIn content or Instagram posts, and schedule everything in advance.

Step 5: Batch-create content ahead of time

Creating content every day sounds productive, but in practice, it slows things down.

What worked better for me was setting aside focused time to create multiple posts in one sitting. Instead of jumping in and out of content creation throughout the week, I handle it in blocks.

When I do this, I’m not starting from scratch. I already have a backlog to pull from, the one I mentioned in step 3, so I can move through ideas quickly.

Instead of jumping between tasks, I focus on one type of content at a time. I might block a few hours just to edit video clips, then switch to designing visuals, and later write the posts. This helps me stay in a rhythm and avoid the mental reset that comes from constantly switching contexts.

I also plan each task around when I’m most productive. Writing takes more focus, so I do it in the morning when my mind is clear. Editing or design work comes later, when I don’t need the same level of concentration.

Once I’m in that content flow, I can write several posts, adapt them for different platforms and marketing campaigns, and prepare visuals or video content much faster than if I handled everything one piece at a time.

This approach makes the work feel more contained. I know when I’m creating, and I know when I’m not.

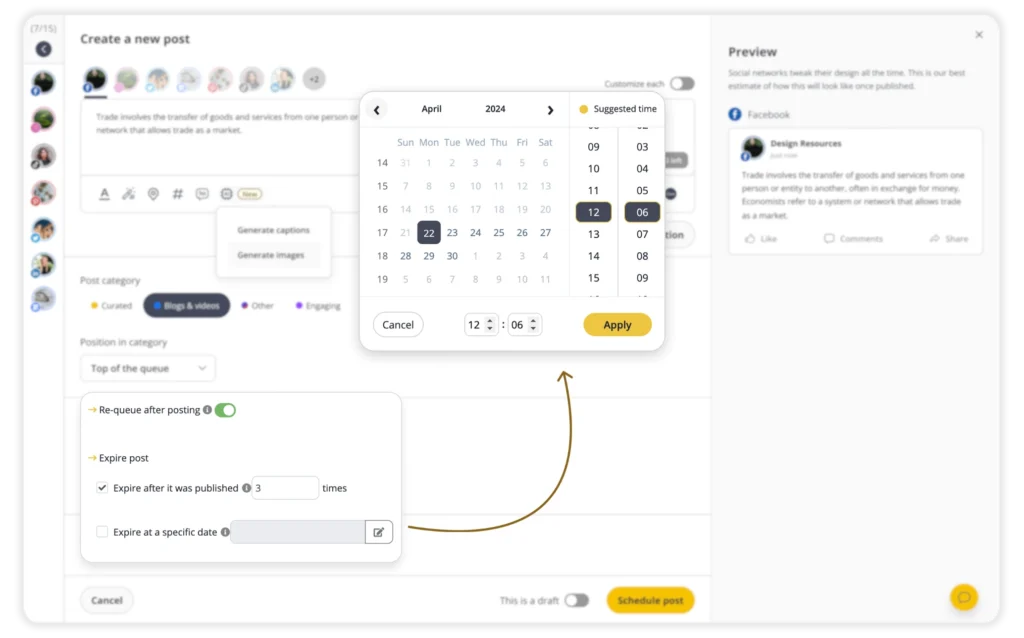
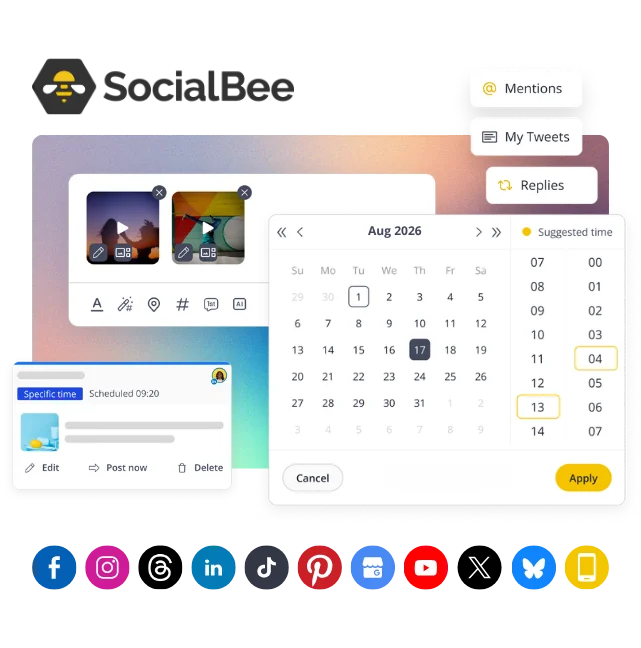
Once the content is ready, I move straight into scheduling. With SocialBee, I can line up posts across all my social media accounts without switching between tools. I either assign them to categories with an existing schedule or set specific times based on when I want them to go out.

Step 6: Work with templates so content isn’t designed from scratch every time

At some point, I noticed I was solving the same problems over and over. How to structure a post. How to write the hook. How to format it.

That doesn’t scale.

Now I rely on a few simple templates. Not rigid ones, just patterns I reuse. A short post with a clear takeaway. A breakdown-style post. A quick how-to guide. Once I know the format, I can focus on the idea instead of rebuilding the structure.

The same applies to visuals. I reuse layouts and swap out the message. It keeps everything consistent and saves time without making the content feel identical.

Step 7: Prepare platform-specific versions for cross-posting without errors

I don’t copy and paste the same post across platforms anymore.

I write one version first, then create variations from it.

For example, I might write a full LinkedIn post, then shorten it for another social platform, or change how the message is framed for Instagram posts where visuals matter more.

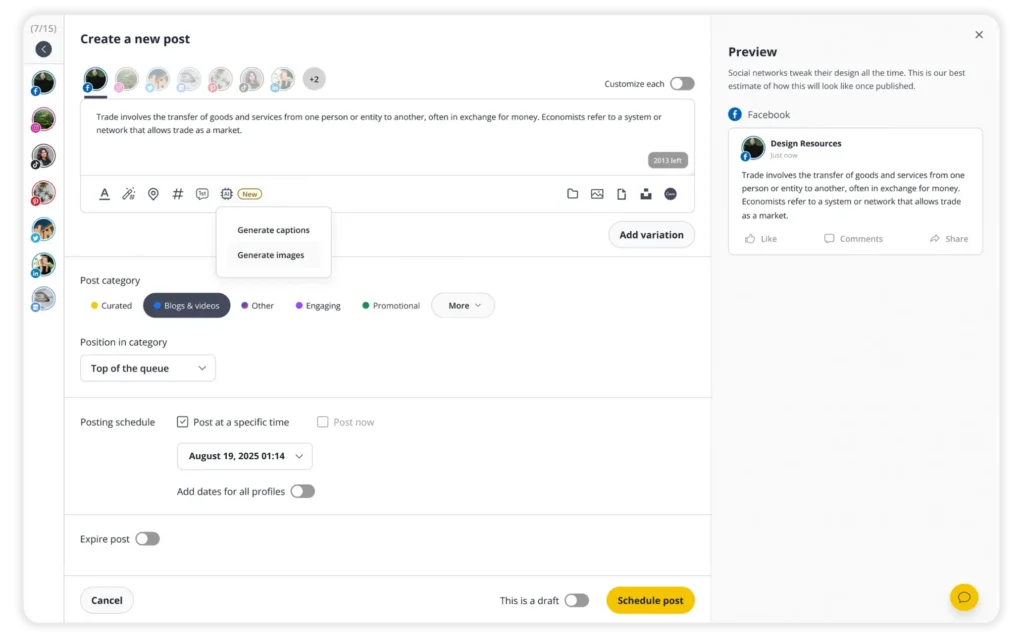
In SocialBee, cross-posting happens directly inside the post editor.

When I create a post, I can select multiple social media accounts at once. Instead of forcing one version across all platforms, SocialBee lets me customize the post per platform.

Here’s how I use it:

  • I write the base version of the post.
  • Then I switch between platforms inside the editor (for example, LinkedIn, Instagram, Facebook).
  • For each one, I adjust the post copy, hashtags, and sometimes the media.
  • I schedule the posts across all my social media platforms from the same place

Each version stays linked to the same post, but it’s edited separately.

So instead of creating three different posts from scratch, I’m working from one idea and tailoring it where needed.

This solves a problem that shows up quickly when you’re posting across different platforms. You don’t risk publishing the wrong format, and you don’t waste time duplicating work. Everything is organized in one place, but still adapted to how each platform works.

Step 8: Plan evergreen content to maintain a buffer

Repurposing helps you get more out of what you already created. Evergreen content is what keeps your schedule running when you’re not creating anything new.

I didn’t think about this early on. If I stopped posting for a few days, everything slowed down. There was no buffer. No content ready to go.

Now I plan for that.

I keep a set of evergreen posts that don’t depend on timing. These are usually how to guides, educational content, or simple posts that answer common questions from my target audience. They’re not tied to trends or announcements, so they stay relevant over time.

In SocialBee, that’s handled through the re-queue setting inside each content category.

When re-queue is turned on, a post doesn’t disappear after it’s published. Instead, it goes back to the bottom of the category and gets scheduled again automatically the next time that category has a slot.

What makes this practical is that you’re not stuck with content repeating forever.

For each post, you can set it to expire. That means you decide how long it stays in rotation. For example, you can:

  • Let it run indefinitely
  • Stop it after a certain number of posts
  • Set it to expire on a specific date

Once that condition is met, the post is removed from the queue automatically.

Step 9: Batch approvals to prevent back-and-forth chaos

Approvals used to slow everything down for me.

I’d send posts one by one, wait for feedback, make edits, resend them, and repeat. It broke the flow of content creation and made even simple updates take longer than they should.

Now I handle approvals in batches.

Instead of sending individual social media posts, I prepare a group of draft posts and move them through review together. That way, feedback comes in one round, not ten separate ones.

Inside SocialBee, this is built into an efficient workflow.

Each post can stay in draft, then move to approved once it’s reviewed. If I’m working with a social media team or clients, they can leave comments directly on the post and approve it there. No emails, no separate documents, no confusion about which version is final.

Step 10: Schedule posts in advance across all platforms from one place

I don’t post manually anymore. It’s too easy to forget, delay, or rush something.

Instead, I schedule everything in advance.

In SocialBee, I either:

  • Assign posts to a category that already has a schedule
  • Or pick a specific date and time for that post; if you choose a specific date, SocialBee suggests the best times to post based on your past performance

That’s it.

If a category is set to post, for example, every Monday at 10, anything I add there will go out in that slot. I’m not choosing times over and over again.

I can also select multiple social accounts when creating a post, so I’m not jumping between platforms to schedule the same thing.

Once it’s set, it runs on its own.

Step 11: Review the full content calendar before publishing

This is where I step out of “post mode” and look at everything as a whole.

When you’re creating content one post at a time, it’s easy to miss patterns. You don’t notice repetition, gaps, or how your content actually looks across a week.

So before anything goes live, I open the calendar view in SocialBee and review it like a timeline.

I’m not editing posts here. I’m checking the structure:

  • Am I posting too many similar posts back to back?
  • Does the mix of content pillars make sense across the week?
  • Are there empty days where I should be showing up?
  • Am I overloading certain days with too many posts?

SocialBee’s calendar shows all scheduled posts across my social accounts in one place, so I can spot these issues quickly.

If something feels off, I go back into the post itself and adjust the date or move it to a different category. It’s a small step, but it keeps the content plan intentional instead of accidental.

Step 12: Monitor performance monthly to inform future content

This is where most people either overdo it or skip it completely.

Checking performance after every post leads to second-guessing. Ignoring it means repeating the same mistakes.

What works better for me is a monthly review of key performance indicators.

I go into SocialBee and look at my social media data across platforms in one place. What I’m trying to do is understand patterns.

Here’s what I actually analyze:

  • Which posts consistently get the most engagement, not just one-offs
  • What type of content drives comments or conversations, not just likes
  • Which formats perform better on each platform (text, visual content, video content)
  • What topics bring in new social media followers or profile visits
  • Which posts underperform, even when they seem like they should work

Then I compare that against my content plan.

If I planned to focus on educational content, but most engagement comes from opinion-style posts, that tells me something needs adjusting. If short-form video is outperforming everything else, I know where to shift my effort.

SocialBee makes this easier because the data is already grouped by post and platform. I don’t need to manually track anything or pull reports from different tools. Instead, I can export PDF reports that clearly showcase results and share them with clients easily to align on the same goal.

The goal here is to spot what works repeatedly and build more of that into the next cycle.

How I turn my content strategy into an organized system with SocialBee

Having a content strategy on paper is one thing. Actually running it across various social media platforms without losing track of posts is something else entirely.

Here are the exact steps I use in SocialBee to keep my content organized:

  1. I start by separating my work properly. Each brand or project gets its own workspace, so content, drafts, approvals, and basic analytics don’t get mixed across social media accounts, even if each one is at different stages.
  2. Next, I define my content categories based on valuable content pillars. Instead of dealing with random social media posts, everything is grouped. Educational content sits in one category, promotional content in another, and so on. This is what gives structure to my social media content strategy.
  3. Then I batch-create content. I sit down and write multiple posts at once, prepare visuals or video content, and get everything ready in one go. This is where most of the actual content creation happens.
  4. Once the posts are written, I save ideas as drafts. If I’m working with someone else, I leave comments directly on the posts so feedback stays attached to the right version. When everything looks good, I move posts from draft to approved so I know they’re ready to go.
  5. After that, I customize each post for the platforms it will be published on. Inside the post editor, I switch between platforms and adjust the post copy, hashtags, and media. The idea stays the same, but the format fits each social channel.
  6. Then I assign each post to a content category. Each category already has a posting schedule, so I’m not setting times manually. SocialBee simply pulls posts from the category queue and publishes them in order.
  7. If a post is evergreen, I turn on the re-queue option. That way, after it’s published, it goes back into the category and gets posted again later. If I don’t want it to run forever, I set an expiration so it stops automatically after a certain number of cycles or a specific date.
  8. Before everything goes live, I check the calendar view. I’m not editing content here, just making sure the mix makes sense and there are no obvious gaps or clusters.
  9. Finally, I review performance. I look at which posts and categories drive the most engagement, clicks, or reach, and use that to adjust what I create next and how I organize my categories. You can use this exact process and all the features I mentioned to organize your content as well by starting your 14-day SocialBee free trial today. 

Frequently asked questions

What is the best way to organize social media content?

The best way to organize social media content and your marketing efforts is to combine structure with a clear process. Start by grouping your posts into content categories based on your content pillars, then assign each category a posting schedule. This removes the need to plan every post manually.

Keep all draft posts, approvals, and scheduled content in one place so you always know what’s ready and what’s missing. Without this setup, even a strong social strategy becomes hard to manage.

What’s the easiest way to manage multiple social media accounts or clients?

The easiest way is to separate everything from the start. Use dedicated workspaces or folders for each brand or client so content, approvals, and analytics don’t overlap. From there, manage all social media accounts from one tool instead of switching between platforms. This makes it easier to schedule posts, review content, and track performance without losing time or mixing things up.

How do I prevent creative burnout while staying organized?

Creative burnout usually comes from doing everything in real time. To avoid it, batch your content creation and build a backlog of ideas so you’re not starting from zero every day. Use templates to reduce repetitive work and rely on evergreen content to keep your social media presence active when you need a break.

This way, you’re not under constant pressure to create more posts, and your system keeps running even when you slow down.

Stay organized and consistent on social media

At this point, I don’t think about organizing my content anymore.

I open SocialBee, see what’s in draft, what’s approved, and what’s scheduled, and continue from there. I’m not checking multiple tools or trying to remember what I posted last week. Everything is already structured.

That’s what makes the process sustainable. The system runs in the background, and I can focus on creating content instead of managing it.

If your current setup feels scattered or hard to maintain, the easiest way to fix it is to centralize everything and add structure step by step.

If you want to see how this changes your content game, try SocialBee and set up your own content process. You can start your 14-day free trial and build a system that keeps your content organized without constant effort.

SocialBee blog CTA box visual with the supported platforms
SocialBee: Your AI-powered social media scheduling tool
Create posts, publish, analyze, engage and collaborate, all from SocialBee.
Summarize this post

Manage your social media with SocialBee: publishing, AI assistance, Canva magic, analytics, unified inbox, and more.

SocialBee Supported Social Platforms with Round Logos
14-day free trial, no credit card required

Related articles

Level up your social media marketing with exclusive resources delivered straight to your inbox

We’re SocialBee LABS SRL, part of WebPros. We use the information you provide to share relevant content and product updates, as outlined in our Privacy Policy. You can opt out anytime.

Fill in the form and get our calendar delivered to your inbox

We’re SocialBee LABS SRL, part of WebPros. We use the information you provide to share relevant content and product updates, as outlined in our Privacy Policy. You can opt out anytime.
Grab our 2026 social media calendar and unlock 500+ content ideas and ready-to-use Canva templates!