
A social media approval process sounds like something you only need once your marketing team gets big. That’s what I used to think, too, until I found myself buried in Slack messages, email chains, and last-minute edits just to get a single social media post out.
At one point, I had more time spent chasing approvals than actually creating content. A caption would sit in a Google Doc, the design in Google Slides, feedback scattered across comments, and no clear “go ahead” from the people involved.
So I rebuilt my entire social media approval workflow from scratch.
What I’m going to walk you through in this article is the exact process I use now. It’s designed for real-world social media teams with multiple stakeholders, multiple approvers, and not a lot of time to waste. It keeps everyone on the same page and makes sure every piece of social content gets a proper final sign-off without slowing down publishing.
We’re SocialBee LABS SRL, part of WebPros. We use the information you provide to share relevant content & updates, as outlined in our Privacy Policy. You can opt out anytime.
Short summary
- A social media approval process defines the review stage and how posts are approved and published, ensuring every post maintains brand consistency and meets legal and regulatory standards as well as content quality before going live.
- Most workflows break down because feedback is scattered across tools, roles are unclear, and too many approvers slow down your social media efforts.
- Setting clear expectations early (review rounds, deadlines, final approver) prevents delays and keeps content moving.
- Assigning a single point of contact for feedback eliminates conflicting comments and reduces back-and-forth.
- Creating content guidelines, templates, and examples helps teams produce on-brand content faster with fewer revisions.
- Defining a clear workflow (Idea → Draft → Review → Approval → Schedule → Publish) keeps everyone aligned and removes confusion.
- Using structured roles and approval deadlines ensures accountability and prevents posts from getting stuck in drafts and feedback loops.
- Batching content and reviewing multiple posts at once speeds up approvals and keeps your content calendar full.
- Managing feedback, approvals, and scheduling in one place with a tool like SocialBee reduces friction and saves time.
- An efficient approval workflow helps your social media team create better content consistently.
What is a social media approval process, and why does it matter?
A social media approval process is the system your team uses to review, edit, and approve content before it goes live. It defines who creates the content, who reviews it, who gives the final sign-off, and when a social media post is ready to publish.
In practice, it connects every step of your social media process:
- The content creator drafts the post
- Stakeholders review content and provide helpful feedback
- Designated approvers give the final approval
- The post gets scheduled and published
This matters because social media content moves fast, and mistakes can sneak past you. Without a clear approval workflow, teams risk publishing off-brand posts, missing legal review, or pushing content that hasn’t been properly checked.
In my experience, a structured content approval workflow does three things:
- It keeps your brand voice consistent across every post
- It prevents last-minute edits that delay publishing
- It gives every stakeholder clarity on their role in the process
Why most social media approval workflows break down
Most social media approval workflows fail because there isn’t a real system behind them. Everything happens across different tools, and nothing is connected.
I’ve seen this happen over and over again. On paper, the process makes sense. In reality, it looks like this:
- Feedback sits in email chains, Slack messages, and scattered Google Docs
- No one is sure who gives the final approval
- Multiple stakeholders leave conflicting comments
- There’s no clear version of the post to work from
This slows everything down. Posts sit waiting for approval, and people lose track of what’s been updated, especially new team members who might still need mentoring. Instead of focusing on creating engaging content, teams spend their time chasing feedback.
Another issue I see often is too many approval steps. When every post needs input from multiple team members, including a marketing manager or legal team, things start to stall. Urgent posts miss their publish date, and scheduled posts start to pile up.
At that point, the process stops working. Deadlines slip, edits get rushed, and posts still go out with issues.
How I set up my social media content approval process for success
After dealing with missed deadlines, unclear feedback, and too many moving parts, I realized the problem wasn’t my team. It was the process.
I didn’t need more meetings or extra steps. I needed a clear approval process that everyone could follow without second-guessing what comes next.
So I rebuilt my content approval process around one simple goal: remove friction. Every step had to answer three questions. Who is responsible? What needs to happen? When is it done?
Here’s exactly how I set up my process so it runs smoothly, even with multiple stakeholders involved:
- Set expectations with clients and team members
- Assign a single point of contact for feedback
- Create simple content guidelines, examples, frameworks, and templates
- Define the steps your posts will go through
- Decide who is responsible for each step
- Approve post ideas and content pillars FIRST
- Set clear approval deadlines
- Create posts in batches and save them as drafts
- Review the post and leave feedback
- Approve the post when it is ready
- Schedule the posts for publishing
- Handle urgent or time-sensitive posts
- Revisit and improve your approval workflow
- Analyze performance and align the team on strategy
1. Set expectations with clients and team members
Before I create a single social media post, I define how the approval process works.
This step saves more time than anything else. If expectations aren’t clear from the start, every post turns into a back-and-forth.
Here’s what I always clarify upfront:
- How many review rounds are allowed: I usually limit this to one or two rounds of feedback. Anything more leads to endless edits and delays.
- How long approvals should take: I set a clear timeframe. For example, 24 to 48 hours for internal reviews. Without this, posts sit in limbo and miss their publish date.
- Who the final decision-maker is: There has to be one person with approval permission. Otherwise, you end up with conflicting feedback and no clear direction.
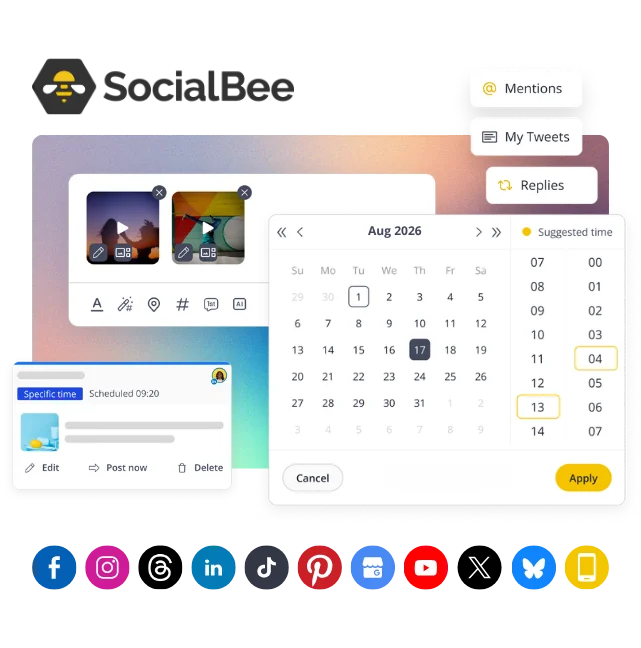
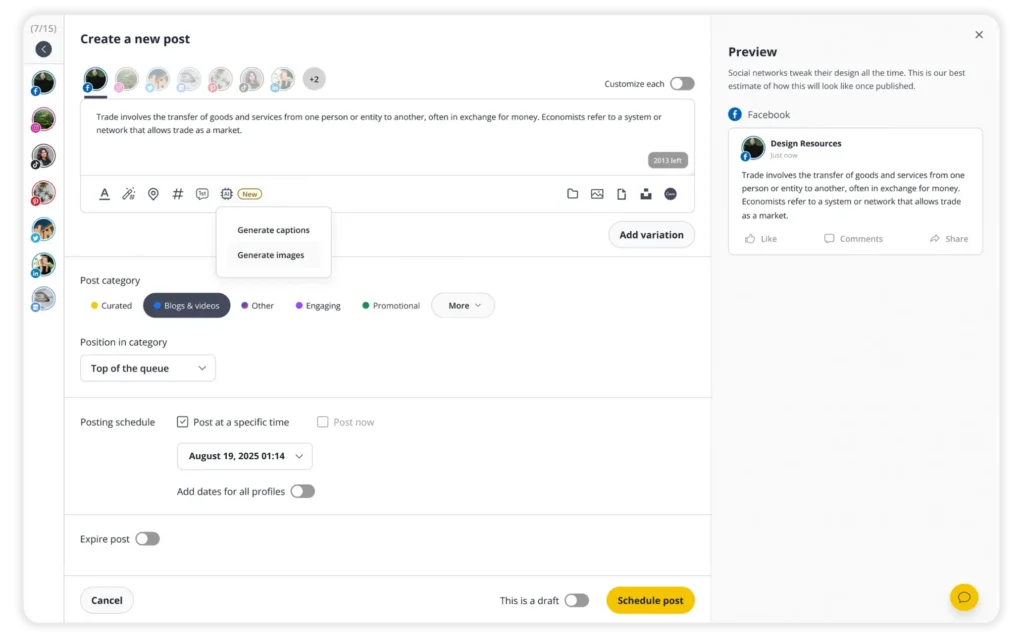
Instead of explaining this over email or scattered documents, I built it directly into my social media workflow process in SocialBee.
I can leave notes under each post, tag the right people, and track approval status without chasing anyone. Everyone involved sees the same version of the post, along with the feedback and approval step.
That clarity makes a huge difference. When expectations are set early and the process is visible, approvals move faster, feedback is more focused, and publishing becomes predictable instead of stressful.
2. Assign a single point of contact for feedback
Too many voices slow everything down. I’ve seen posts go through five different people, each leaving separate comments, and no one taking responsibility for the final direction.
That’s when feedback starts to conflict, and the approval process breaks.
What works better is simple. I ask the client or internal team to assign one main point of contact. That person gathers input from everyone else and sends back clear, consolidated feedback.
This keeps the process organized:
- You avoid conflicting requests from multiple stakeholders
- You get one clear direction instead of mixed opinions
- You reduce unnecessary back and forth
3. Create simple content guidelines, examples, frameworks, and templates
If your team keeps rewriting the same social media post over and over, the problem is usually the lack of clear brand guidelines.
Without structure, every draft turns into a discussion about tone, formatting, or small details that should already be decided.
So now, before creating content, I set clear rules.
Here’s what I include:
- Brand voice and tone. I define how the brand messaging should sound. Is it formal, casual, opinionated, or educational? This removes guesswork for every content creator, whether they work on captions, images, or the video creation process.
- Hashtag usage. I set limits and formats. For example, how many hashtags to use and whether they go in the caption or comments.
- Emoji rules. I clarify if emojis are part of the brand voice and how often they should be used.
- Link formatting. I standardize how links appear in posts so everything looks consistent across platforms.
But clear guidelines alone aren’t enough to create high-quality content. I also share examples of approved posts so the team knows what “good” looks like, along with simple caption frameworks and ready-to-use templates for recurring content like promotions, tips, or announcements.
Using tools can help maintain brand standards during the content creation process. Here are a few examples:
- Grammarly for grammar, clarity, and readability
- Sharethrough for analyzing headlines
- Canva for design
- Quetext for plagiarism
- Wordtracker for keyword research
4. Define the steps your posts will go through
If your team doesn’t follow a clear sequence, your approval process will always feel chaotic.
What worked for me was defining a simple path that every social media post follows, no exceptions. Once that’s in place, no one has to ask what comes next.
Here’s the structure I use:
Idea → Draft → Review → Approval → Schedule → Publish
Each step has a clear purpose:
- Idea: decide what the post is about
- Draft: create the caption and visuals
- Review: this is the time for quality control; collect feedback and make edits
- Approval: get final sign-off from the right person
- Schedule: assign a date to publish content
- Publish: let the post go live
This might look basic, but the clarity makes a big difference. Everyone involved knows exactly where a post is in the process and what needs to happen next once the approval notifications come through.
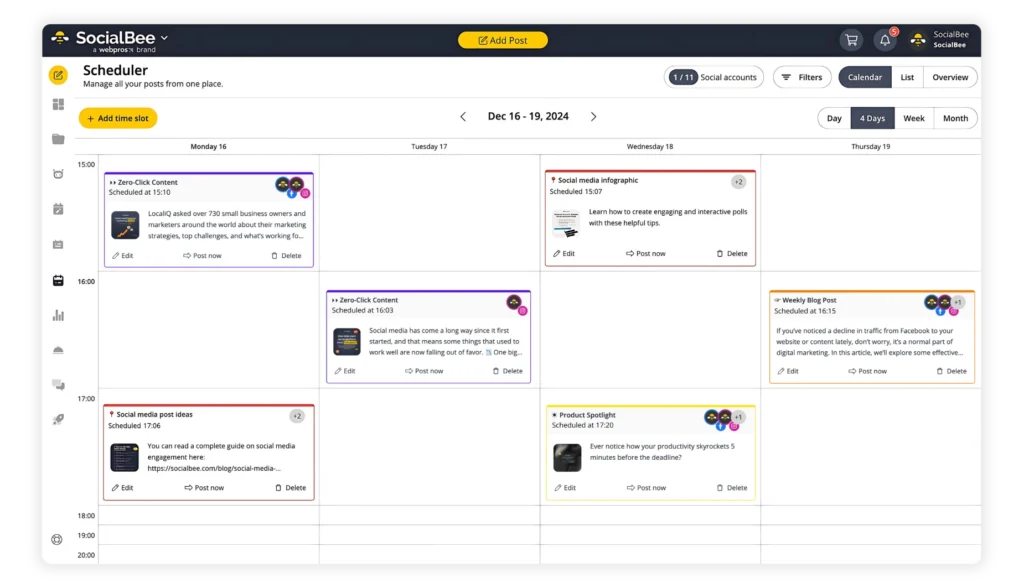
I manage all of these steps inside SocialBee.
For example, I create posts, move them through different stages, and track progress directly in the content calendar. I can see which posts are still in review, which ones are approved, and which scheduled posts are ready to go out. The post preview also helps me catch issues before publishing, so there are fewer last-minute edits.
5. Decide who is responsible for each step
A clear process only works if everyone knows their role in it. If people aren’t sure what they’re responsible for, tasks get delayed or duplicated.
To avoid confusion, I assign tasks and clear ownership to each step in the process. For example, the content creator is responsible for writing the caption and preparing the post, while the content manager oversees the entire workflow, reviews content, does version control, and handles scheduling after multiple approvals.
When responsibilities are clear, there’s no confusion about who needs to act next. Posts move forward without constant follow-ups.
6. Approve post ideas and content pillars FIRST
Before I start drafting anything, I get post ideas approved.
This one change made a bigger difference than I expected. When I used to skip this step, I’d spend time creating content that didn’t quite fit the campaign or had to be reworked later, especially when multiple departments were involved.
Now I organize ideas first using content pillars. I group them by topic, decide what type of post fits best, and think about how each idea should show up on different platforms. That way, I’m not guessing while creating. The direction is already clear.
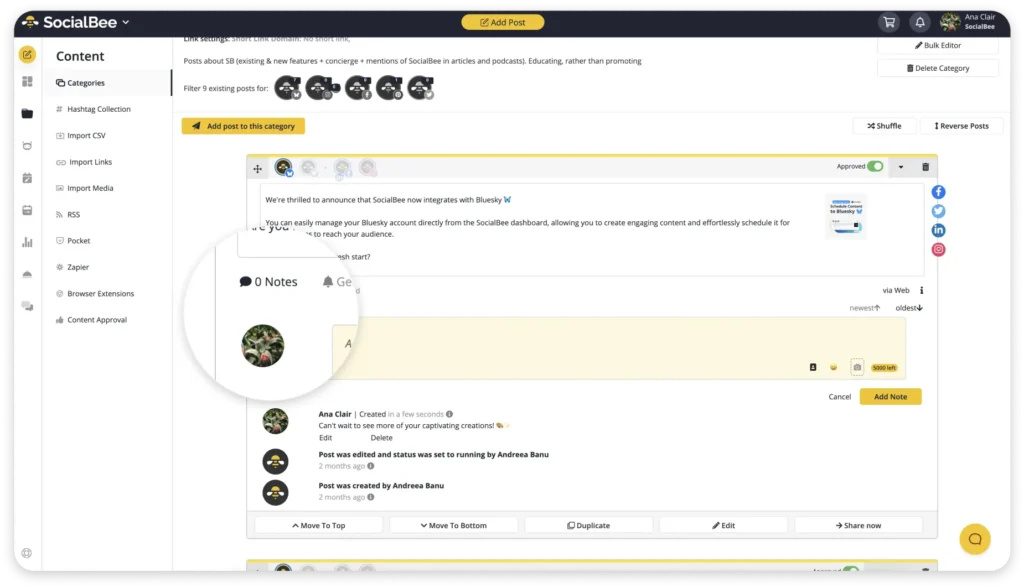
I keep everything inside SocialBee using content categories, which are essentially structured folders tied to a consistent posting schedule. Each category represents a content pillar or post type, like educational, promotional, or behind-the-scenes, and has its own predefined time slots for publishing.
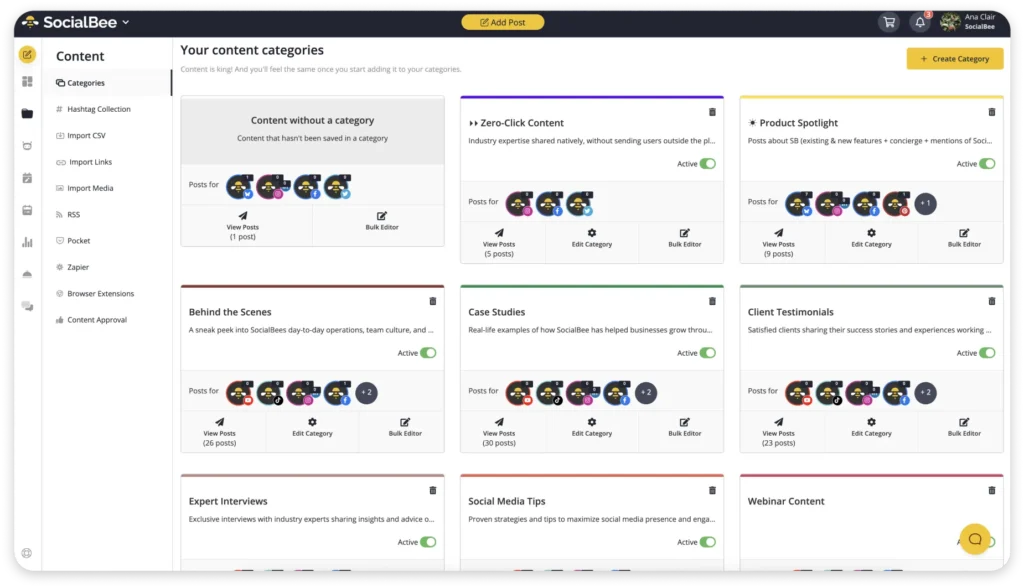
Instead of storing ideas in a Google Doc or spreadsheet, I add them directly as draft posts inside these categories. I can attach links, visuals, or reference materials to each draft so the idea is fully developed before content creation even starts.
When it’s time for review, clients or team members can go into those drafts and leave notes directly on the post. That means feedback stays connected to the idea itself, not scattered across tools.
This keeps the whole process cleaner and the review criteria clearer. I’m not starting from scratch every time, and I’m not creating posts that need to be rethought later.
7. Set clear approval deadlines
If you don’t set deadlines, posts will sit in drafts longer than they should. Without a timeframe, reviews become “I’ll get to it later,” and later usually means missed publish dates.
So I set clear expectations for how long each approval step should take. For example, I expect internal reviews within 24 hours and final approval within 48 hours. These timelines keep content moving without rushing the review process.
I apply the same rule to everyone involved, whether it’s internal team members or clients. If someone is part of the approval workflow, they also follow the deadline.
8. Create posts in batches and save them as drafts
Creating one post at a time sounds manageable, but it quickly turns into a bottleneck. I used to do this, and I was always waiting for feedback before I could move on.
Now I batch everything.
I sit down, create multiple posts in one go, and save them as drafts while they’re under review. This way, I’m not stopping and starting all day. I stay in creation mode, and approvals happen in parallel.
In SocialBee, I simply keep posts in Draft until they’re approved, then switch them to Approved once they’re ready to go. That small status change makes it very clear where each post stands.
What I’ve noticed is that this speeds up everything. Reviewers can go through several posts at once instead of reacting to one-off requests. There’s less back and forth, fewer interruptions, and way less context switching for everyone involved.
It also keeps the content calendar healthy. You’re not scrambling to fill gaps because you always have approved posts ready to schedule.
If you’re only creating posts one by one, batching is one of the easiest ways to save time without changing your entire process.
9. Review the post and leave feedback
Most approval processes fall apart because feedback gets scattered, unclear, or lost entirely.
I avoid that by keeping all feedback in one place, directly on the post.
Instead of sending comments through email or Slack, I review content inside SocialBee and leave notes right where the post is created. I can point out specific changes, suggest edits, and tag the right people using @mentions so nothing gets missed.
Everything stays attached to the post, including comments and edits. That means no digging through old messages or wondering which version is the latest. You can see the full history of feedback and changes in one place.
10. Approve the post when it is ready
Once the feedback is addressed, the next step is simple. Someone needs to give the final approval.
I always make sure this is handled by the right person, whether that’s a social media manager, a client, or a designated approver. This avoids confusion and makes it clear when a post is ready to move forward.
In SocialBee, approving content is straightforward:
- You can switch the post from Draft to Approved directly inside the content category once everything looks good.
- If you’re working with multiple posts, you can also use the Content Approval tab to review drafts in one place and approve them in batches.
I use both depending on the situation. For quick approvals, I update the post status directly. For larger batches, I go through everything at once.
11. Schedule the posts for publishing
Once a post is approved, I don’t touch it again. That’s the goal.
Earlier in my process, scheduling was a separate step. I had to go back in, pick a time, and manually publish or double-check everything. It added unnecessary work and made it easy to miss things.
Now I set the scheduling logic upfront instead of treating it as a separate step later.
In SocialBee, I can add each post to a content category, and it will automatically follow the posting schedule assigned to that category. That covers most of my content because the schedule is already aligned with my content pillars.
If needed, I can also set a specific date and time for individual posts. This is useful for campaigns or time-sensitive content, and SocialBee even highlights the best times to post based on past performance.
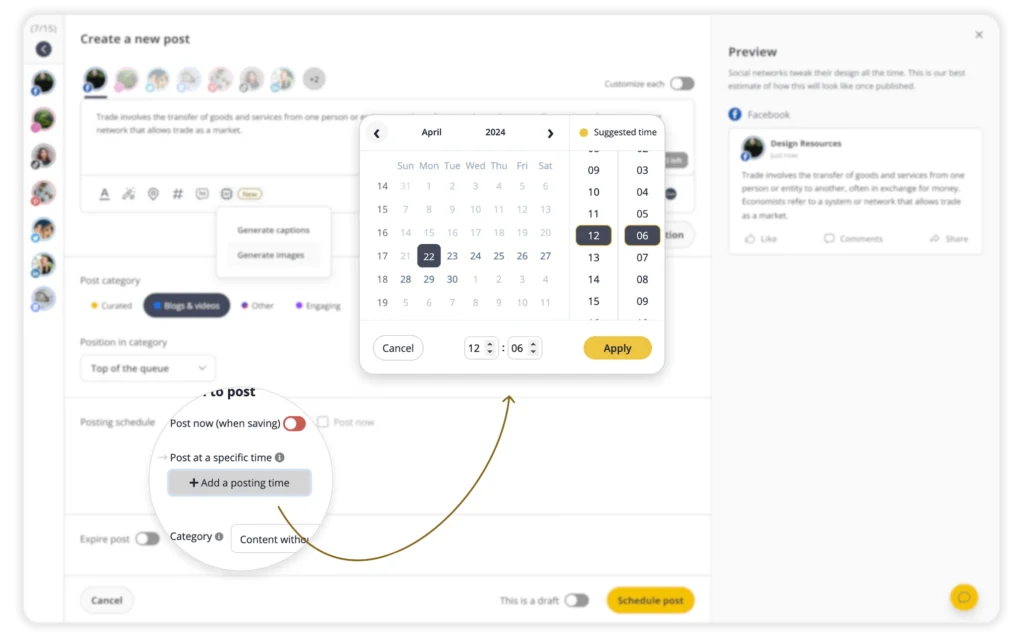
And for urgent cases, I can choose to publish immediately. As soon as the post is approved, it goes live without waiting for a scheduled slot.
Having these options makes the workflow much more flexible. I can plan content in bulk, adjust timing when needed, and still keep everything organized. I’m not going back and forth to manually schedule posts after approval, and I’m not worried about missing a publish date.
It also keeps the content calendar consistent. Whether posts follow a category schedule, a custom time, or go out immediately, everything is handled within the same workflow, so nothing slips through.
12. Handle urgent or time-sensitive posts
Not every post can wait for the full approval process. Sometimes you’re dealing with breaking news, live events, or last-minute campaigns that need to go out quickly.
This is where a simplified approval flow helps.
For urgent posts, I reduce the number of reviewers and go straight to the decision-maker. Instead of waiting for multiple rounds of feedback, I rely on direct communication to get a quick yes or a small set of edits.
The key is to keep this process simple without skipping responsibility. You still want approval, just without the delays. Done right, urgent posts go live fast without disrupting the rest of your process.
13. Revisit and improve your approval workflow
Even the best approval process needs continuous improvement over time.
What works for a small team might break once you add more people. New clients, new campaigns, or changes in team size can all introduce friction.
So I make it a habit to review my workflow regularly.
I look for things like:
- Where posts are getting stuck
- Whether roles are overlapping
- If the same issues keep coming up during approvals
When I notice patterns, I adjust. Sometimes it’s shortening deadlines. Other times it’s removing unnecessary approval steps or redefining who is responsible for what.
I also ask for feedback from both team members and clients. They’re the ones using the process daily, so they usually spot inefficiencies faster than I do.
Keeping the workflow flexible is what makes it sustainable. The goal is to keep improving your system as your team evolves.
14. Analyze performance and align the team on strategy
A smooth approval process is only useful if the content performs.
That’s why I always connect my workflow back to results.
I regularly review performance data to understand what’s working and what needs to change. I focus on metrics like engagement, reach, clicks, and conversions, depending on the platform and goals.
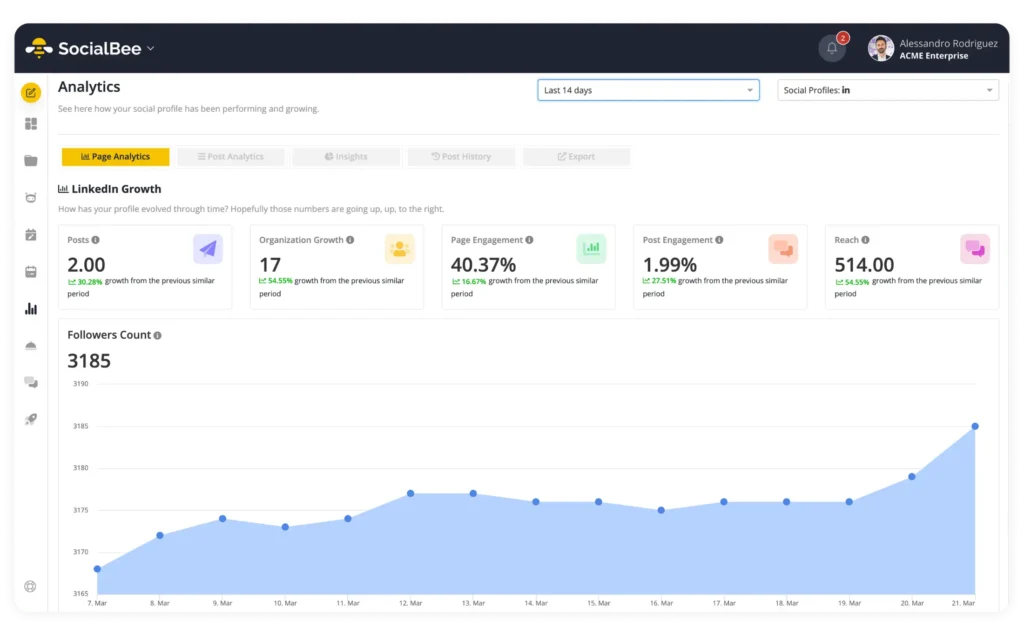
Inside SocialBee’s Analytics dashboard, I can track how posts perform across channels and use that data to guide future decisions. Instead of guessing, I adjust based on real results.
I also make time to align with the team.
Since we all work on a unified platform, we can review what performed well, identify patterns, and adjust content pillars or post formats if needed. This keeps both internal team members and clients on the same page and avoids repeating the same mistakes.
How I turn this approval workflow into a working system with SocialBee
At this point, the process is clear. The real question is how to actually run it without things falling apart after a week.
For me, the difference came from setting everything up inside one social media management tool, so I don’t have to think about the process every time I create or approve a post. Once it’s built, the workflow just runs in the background.
Here’s exactly how I implement it in SocialBee:
- Create a separate Workspace for each brand or client to keep content, drafts, approvals, and analytics organized.
- Set up Content Categories based on your content pillars (e.g., educational, promotional, behind-the-scenes) so ideas, drafts, and posts are grouped logically.
- Batch-create content (captions, visuals, videos) instead of working post-by-post.
- Save posts as Drafts and leave internal notes/comments for your team or clients; use @mentions to direct feedback efficiently.
- Toggle Drafts to Approved once they pass review; SocialBee’s pre-set schedule in Categories ensures posts automatically go live at the right time.
- Customize each post for different platforms without recreating it from scratch.
- Track performance through SocialBee’s analytics dashboard to see which posts perform best and adjust your content pillars accordingly.
- Keep at least 2 weeks of content approved and scheduled to avoid last-minute pressure and maintain consistency.
Frequently asked questions
1. How long should content approval take?
Content approval should take between 24 and 48 hours for most posts. Internal reviews can happen within a day, while final approval may take up to two days, depending on the number of key stakeholders involved. Anything longer usually leads to missed publish dates and delays.
2. How can we speed up content approvals?
To speed things up, reduce the number of approvers, assign one clear decision-maker, and keep all feedback in one place. Using a social media approval tool also helps by centralizing comments, tracking status, and removing the need for back-and-forth across email or chat without compromising quality.
3. How do content approvals work for last-minute or urgent posts?
For urgent posts, simplify the process. Limit the number of reviewers, go directly to the final approver, and use collaboration tools for quick communication for feedback. This allows you to publish on time without disrupting your regular approval workflow.
Simplify your social media approval process with SocialBee
If your approval process feels messy, the issue is usually the setup. Too many tools, unclear steps, and no single place where content actually gets approved.
I ran into this when everything lived in different places. Drafts in one tool, feedback in another, approvals somewhere else. Every post required extra effort just to figure out what was going on.
What helped was building a process I could follow without stopping to think. Clear steps, clear roles, and a single place where everything happens.
That’s how I use SocialBee now. I create content, collect feedback, approve posts, and schedule everything from the same workspace. I can see which posts are still in review, which ones are approved, and what’s already scheduled without checking multiple tools.
If your current process feels scattered, start by simplifying the steps and bringing everything into one system. And if you want to set this up without rebuilding your process from scratch, you can start your 14-day free trial of SocialBee and see how it works for your team.