
Switching to a new social media management platform can save you money, give your team better tools, or simply make managing your accounts less frustrating. But before you leave your current platform, you need a plan for everything that lives inside it.
Your published posts won’t disappear from Facebook or LinkedIn just because you cancel your social media management software. The bigger risk is losing access to drafts, scheduled posts, analytics reports, media, approval workflows, saved settings, and other data about your social media presence stored inside the tool itself.
So, don’t treat a platform switch like starting from scratch. First, figure out what you can export, what you’ll need to rebuild, and what could disappear when your subscription ends. Then run the old and new tools side by side long enough to confirm everything works.
In this guide, we’ll walk through how to switch social media management tools without disrupting your publishing schedule.

We’re SocialBee LABS SRL, part of WebPros. We use the information you provide to share relevant content & updates, as outlined in our Privacy Policy. You can opt out anytime.
Short summary
- Check your new platform before you migrate. Make sure it supports the social networks, post formats, scheduling capabilities, analytics, and team collaboration features your team actually uses.
- Back up anything that lives only inside the tool you currently use. Drafts, scheduled posts, media files, analytics reports, content categories, and account settings may not transfer automatically.
- Set up the new platform before canceling the old one. Running both tools during a short transition period gives you time to catch missing content and publishing issues.
- Don’t assume every feature can be transferred. Some content can be exported and imported, while approval workflows, integrations, analytics history, and other settings may need to be recreated.
- Use bulk migration options whenever possible. CSV uploads, bulk media uploads, and bulk scheduling can save hours compared with rebuilding social media posts manually.
- Test before completing the move. Publish a small batch from the new platform and confirm that accounts, formatting, schedules, permissions, and integrations work as expected.
- If you’re ready to move to SocialBee, you can also get help with the transition through SocialBee’s migration service.
What should you consider before moving to another social media management platform?
Before you start moving content, make sure the new social media management tool covers the parts of your current setup you want to keep. Focus on six things: network support, content migration, scheduling, analytics, collaboration, and cost.
If you’re still comparing options, read our guide on how to choose social media management software for your business first. Once you’ve picked a replacement, use the checks below before you start the migration.
1. Make sure it supports all the social networks and post types you use
A platform saying it “supports Instagram” doesn’t tell you whether it can publish every Instagram format you use.
Make a list of your active social accounts and the content you publish on each one. Then check whether the new platform supports those specific combinations, such as:
- Facebook Pages
- Instagram posts, Reels, Stories, and carousels
- LinkedIn profiles and LinkedIn Company Pages
- TikTok videos
- Pinterest Pins
- YouTube videos
- X posts
- Threads
- Bluesky
- Google Business Profile
Pay particular attention to direct publishing. Social network APIs can restrict what third-party tools can publish, so you might receive a mobile notification or another manual step to publish certain content formats.
2. Check whether your existing content can be imported
Next, find out how you’ll get your upcoming content from one platform to the other.
Look for migration options such as CSV imports, bulk post uploads, bulk media uploads, and other tools that let you move content in batches. If you have hundreds of scheduled social media posts, this can make the difference between an easy migration and manually rebuilding every post.
Check exactly what the import will move, too. For example, importing the caption and publishing date won’t help much if you still need to manually find and upload the media for every post.
3. Compare scheduling and content management features
Next, check whether you can set up your content schedule the way you want on the new platform.
Think about how you currently plan and schedule posts. Do you use a visual calendar? Content categories or queues? Do you schedule posts in bulk, save drafts, or create different versions for each platform? Make sure the new tool supports the features you actually use.
You don’t have to copy your old setup exactly, either. Use the switch as a chance to clean things up. Remove content you no longer use, get rid of unnecessary posting times, and keep only the parts of your schedule that still make sense.
4. Check what happens to your analytics history
Your historical social media analytics may not carry over when you switch platforms.
Before you move, check how much past data the new tool can show and whether it starts tracking some metrics only after you connect your accounts.
If you won’t have access to the same history, download the reports you want to keep before canceling your old platform. That way, you’ll still have your past results to refer back to when you start reporting from the new tool.
5. Make sure it supports the way your team works
If several people manage social media together, check how the new platform handles access and approvals.
For example, you might need separate workspaces for multiple clients, role-based permissions for team members, or an approval process that lets clients review posts without giving them access to everything else.
Map those responsibilities to the new platform’s collaboration tools. The important question is whether each person can see and do what they need without getting access to accounts or settings they shouldn’t touch.
6. Calculate what the new platform will actually cost
Don’t compare social media management tools by their starting price alone. Plans can start at around $10–$30 per month, but what you actually pay depends on how the platform charges for social accounts, users, workspaces, and advanced features.
Some tools charge per user or social account, while others bundle a set number into each plan. You may also pay extra for additional profiles, team members, analytics, social listening, or other features. That means a low starting price can climb quickly once you recreate your current setup.
SocialBee, for example, starts at $29/month with 5 social profiles included. If you need more without moving to another plan, you can add five social profiles for $15/month, an extra user for $10/month, or another workspace for $10/month.
Before switching, price out the version of the platform you’ll actually use. Count if you have multiple accounts, team members, client workspaces, and must-have features, then compare that total with what you’re paying now. This gives you a much clearer idea of whether switching will actually save you money.
What content may not transfer automatically between social media management platforms?
Changing tools isn’t like moving everything from one phone to another. Some content can be imported, some will need to be set up again, and some data may stay behind in your old platform.
Before you cancel your current tool, check what will happen to:
- Drafts and scheduled posts: Captions may be easy to export, but publishing dates, media, tags, first comments, approval status, and platform-specific versions may not come with them.
- Historical analytics: Your new platform may not have access to the same reporting history, so keep any reports or social media performance data you’ll want to reference later.
- Media libraries: Images and videos stored in your old tool may not automatically appear in the new one. Make sure you have copies of anything you still use.
- Saved replies and audience engagement history: Saved responses, internal notes, assignments, past conversations, social media listening data, and keyword monitoring streams may remain in your old unified inbox.
- Platform settings: Publishing queues, recurring posting schedules, permissions, social media workflows for approvals, integrations, automations, and other account settings may need to be set up again.
You don’t need to save everything just because it’s there. Focus on the content, data, and settings your team still uses, then make sure you have them before closing the old account.
How to switch to a new social media management platform: step-by-step guide
Once you know what you need to move, you can start switching platforms.
Keep your old platform active until you’ve set up and tested the new one. If an account doesn’t connect, a scheduled post is missing, or something isn’t working as expected, you can still go back and fix it before you cancel.
1. Export and back up your existing content and data
Start with anything that could become inaccessible after you cancel.
You don’t need to export information just because the platform has an export button. Prioritize the content and data you’d actually miss.
For analytics, I’d save at least enough history to maintain your normal reporting comparisons.
2. Set up your accounts on the new platform before canceling the old one
Create your new workspace while your existing platform is still active.
This overlap is intentional.
It gives you time to recreate your setup while you can still open the old tool and check how things were configured. You’ll also be able to compare both calendars and catch anything that didn’t make the move.
Avoid disconnecting or deleting anything from the old platform at this point.
3. Reconnect your social media profiles
Connect each profile to the new centralized platform and make sure you’re using the correct account.
This sounds simple until you’re managing five Facebook Pages, four Instagram profiles, three LinkedIn Company Pages, and accounts for multiple clients.
Go account by account rather than connecting everything as quickly as possible.
Check the name, profile image, permissions, and associated brand or workspace before moving on.
4. Rebuild your folders, queues, and publishing schedules
Next, recreate the structure behind your calendar.
Set up the folders, posting slots, queues, and scheduling rules you want to keep. Then compare the new content calendar against your old one.
This is also your chance to clean house.
If you’ve been publishing a particular category every Tuesday at 10 a.m. simply because someone created that schedule in 2023, ask whether it still makes sense. Migration can remove old repetitive tasks as well as recreate useful ones.
5. Transfer upcoming scheduled content
Now move the posts that haven’t been published yet.
Use CSV uploads, bulk scheduling, or other import tools where available. For a small calendar, manual transfer may be fine. For hundreds of social posts across multiple accounts, bulk tools can save significant time.
After importing, don’t assume everything came across perfectly.
Spot-check captions, media, dates, links, and destinations, particularly for posts customized for different platforms.
6. Recreate team roles and approval workflows
Invite your team and recreate the permissions they need.
If you manage client accounts, keep clients separated appropriately and confirm that people can only access the accounts, content, and approval tools they’re supposed to see.
Run one post through your entire approval process.
Have someone create it, request feedback, approve it, and schedule it. That tells you much more than simply confirming everyone can log in.
7. Reconnect integrations and automations
Review any external tools connected to your old platform.
You may have integrations for content creation, cloud storage, analytics, automation, or other parts of your marketing stack.
Only recreate the ones you still use.
A platform migration is a good excuse to remove integrations that have quietly become part of your setup even though nobody remembers why they’re there.
8. Test publishing on every social network
Don’t test one Facebook post and assume everything else works.
Publish a low-risk test on every major platform you manage. Where relevant, test different formats too.
Check that the post:
- Reaches the correct account.
- Publishes at the expected time.
- Includes the correct media.
- Preserves the intended formatting.
- Displays links and tags correctly.
If a network or post format requires a different publishing process, you want to find that out before important social media campaigns go live.
9. Compare both platforms before finishing the migration
With both platforms still available, compare your upcoming calendars side by side.
Look for missing posts, duplicate posts, incorrect times, empty publishing slots, or accounts you forgot to connect.
Ask your team to do the same from their side. Social media managers often notice missing permissions or approval steps that aren’t obvious from an administrator account.
10. Cancel your old platform only after the switch is complete
Once you’ve confirmed that your content, accounts, team setup, integrations, and publishing process work correctly, you can cancel the previous tool.
Before you do, make one final check for data stored exclusively there.
Download anything you still need and confirm that your upcoming posts are safely scheduled in the new platform.
Only then is the migration finished.
How to move your social media management to SocialBee
If you’re moving to SocialBee, you don’t necessarily have to rebuild your social media management setup one post at a time.
SocialBee offers a migration service for people moving from another social media management platform, while bulk content features can help you bring over larger amounts of content without turning the switch into days of copying and pasting.
Use SocialBee’s migration service to get help with the switch
If you’re moving from another social media scheduling tool, SocialBee’s Concierge Migration service can handle much of the move for you. The team can migrate your existing content, posting schedule, RSS feeds, and shortlink provider settings, then send you a report showing what was moved and flagging any issues they ran into.
To get started, fill out the form on the migration page. SocialBee’s customer success team will contact you within a few business days to schedule a 15-minute setup call and provide a custom quote.
After you create your SocialBee account and purchase the service, the process looks like this:
- Fill out the intake form. You’ll answer a few questions about your business and what you want to achieve with SocialBee.
- Connect your social media accounts. During the setup call, the team can help you connect the profiles you want to migrate content to.
- Share access to your current tool securely. You’ll provide the necessary credentials through LastPass so the team can access the platform you’re leaving.
- Let SocialBee handle the migration. The team will move your content, posting schedule, RSS feeds, and shortlink provider settings and email you when the migration starts.
- Review the migration report. Once everything is finished, you’ll receive an email with a report explaining what was migrated and noting any issues that came up.
Your migrated posts are also set to “not approved” in SocialBee. Nothing will go live until you’ve had a chance to review and approve it, so switching platforms won’t accidentally send old or unreviewed content to your social accounts.
Connect your existing social media accounts
Once your workspace is ready, connect the profiles you want to manage through SocialBee.
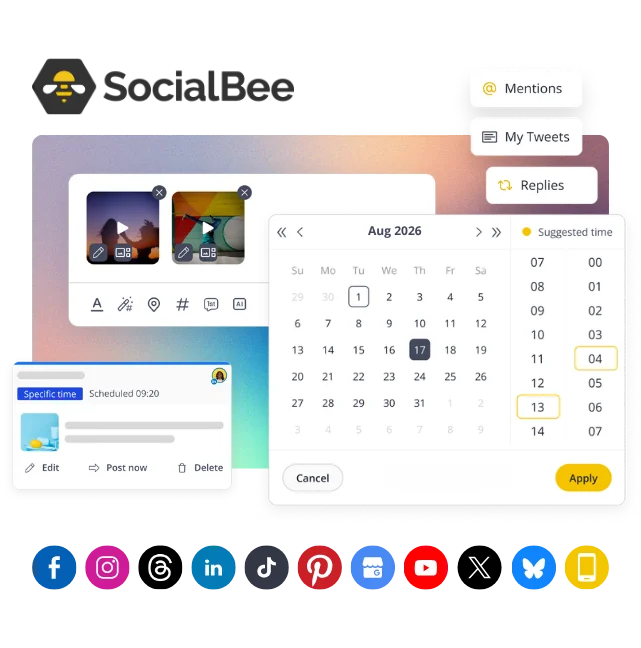
SocialBee supports Facebook, Instagram, LinkedIn, X, Pinterest, TikTok, YouTube, Threads, Bluesky, and Google Business Profile, so you can manage multiple social networks from the same place.
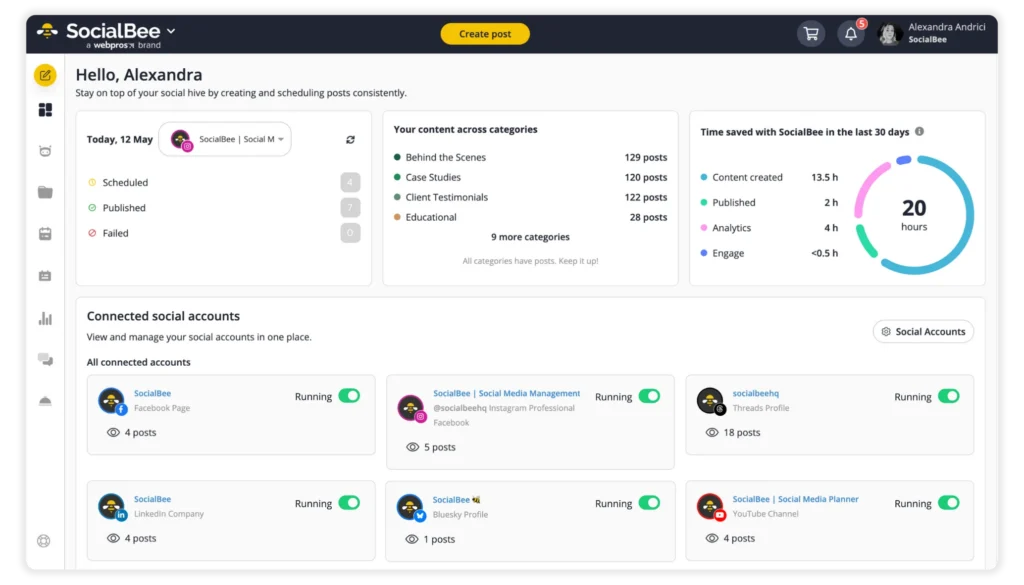
If you’re moving several brands or clients, organize them carefully as you connect accounts. A few extra minutes checking names and permissions now can prevent the much bigger headache of scheduling a client’s post to the wrong profile later.
Move your existing content with CSV and bulk imports
This is where moving to a new social media scheduling tool can get much faster.
Rather than recreating every upcoming post manually, you can use CSV uploads and SocialBee’s bulk content options to add multiple posts at once. Bulk media capabilities also make it easier to work with larger batches of images and other content.
For example, imagine you have 80 posts scheduled for the next month across several social accounts. Copying each caption, uploading each visual, choosing the account, and setting every publishing time manually turns migration into hours of repetitive work.
A bulk import gives you a much better starting point.
After importing, review the posts before scheduling them. Check dates, media, URLs, formatting, and the social account assigned to each post.
Rebuild your content calendar and posting schedule
Next, recreate the parts of your schedule you actually want to keep.
SocialBee’s content calendar gives you a visual overview of your upcoming posts, while category-based scheduling lets you organize content by topic and create posting schedules around those categories.
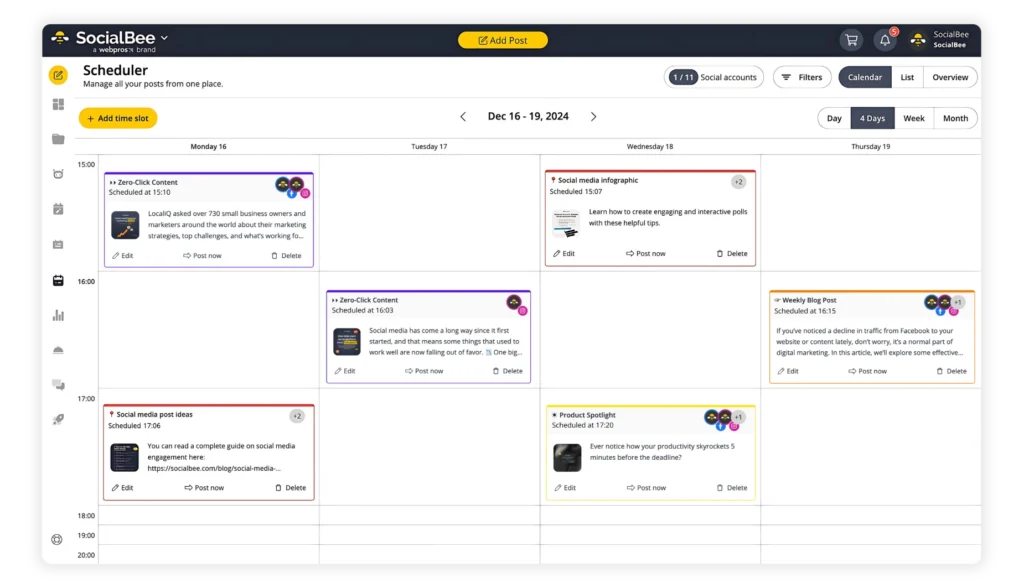
For example, a local business might create separate categories for educational posts, promotions, customer stories, and local updates, then assign different publishing slots to each.
You don’t have to recreate your old calendar exactly. If you’re already changing tools, use the opportunity to remove categories you no longer use and rethink posting slots that aren’t serving a clear purpose.
Set up your team, workspaces, and approvals
If other people manage social media with you, recreate your collaboration setup before you start publishing at full speed.
SocialBee lets teams work together with roles, permissions, feedback, and content approvals. Agencies can also use separate workspaces to keep multiple clients and their social accounts organized.
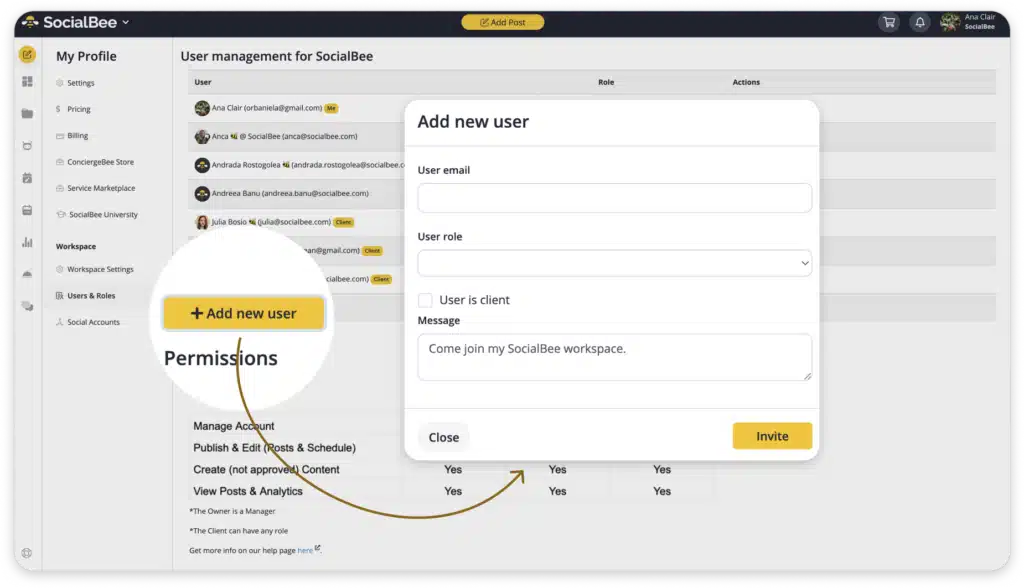
Set up the people who create, review, approve, and manage posts, then test the process with a real draft.
You want to know that an approval request reaches the right person before Friday afternoon’s campaign is waiting for approval from someone who can’t see it.
Check your imported content before publishing
Once your content is inside SocialBee, compare it against the calendar in your previous tool.
Check:
- Social account
- Publishing date
- Publishing time
- Caption
- Images or videos
- Links
- Platform-specific formatting
- Approval status
For large migrations, review a sample from every account and content type rather than checking only the first few imported posts.
Then schedule a small test batch.
Monitor your first scheduled posts after the switch
Watch your first posts closely after migration.
Confirm they publish to the right accounts at the right times and look the way you expected on the native social networks.
Once content starts going out, you can also use SocialBee’s analytics dashboard to monitor post performance and rebuild your reporting history over time.
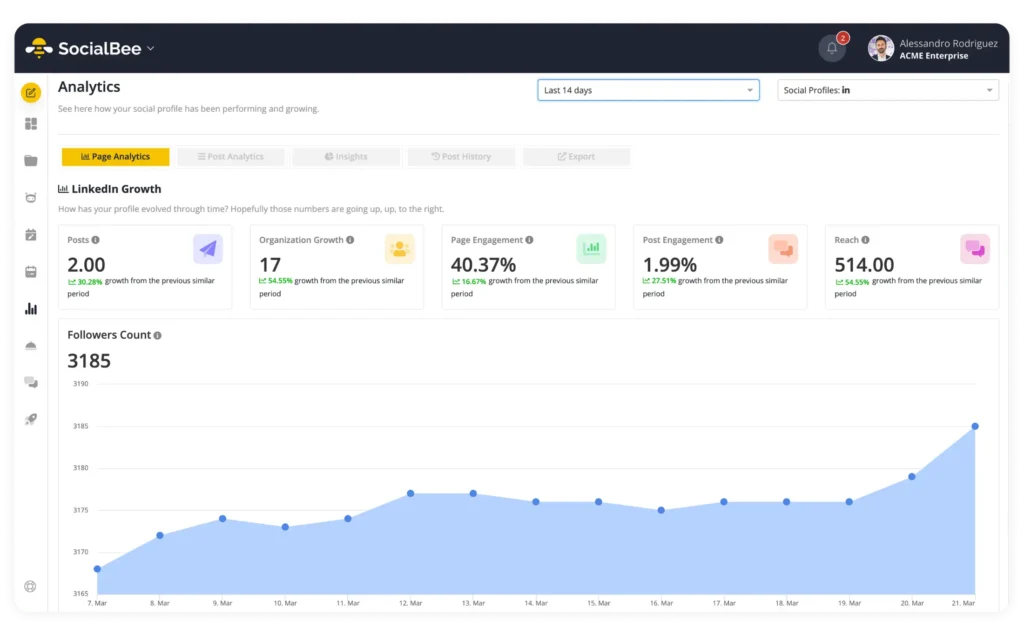
The important thing is to give the new setup a short proving period before considering the migration finished.
Social media platform migration checklist
Use this checklist to keep the switch organized.
Before migration:
- Confirm the new tool supports your social networks and post formats.
- Check the account and user limits on your chosen plan.
- Identify drafts and scheduled posts that need to move.
- Export important analytics reports.
- Back up media stored only in your current tool.
- Document publishing schedules and content categories.
- Record team permissions and approval workflows.
- List the integrations and automations you still use.
- Find out which data the new tool can import.
During migration:
- Keep your existing platform active.
- Connect your social media accounts to the new tool.
- Create the necessary workspaces or account groups.
- Import posts and media.
- Rebuild your content calendar.
- Recreate team permissions and approvals.
- Reconnect necessary integrations.
- Check imported posts for errors.
- Test publishing on each social network.
Before canceling your old platform:
- Compare both content calendars.
- Check for missing or duplicate posts.
- Confirm future posts are scheduled correctly.
- Test team and client permissions.
- Confirm your key integrations work.
- Download any remaining reports or files.
- Monitor the first posts published by the new platform.
- Only cancel once you’re confident nothing important remains behind.
Frequently asked questions
1. Can you transfer scheduled posts between social media management platforms?
Sometimes, but there usually isn’t a universal one-click transfer between social media management apps. Your existing platform may let you export scheduled posts, and the replacement may support CSV or bulk imports.
Check what data each tool exports and imports before canceling your subscription. If a direct transfer isn’t possible, save your captions, media, publishing dates, account destinations, and other settings so you can rebuild the posts.
2. Will you lose published social media posts when switching platforms?
No, switching a third-party social media management tool doesn’t normally delete posts that have already been published to your social accounts.
What you can lose is information stored inside the management tool, such as drafts, scheduled posts, analytics history, media library assets, saved replies, or internal notes. Back these up before canceling.
3. Can you transfer social media analytics to a new platform?
Usually not in the same way you’d transfer a spreadsheet or media file. Different analytics tools may retrieve different amounts of historical data and calculate or present metrics differently.
Export the analytics reports and historical data you want to keep before leaving your old platform. You can use those reports as a baseline while the new analytics dashboard builds its own history.
4. Should you cancel your old platform before setting up the new one?
No. Set up and test the new social media management platform first.
Keeping both active for a short transition period lets you compare content calendars, check account connections, test publishing, recreate approval workflows, and recover anything you initially forgot to export.
Cancel the old platform once you’ve confirmed the new setup works.
5. How long does it take to switch social media management platforms?
The time depends on how much you’re moving. A small business with a few social accounts and a simple posting schedule may have relatively little to recreate, while an agency managing multiple clients, large content calendars, approval workflows, and detailed analytics will have more work to do.
Bulk imports and migration services can reduce the manual setup required. The important thing is to allow enough overlap to test the new platform instead of rushing to cancel the old one.
A careful migration keeps your content and setup intact
The hardest part of changing social media management platforms isn’t connecting your Facebook Page or scheduling your first post, but accounting for everything you’ve gradually built inside the old tool.
Drafts, scheduled posts, media, analytics reports, publishing schedules, permissions, approvals, and integrations can be easy to forget until you no longer have access to them.
That’s why I recommend treating the switch as a short migration rather than a clean break. Back up what matters, build the new setup while the old one is still available, move your content in batches, and test the whole process before canceling anything.
If you’re ready to move to SocialBee, you can also get help with the transition through our migration service. Once you’re set up, SocialBee gives you one place to create, schedule, publish, collaborate on, and analyze content across your social accounts.
Start your 14-day SocialBee trial and build your new setup before leaving the old one behind.